Skip to content

Build your Backend with Netlify Functions in 20 Minutes

This article was written over 18 months ago and may contain information that is out of date. Some content may be relevant but please refer to the relevant official documentation or available resources for the latest information.

Build your Backend with Netlify Functions in 20 minutes

Netlify makes deploying your front end quick and easy, and Netlify functions makes running a serverless backend just as easy.

In this guide, we'll get setup on how to use Netlify functions. As an indie developer, you should embrace serverless offerings because of their low barrier to entry and generous free tiers. And as an enterprise shop, you should seriously consider them for an extremely cheap, fast, and scalable way to build out your backend infrastructure.

Use Cases - What can you build?

Modern JavaScript frameworks allow us to build large and complex applications on the client, but they can occasionally run into limitations. For everything else, there's the "backend" which excels at handling some of these use cases:

  • Protecting Secrets & Credentials
  • Server Side Rendering
  • Sending Emails
  • Handling File IO
  • Running centralized logic
  • Executing tasks off the main thread
  • Bypassing CORS issues for locked down APIs
  • Providing Progressive Enhancement / NoScript Fallback

Composition of a Function

Netlify Functions provides a wrapper around AWS Lambdas. While the Netlify documentation should be sufficient, it's good to know that there's an escape hatch if you ever want to run on your own AWS subscription. However, Netlify handles some of the deployment magic for you, so let's start there.

Here's the bare bones of a Netlify function in JavaScript:

exports.handler = async function(event, context) {
    return {
        statusCode: 200,
        body: JSON.stringify({message: "Hello World"})
    };
}

If you're familiar with running JavaScript on Node, this should look somewhat familiar. Each function should live in its own file, and will execute whatever is assigned to exports.handler. We have access to event and context. We can run whatever code we need on Node, and return whatever response type we'd like.

To set this up, lets create an empty repository on GitHub. We need to add functions to a folder. While we can use any name, a common pattern is to create a folder name functions. Let's add a file in there called hello.js

//functions/hello.js
exports.handler = async (event, context) => {
  const { name = "Anonymous" } = event.queryStringParameters;
  return {
    statusCode: 200,
    body: `Hello, ${name}`
  };
};

In our function, we can grab information from the query string parameters passed in. We'll destructure those (with a default value) and look for a name param.

To actually wire up our functions folder, we'll need to add a netlify.toml config file at the root of our project.

# netlify.toml
[build]
  functions = "functions/"

Walk Before You Run (Locally)

Our "repo" should look like this at this point:

my-app
├── functions
│   └── hello.js
└── netlify.toml

The best way to run your Netlify site locally, with all the bells and whistles attached, is to use Netlify Dev which you can install via npm:

npm install netlify-cli -g

And then kick off your dev server like this:

netlify dev
Netlify Dev

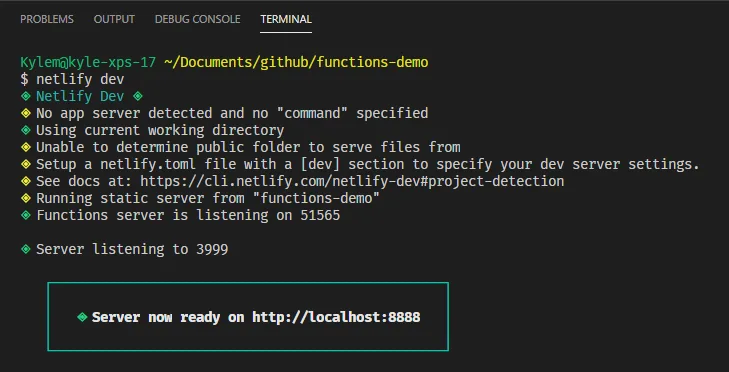
Your "site" should now be live at http://localhost:8888. By default, Netlify hosts functions under the subpath /.netlify/functions/<fn-name> so you can invoke your function here:

http://localhost:8888/.netlify/functions/hello?name=Beth

Now, let's make our function's address a little cleaner by also taking advantage of another free Netlify feature using redirects. This allows us to expose the same functions at a terser url by replacing /.netlify/functions with /api.

FROM: <site>/.netlify/functions/hello TO: <site>/api/hello

To do so, append the following info to your netlify.toml config, and restart Netlify dev:

[[redirects]]
  from = '/api/*'
  to = '/.netlify/functions/:splat'
  status = 200

This will route all traffic at /api/* internally to the appropriate functions directory, and the wildcard will capture all additional path info, and move to :splat. By setting the HTTP Status Code = 200, Netlify will preform a "rewrite" (as opposed to a "redirect") which will change the server response without changing the URL in the browser address bar.

So let's try again with our new url:

http://localhost:8888/api/hello?name=Beth

hello world

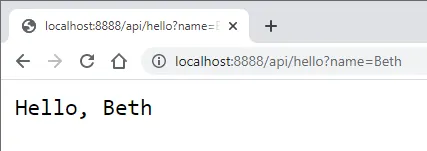
👏 Awesome, you just created a function! (you're following along live, right?)

Getting the CRUD Out & Submitting Data

Now that we can build functions, let's create our own API with some basic CRUD functions (Create, Read, Update, & Delete) for a simple todos app.

One of the central tenants of serverless computing is that it's also stateless. If you need to store any state across function invocations, it should be persisted to another, layer like a database. For this article, let's use the free tier of DynamoDb, but feel free to BYODB (Bring Your Own DB), especially if it has a Node SDK.

In the next steps, we'll:

  1. Setup a table on DynamoDB in AWS
  2. Install npm packages into our project
  3. Setup secret keys in AWS, and add to our environment variables
  4. Initialize the aws-sdk package for NodeJs
  5. And then finally add a Netlify function route to create a record on our database

AWS - Amazon Web Services

This guide will assume some degree of familiarity with AWS & DynamoDB, but if you're new to DynamoDB, you can start with this guide on Getting Started with Node.js and DynamoDB.

On AWS, create a table with the name NetlifyTodos, and string partition key called key.

NPM - Node Package Manager

Now, let's setup npm and install aws-sdk, nanoid, & dotenv.

In a terminal at the root of your project, run the following commands:

npm init -y
npm install aws-sdk nanoid dotenv --save

ENV - Environment Variables

You'll need to provision an access key / secret for an IAM user that we'll use to authenticate our API calls. One of the benefits of running these calls on the server is you're able to protect your application secret through environment variables, instead of having to ship them to the client, which is not recommended.

There are quite a few ways to log into AWS on your local machine, but just to keep everything inside of our project, let's create a .env file at the root of our project, and fill in the following keys with your own values:

# .env
MY_AWS_ACCESS_KEY_ID=***
MY_AWS_SECRET_ACCESS_KEY=***
MY_AWS_REGION=us-east-1

NOTE: One little gotcha here is that the more common AWS_ACCESS_KEY_ID is a reserved environment keyword used by the Netlify process. So if we want to pass around env variables, we'll have to use our own key, in this case prefixed with MY_.

Once they're added to the process, we can destructure them and use in setting up our AWS SDK. We'll need to setup AWS for every CRUD function, so let's assemble all this logic in a separate file called dyno-client.js.

// dyno-client.js
require('dotenv').config()
const { MY_AWS_ACCESS_KEY_ID, MY_AWS_SECRET_ACCESS_KEY, MY_AWS_REGION } = process.env

The following is required.

SDK - Software Developer Kit

Using the aws-sdk makes our life a lot easier for connecting to DynamoDB from our codebase. We can create an instance of the Dynamo client that we'll use for the remaining examples:

// dyno-client.js
const AWS = require("aws-sdk");

AWS.config.update({
    credentials: {
        accessKeyId: MY_AWS_ACCESS_KEY_ID,
        secretAccessKey: MY_AWS_SECRET_ACCESS_KEY
    },
    region: MY_AWS_REGION,
});

const dynamoDb = new AWS.DynamoDB.DocumentClient();

To make this available to all our functions, add the DynamoDB instance to your exports, and we'll grab it when we need it:

module.exports = { dynamoDb, TABLE_NAME }

Create Todo (Due by EOD 😂)

⚡ We're finally ready to create our API function!

In the following example, we'll post back form data containing the text for our todo item. We can parse the form data into JSON, and transform it into an item to insert into our table. If it succeeds, we'll return the result with a status code of 200, and if it fails, we'll return the the error message along with the status code from the error itself.

// functions/create.js
const { nanoid } = require("nanoid");
const { dynamoDb } = require("../dyno-client")

exports.handler = async(event, context) => {
    try {
        // parse form data
        const body = JSON.parse(event.body);

        // create item to insert
        const params = {
            TableName: TABLE_NAME,
            Item: {
                key: nanoid(7),
                text: body.text,
                createDate: new Date().toISOString(),
            },
        };

        let result = await dynamoDb.put(params).promise();

        // return success
        return {
            statusCode: 200,
            body: JSON.stringify({
                success: true,
                data: result,
            }),
        };

    } catch (error) {
        return {
            statusCode: error.statusCode || 500,
            body: JSON.stringify(error),
        };
    }

};

This should give you the gist of how to expose your API routes and logic to perform various operations. I'll hold off on more examples because most of the code here is actually just specific to DynamoDB, and we'll save that for a separate article. But the takeaway is that we're able to return something meaningful with very minimal plumbing. And that's the whole point!

With Functions, you only have to write your own business logic!

Debugging - For Frictionless Feedback Loops

There are two critical debugging tools in Visual Studio Code I like to use when working with node and API routes.

  1. Script Debugger &
  2. Rest Client Plugin

Did you know, instead of configuring a custom launch.json file, you can run and attach debuggers directly onto npm scripts in the package.json file:

npm debug

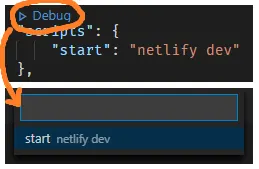
And while tools like Postman are a valuable part of comprehensive test suite, you can add the REST Client Extension to invoke API commands directly within VS Code. We can easily use the browser to mock GET endpoints, but this makes it really easy to invoke other HTTP verbs, and post back form data.

Just add a file like test.http to your project. REST Client supports expansion of variable environment, and custom variables. If you stub out multiple calls, you can separate multiple different calls by delimiting with ###.

Add the following to your sample file:

@baseUrl = http://localhost:8888

// create todo item
POST {{baseUrl}}/api/create
content-type: application/json

{
    "text": "Feed the cats",
}
send request

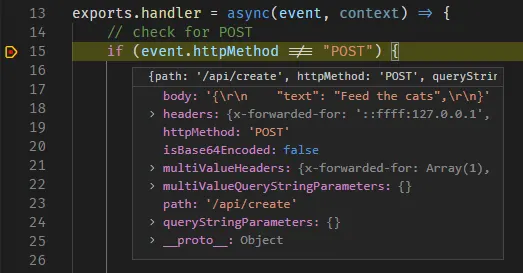
We can now run the above by clicking "Send Request". This should hit our Netlify dev server, and allow us to step through our function logic locally!

debugger breakpoint

Publishing

Publishing to Netlify is easy as well. Make sure your project is committed, and pushed up to a git repository on GitHub, GitLab or BitBucket.

Login to Netlify, and click the option to Create "New Site From Git" and select your repo.

Netlify will prompt for a Build command, and a Publish directory. Believe it or not, we don't actually have either of those things yet, and it's probably a project for another day to set up our front end. Those commands refer to the static site build part of the deployment. Everything we need to build serverless functions is inside our functions directory and our netlify.toml config.

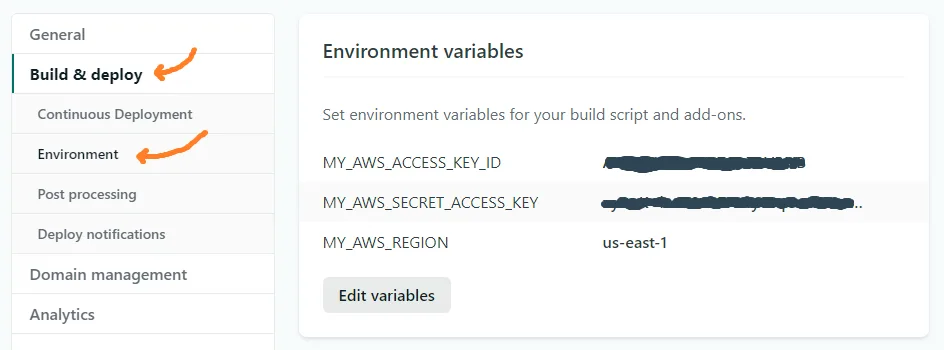
Once we deploy the site, the last thing we'll need to do is add our environment variables to Netlify under Build > Environment

netlify environment variables

Next Steps - This is only the beginning

Hopefully some ideas are spinning as to how you can use these technologies on your own sites and projects. The focus of this article is on building and debugging Netlify functions, but an important exercise left to the reader is to take advantage of that on your front end.

TIP: If you want to add Create React App to your current directory (without creating a new folder), add a . when scaffolding out a new app like this:

create-react-app .

Try it out - build a front end, and let me know how it goes at KyleMitBTV!

For more context, you can browse the full source code for the article on GitHub at KyleMit/netlify-functions-demo.

For even more practical examples with actual code, checkout the following resources as well!

Good luck, and go build things!

This Dot is a consultancy dedicated to guiding companies through their modernization and digital transformation journeys. Specializing in replatforming, modernizing, and launching new initiatives, we stand out by taking true ownership of your engineering projects.

We love helping teams with projects that have missed their deadlines or helping keep your strategic digital initiatives on course. Check out our case studies and our clients that trust us with their engineering.

You might also like

Incremental Hydration in Angular cover image

Incremental Hydration in Angular

Incremental Hydration in Angular Some time ago, I wrote a post about SSR finally becoming a first-class citizen in Angular. It turns out that the Angular team really treats SSR as a priority, and they have been working tirelessly to make SSR even better. As the previous blog post mentioned, full-page hydration was launched in Angular 16 and made stable in Angular 17, providing a great way to improve your Core Web Vitals. Another feature aimed to help you improve your INP and other Core Web Vitals was introduced in Angular 17: deferrable views. Using the @defer blocks allows you to reduce the initial bundle size and defer the loading of heavy components based on certain triggers, such as the section entering the viewport. Then, in September 2024, the smart folks at Angular figured out that they could build upon those two features, allowing you to mark parts of your application to be server-rendered dehydrated and then hydrate them incrementally when needed - hence incremental hydration. I’m sure you know what hydration is. In short, the server sends fully formed HTML to the client, ensuring that the user sees meaningful content as quickly as possible and once JavaScript is loaded on the client side, the framework will reconcile the rendered DOM with component logic, event handlers, and state - effectively hydrating the server-rendered content. But what exactly does "dehydrated" mean, you might ask? Here's what will happen when you mark a part of your application to be incrementally hydrated: 1. Server-Side Rendering (SSR): The content marked for incremental hydration is rendered on the server. 2. Skipped During Client-Side Bootstrapping: The dehydrated content is not initially hydrated or bootstrapped on the client, reducing initial load time. 3. Dehydrated State: The code for the dehydrated components is excluded from the initial client-side bundle, optimizing performance. 4. Hydration Triggers: The application listens for specified hydration conditions (e.g., on interaction, on viewport), defined with a hydrate trigger in the @defer block. 5. On-Demand Hydration: Once the hydration conditions are met, Angular downloads the necessary code and hydrates the components, allowing them to become interactive without layout shifts. How to Use Incremental Hydration Thanks to Mark Thompson, who recently hosted a feature showcase on incremental hydration, we can show some code. The first step is to enable incremental hydration in your Angular application's appConfig using the provideClientHydration provider function: ` Then, you can mark the components you want to be incrementally hydrated using the @defer block with a hydrate trigger: ` And that's it! You now have a component that will be server-rendered dehydrated and hydrated incrementally when it becomes visible to the user. But what if you want to hydrate the component on interaction or some other trigger? Or maybe you don't want to hydrate the component at all? The same triggers already supported in @defer blocks are available for hydration: - idle: Hydrate once the browser reaches an idle state. - viewport: Hydrate once the component enters the viewport. - interaction: Hydrate once the user interacts with the component through click or keydown triggers. - hover: Hydrate once the user hovers over the component. - immediate: Hydrate immediately when the component is rendered. - timer: Hydrate after a specified time delay. - when: Hydrate when a provided conditional expression is met. And on top of that, there's a new trigger available for hydration: - never: When used, the component will remain static and not hydrated. The never trigger is handy when you want to exclude a component from hydration altogether, making it a completely static part of the page. Personally, I'm very excited about this feature and can't wait to try it out. How about you?...

Next.js + MongoDB Connection Storming cover image

Next.js + MongoDB Connection Storming

Building a Next.js application connected to MongoDB can feel like a match made in heaven. MongoDB stores all of its data as JSON objects, which don’t require transformation into JavaScript objects like relational SQL data does. However, when deploying your application to a serverless production environment such as Vercel, it is crucial to manage your database connections properly. If you encounter errors like these, you may be experiencing Connection Storming: * MongoServerSelectionError: connect ECONNREFUSED &lt;IP_ADDRESS>:&lt;PORT> * MongoNetworkError: failed to connect to server [&lt;hostname>:&lt;port>] on first connect * MongoTimeoutError: Server selection timed out after &lt;x> ms * MongoTopologyClosedError: Topology is closed, please connect * Mongo Atlas: Connections % of configured limit has gone above 80 Connection storming occurs when your application has to mount a connection to Mongo for every serverless function or API endpoint call. Vercel executes your application’s code in a highly concurrent and isolated fashion. So, if you create new database connections on each request, your app might quickly exceed the connection limit of your database. We can leverage Vercel’s fluid compute model to keep our database connection objects warm across function invocations. Traditional serverless architecture was designed for quick, stateless web app transactions. Now, especially with the rise of LLM-oriented applications built with Next.js, interactions with applications are becoming more sequential. We just need to ensure that we assign our MongoDB connection to a global variable. Protip: Use global variables Vercel’s fluid compute model means all memory, including global constants like a MongoDB client, stays initialized between requests as long as the instance remains active. By assigning your MongoDB client to a global constant, you avoid redundant setup work and reduce the overhead of cold starts. This enables a more efficient approach to reusing connections for your application’s MongoDB client. The example below demonstrates how to retrieve an array of users from the users collection in MongoDB and either return them through an API request to /api/users or render them as an HTML list at the /users route. To support this, we initialize a global clientPromise variable that maintains the MongoDB connection across warm serverless executions, avoiding re-initialization on every request. ` Using this database connection in your API route code is easy: ` You can also use this database connection in your server-side rendered React components. ` In serverless environments like Vercel, managing database connections efficiently is key to avoiding connection storming. By reusing global variables and understanding the serverless execution model, you can ensure your Next.js app remains stable and performant....

Adding React to your ASP.NET MVC web app  cover image

Adding React to your ASP.NET MVC web app

Adding React to your ASP.NET MVC web app In this article, we'll take a look how and why you might want to choose React to handle your front end considerations, and let ASP.NET manage the backend Architecture First, let's consider the range of responsibilities that each solution offers: * Templating - scaffolding out HTML markup based on page data * Routing - converting a request into a response * Middleware Pipeline - building assets * Model Binding - building usable model objects from HTML form data * API Services - handling data requests on a server * Client Side Interaction - updating a web page based on user interaction For the most part, both of these frameworks offer ways to handle most of these concerns: | Feature | ASP.NET | React | | ----------------------- |:-------:|:-----:| | Templating | ✔ | ✔ | | Routing | ✔ | ✔ | | Middleware Pipeline | ✔ | | | Model Binding | ✔ | ✔ | | API Services | ✔ | | | Client Side Interaction | | ✔ | Challenges when combining these two technologies include finding which pieces work best together. Historically, ASP.NET has struggled to offer any sort of rich client experience out of the box. Because ASP.NET performs templating on the server, it's difficult to immediately respond to changes in state on the client without making a round trip, or writing the client side logic entirely separate from the rest of your application. Also, React doesn't have anything to say about server-side considerations or API calls, so part of building any React app will involve picking how you want to handle requests on the server. Here's roughly how we'll structure our architecture, with React taking care of all the client side concerns, and .NET handling the server side API. > Aside: Blazor is adding rich interactivity to .NET with a monolithic API. If you want to give your existing .cshtml super powers, that's another possible path to pursue, but there's already a large and vibrant ecosystem for using React to take care of front end architecture. Prerequisites - If you don't have these, you'll need em' * Install dotnet core * Install node & npm * Install vs code Getting Started .NET comes with its own react starter template which is documented here. We'll use it for this example. You can spin up a new project with the dotnet new command like this: ` > Note: If you have Visual Studio, you'll also see the available template starters under the the new project dialog > You should be able to cd into your application directory, open with VS Code, and launch with F5, or by running the following: ` Which will be available at https://localhost:5001/ Net React Starter Let's review what this template adds, and how all the pieces fit together File Structure Here's a very high level view of some of the files involved ` The startup.cs file will wire up the react application as asp.net middleware with the following services / configuration: ` This takes advantage of the Microsoft.AspNetCore.SpaServices.Extensions library on nuget to wire up some of the client side dependencies, and server kick off. Finally, to wire up React to our .NET build step, there are a couple transforms in the .csproj file which run the local build process via npm and copy the build output to the .NET project. ` Adding Functionality - More Cats Please And finally, let's review how to leverage all of these existing components to start adding functionality to our application. We can take advantage of the fact that API calls can happen on the server-side, allowing us to protect API Keys and tokens, while also benefiting from immediate client updates without a full page refresh. As an example, we'll use TheCatApi, which has a quick, easy, and free sign up process to get your own API key. For this demo project, we'll add a random image viewer, a listing of all breeds, and a navigation component using react-router to navigate between them. We can scaffold C# classes from the sample output, and processing, through JSON2CSharp, and we'll add them to the models folder. MVC Controller - That's the C in MVC! The controller will orchestrate all of the backend services. Here's an example that helps setup a wrapper around the cat API so we can simplify our client side logic, and forward the request on the backend, but we could also hit a database, filesystem, or any other backend interfaces. We'll deserialize the API into a strongly typed class using the new System.Text.Json.JsonSerializer. This is baked into .NET core, and saves us the historical dependency on Newtonsoft's JSON.NET. The API Controller can then just return data (wrapped up in a Task because we made our method async). ` If we run the project, we should now be able to fetch data by navigating to /api/breed in the browser. You can test check if it works by itself by going to https://localhost:5001/api/breed Now let's load that up into a React component. React Component - It's Reactive :D Here's the basic structure of a React component: ` If this JavaScript is looking unfamiliar, it's because it's using JSX as well as ES6 syntax that's not supported by all browsers, which is why React needs to get preprocessed, by Babel, into something more universally understood to browsers. But let's take a look at what's going on piece-by-piece. In order for JSX to be processed, we need to import React into our file (until React 17 that is). The component function's primary responsibility is to return the HTML markup that we want to use one the page. Everything else is there to help manage state, or inform how to template and transform the data into HTML. So if we want a conditional, we can use the ternary operator (bool ? a : b), or if we want to transform items in an array, we could use Array.map to produce the output. In order to manage state inside of a component, we use the React Hooks function useState, which returns two items in an array that we can deconstruct like this: ` This allows us to update the state of this property and informs React to dynamically re-render the output when we do so. For example, while loading, we can display some boilerplate text until the data has returned, and then update the view appropriately. We'll want to fetch data on load, but sending async fetch calls during the initial execution can have some weird side effects, so we can use another hook called useEffect. Every time the component renders, we want to introduce *an effect*, so we'll put the initial call for data inside of there and it will fire as soon as the component goes live: ` This hits our backend API, gets the data, and updates our component state not only with the data, but also by toggling the loading indicator. Any updates to state that are used in the render function will cause it to kick off again and update the DOM automatically. Navigation - How to get around Let's imagine we create a second component, roughly the same as the first, to go get a random cat image. How do we handle navigation between both components. Many of the advantages to choosing React occur from preventing full page reloads on navigation. After all, your header, footer, loaded JS, and CSS libraries haven't changed - why should they get shipped to and parsed on the client from scratch. So we'll handle all navigational concerns within React as well. Here's a pared down version of how that occurs: 1. Our index.js file wraps the entire application in BrowserRouter from react-router-dom. 2. It then loads our application component which passes Route objects with a path and component into the overall Layout. 3. The layout then renders the "live" route by injecting this.props.children into the rest of the site layout. 4. React router will handle the rest by only loading components when the path is navigated to in the browser or from other areas in the app. ` Wrap Up & Source Code That's a quick run down of how you can combine both of these two technologies, and leverage the good parts of each. There are many ways to explore each of these technologies on their own, and also try out use cases for using them together: * If you're new to React, the current React template uses the very popular Create React App. * If you're new to .NET, microsoft has some fantastic docs on dotnet core as well. For more context, you can browse the full source code for the article on my Github at KyleMit/aspnet-react-cats. What would you like to see added to this example next? Tweet me at KyleMitBTV....

Vercel BotID: The Invisible Bot Protection You Needed cover image

Vercel BotID: The Invisible Bot Protection You Needed

Nowadays, bots do not act like “bots”. They can execute JavaScript, solve CAPTCHAs, and navigate as real users. Traditional defenses often fail to meet expectations or frustrate genuine users. That’s why Vercel created BotID, an invisible CAPTCHA that has real-time protections against sophisticated bots that help you protect your critical endpoints. In this blog post, we will explore why you should care about this new tool, how to set it up, its use cases, and some key considerations to take into account. We will be using Next.js for our examples, but please note that this tool is not tied to this framework alone; the only requirement is that your app is deployed and running on Vercel. Why Should You Care? Think about these scenarios: - Checkout flows are overwhelmed by scalpers - Signup forms inundated with fake registrations - API endpoints draining resources with malicious requests They all impact you and your users in a negative way. For example, when bots flood your checkout page, real customers are unable to complete their purchases, resulting in your business losing money and damaging customer trust. Fake signups clutter the app, slowing things down and making user data unreliable. When someone deliberately overloads your app’s API, it can crash or become unusable, making users angry and creating a significant issue for you, the owner. BotID automatically detects and filters bots attempting to perform any of the above actions without interfering with real users. How does it work? A lightweight first-party script quickly gathers a high set of browser & environment signals (this takes ~30ms, really fast so no worry about performance issues), packages them into an opaque token, and sends that token with protected requests via the rewritten challenge/proxy path + header; Vercel’s edge scores it, attaches a verdict, and checkBotId() function simply reads that verdict so your code can allow or block. We will see how this is implemented in a second! But first, let’s get started. Getting Started in Minutes 1. Install the SDK: ` 1. Configure redirects Wrap your next.config.ts with BotID’s helper. This sets up the right rewrites so BotID can do its job (and not get blocked by ad blockers, extensions, etc.): ` 2. Integrate the client on public-facing pages (where BotID runs checks): Declare which routes are protected so BotID can attach special headers when a real user triggers those routes. We need to create instrumentation-client.ts (place it in the root of your application or inside a src folder) and initialize BotID once: ` instrumentation-client.ts runs before the app hydrates, so it’s a perfect place for a global setup! If we have an inferior Next.js version than 15.3, then we would need to use a different approach. We need to render the React component inside the pages or layouts you want to protect, specifying the protected routes: ` 3. Verify requests on your server or API: ` - NOTE: checkBotId() will fail if the route wasn’t listed on the client, because the client is what attaches the special headers that let the edge classify the request! You’re all set - your routes are now protected! In development, checkBotId() function will always return isBot = false so you can build without friction. To disable this, you can override the options for development: ` What happens on a failed check? In our example above, if the check failed, we return a 403, but it is mostly up to you what to do in this case; the most common approaches for this scenario are: - Hard block with a 403 for obviously automated traffic (just what we did in the example above) - Soft fail (generic error/“try again”) when you want to be cautious. - Step-up (require login, email verification, or other business logic). Remember, although rare, false positives can occur, so it’s up to you to determine how you want to balance your fail strategy between security, UX, telemetry, and attacker behavior. checkBotId() So far, we have seen how to use the property isBot from checkBotId(), but there are a few more properties that you can leverage from it. There are: isHuman (boolean): true when BotID classifies the request as a real human session (i.e., a clear “pass”). BotID is designed to return an unambiguous yes/no, so you can gate actions easily. isBot (boolean): We already saw this one. It will be true when the request is classified as automated traffic. isVerifiedBot (boolean): Here comes a less obvious property. Vercel maintains and continuously updates a comprehensive directory of known legitimate bots from across the internet. This directory is regularly updated to include new legitimate services as they emerge. This could be helpful for allowlists or custom logic per bot. We will see an example in a sec. verifiedBotName? (string): The name for the specific verified bot (e.g., “claude-user”). verifiedBotCategory? (string): The type of the verified bot (e.g., “webhook”, “advertising”, “ai_assistant”). bypassed (boolean): it is true if the request skipped BotID check due to a configured Firewall bypass (custom or system). You could use this flag to avoid taking bot-based actions when you’ve explicitly bypassed protection. Handling Verified Bots - NOTE: Handling verified bots is available in botid@1.5.0 and above. It might be the case that you don’t want to block some verified bots because they are not causing damage to you or your users, as it can sometimes be the case for AI-related bots that fetch your site to give information to a user. We can use the properties related to verified bots from checkBotId() to handle these scenarios: ` Choosing your BotID mode When leveraging BotID, you can choose between 2 modes: - Basic Mode: Instant session-based protection, available for all Vercel plans. - Deep Analysis Mode: Enhanced Kasada-powered detection, only available for Pro and Enterprise plan users. Using this mode, you will leverage a more advanced detection and will block the hardest to catch bots To specify the mode you want, you must do so in both the client and the server. This is important because if either of the two does not match, the verification will fail! ` Conclusion Stop chasing bots - let BotID handle them for you! Bots are and will get smarter and more sophisticated. BotID gives you a simple way to push back without slowing your customers down. It is simple to install, customize, and use. Stronger protection equals fewer headaches. Add BotID, ship with confidence, and let the bots trample into a wall without knowing what’s going on....

Let's innovate together!

We're ready to be your trusted technical partners in your digital innovation journey.

Whether it's modernization or custom software solutions, our team of experts can guide you through best practices and how to build scalable, performant software that lasts.

Prefer email? hi@thisdot.co