Skip to content

Decomposing a project using Nx - Part 1

Decomposing a project using Nx - Part 1

Working on a large codebase brings multiple challenges that we need to deal with. One of them is how to manage the repository structure and keep it as clean and maintainable as possible. There are multiple different factors that can be considered when talking about project maintainability, and one of them, that is fundamental in my opinion, is how we structure the project.

When it comes to managing large scale project which may consist of many modules, or even separate applications, a Nx Workspace based mono-repository is a good candidate for managing such a project. If you don't know what an Nx Workspace is, I encourage you to read my previous article where I introduce it along with monorepo fundamentals.

In this article series, I'll show you:

  • 2 approaches for decomposing a project
  • How they can help you to better manage your project's codebase
  • What tools Nx Workspace provides us with that help us enforce boundaries within a project

Modules vs libraries

It is a well-known good practice, especially when working with a complex Web Application, to divide the functionality into separate, self-contained, and, when possible, reusable modules. This is a great principle and many modern CLIs (ie. Angular, Nest) provide us with tooling for creating such modules with ease, so we don't waste time creating additional module structure by hand.

Of course, we could take it a step further, and instead of just creating a separate module, create a whole separate library instead. This seems to be a bit of an overkill at first, but when we consider that Nx CLI provides us with just as easy a way of creating a library as we did for a module, it doesn't feel so daunting anymore. With that in mind, let's consider what the benefits of creating a separate library instead of just a module are:

  • libs may result in faster builds
    • nx affected command will run the lint, test, build, or any other target only for the libraries that were affected by a given change
    • with buildable libs and incremental builds, we can scale our repo even further
  • libs enable us to enforce stricter boundaries
  • code sharing and minimizing bundle size is easier with libs
    • we can extract and publish reusable parts of our codebase
    • with small and focused libraries we only import small pieces into the application (in the case of multi-app monorepo)

Decomposition strategies - horizontal

In this article, I want to focus on horizontal decomposition strategy, which is great not only for large, enterprise projects, but for smaller applications as well. Horizontal decomposition focuses on splitting the project into layers that are focused on a single technical functionality aspect of the module. A good example of libraries type in this case is:

  • application layer
  • feature layer
  • business logic layer
  • api/data access layer
  • presentational components layer

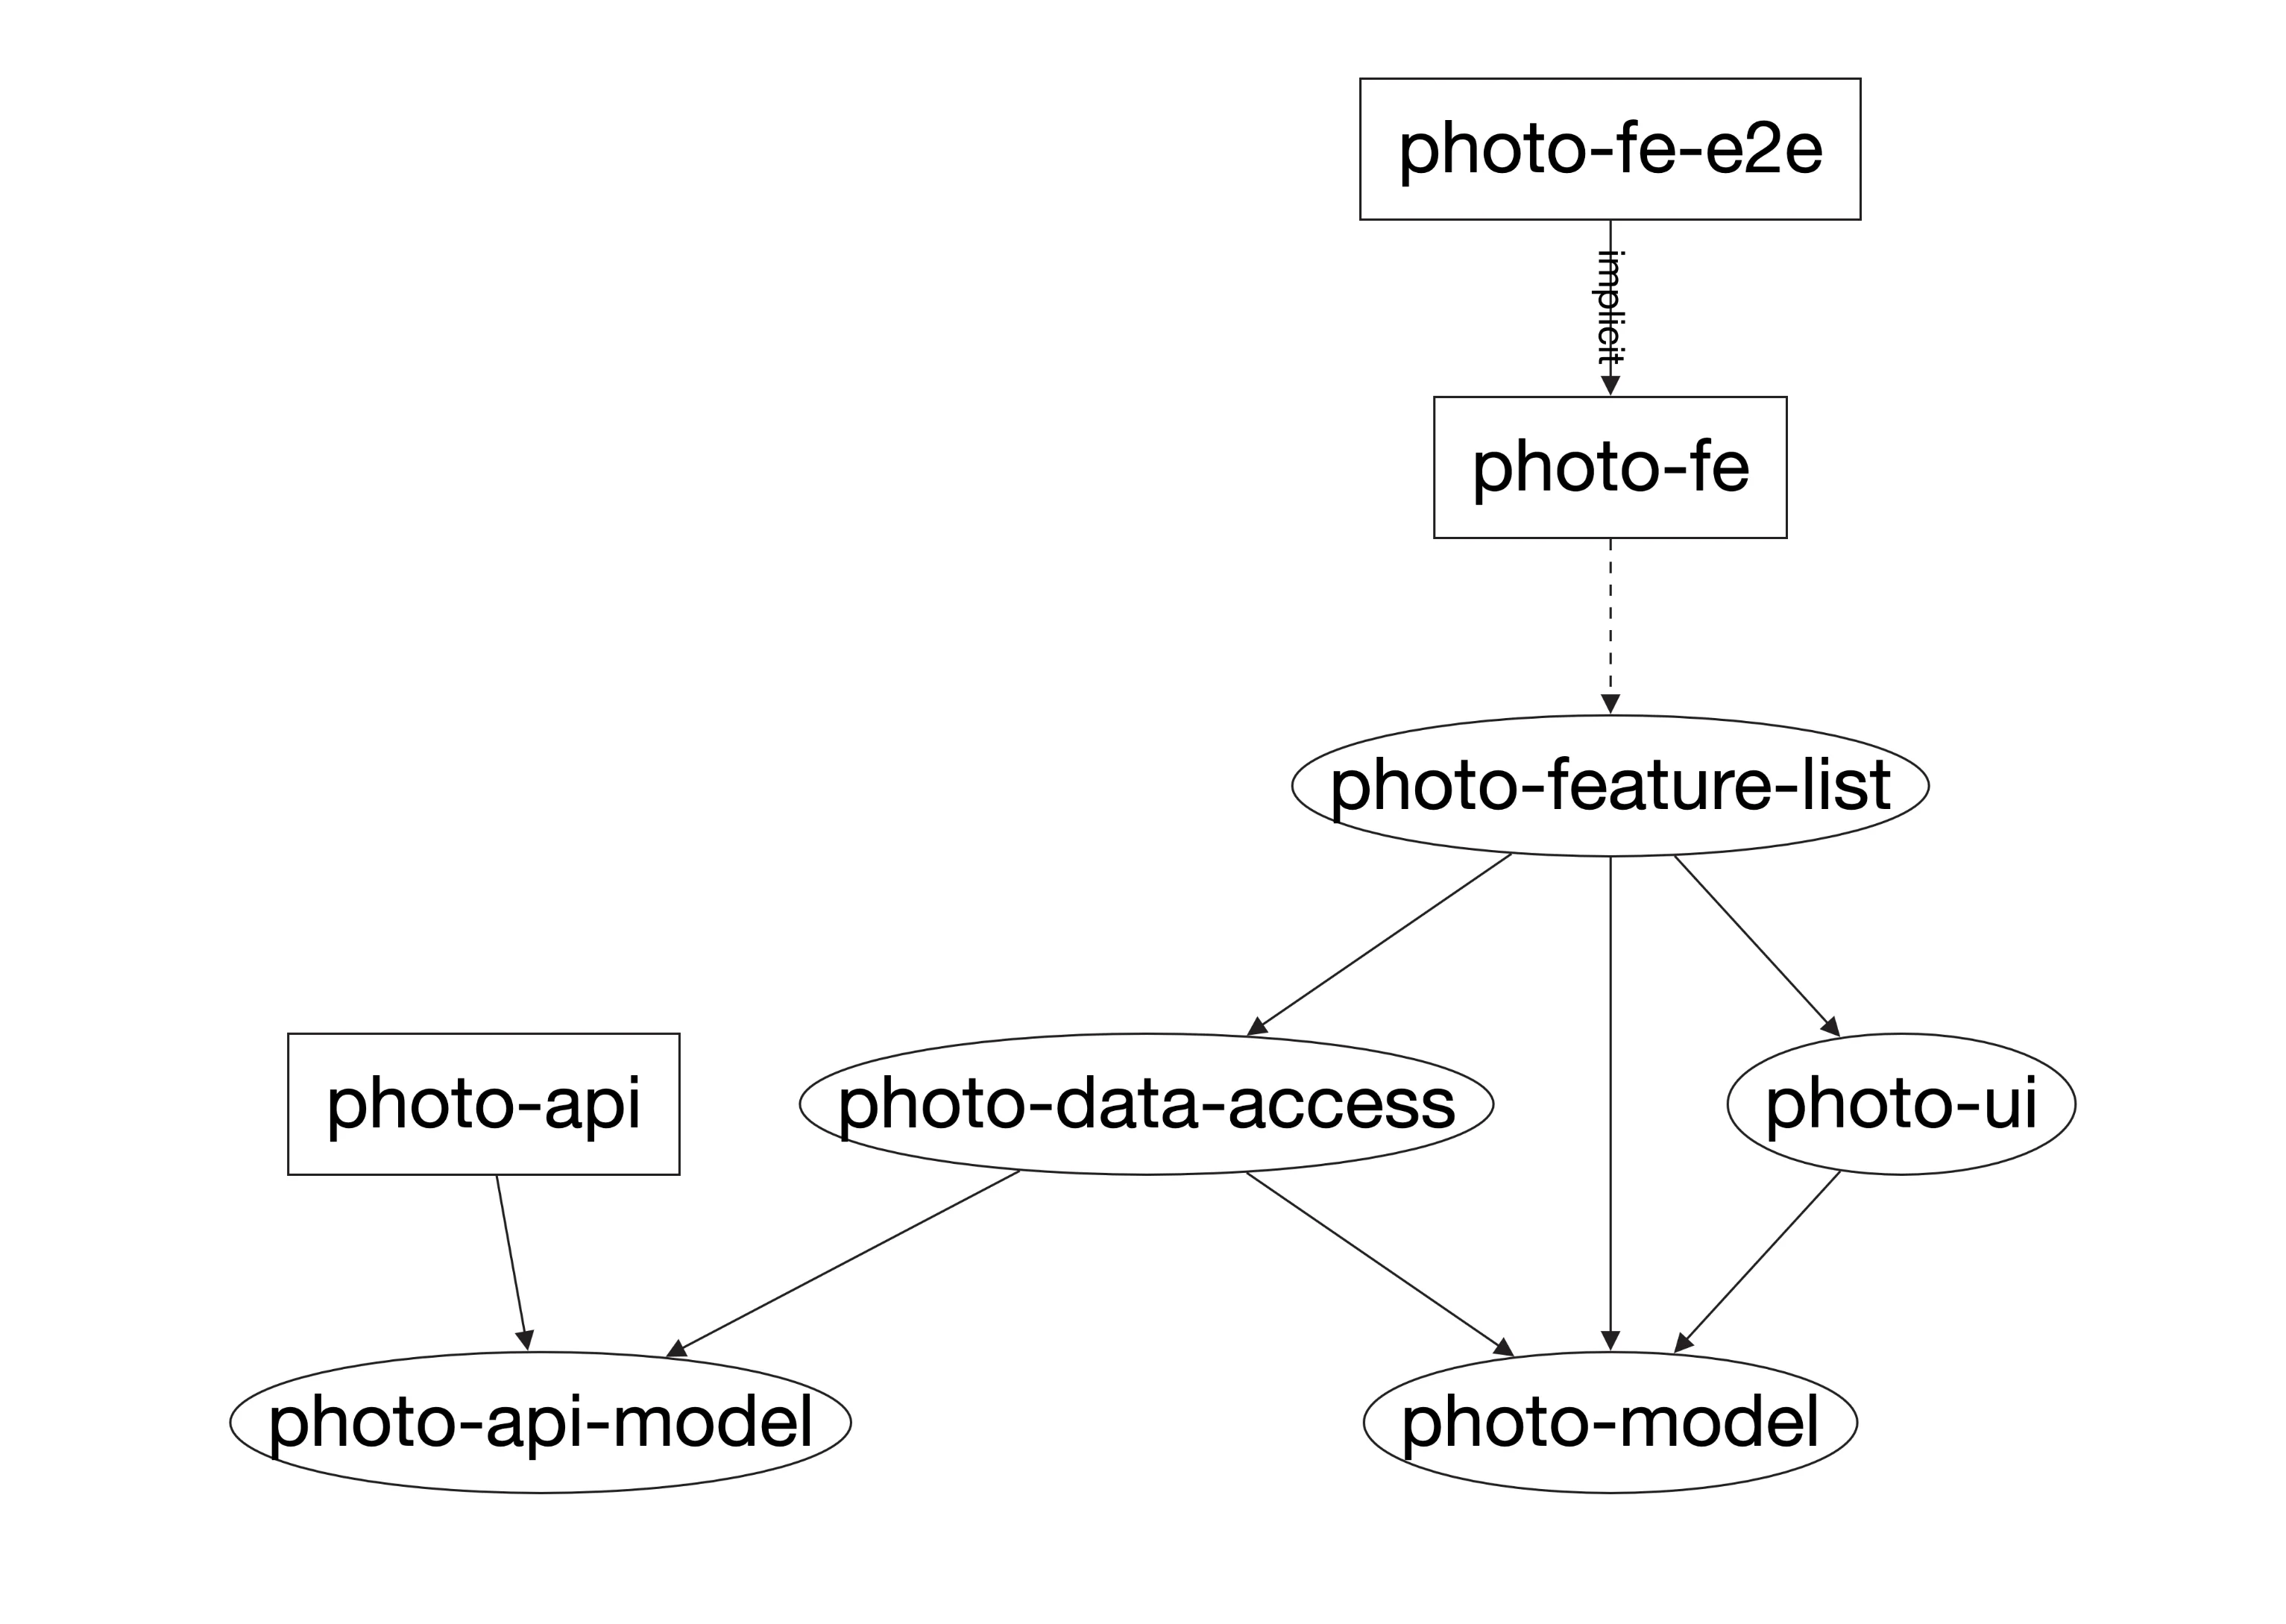
As you may see in this example layering concept, each of the library types has a specific responsibility that can be encapsulated. I have created an example application that demonstrates how the aforementioned decomposition can be applied into even a simple example app. You can find the source code on my repository. Please check out the post/nx-decomposition-p1 branch to get the code related to this post. This application allows a user to see a list of photos and like or dislike them. It is a very simple use case, but even here, we can distinguish few layers of code:

  • photo-fe - frontend application top layer
  • photo-feature-list - this is a feature layer. It collects data from data-access layer, and displays it using ui presentational components.
  • photo-data-access - this is a layer responsible for accessing and storing the data. This is where we include calls to the API and store the received data using NgRx store.
  • photo-ui - this library contains all the presentational components necessary to display the list of photos
  • photo-api-model, photo-model - those are libraries that contain data model structure used either in the API (it's shared by FE and BE applications), and the internal frontend model. API and internal models are the same now but this approach gives us the flexibility to, for example, stop API breaking changes from affecting the whole FE application. To achieve this we could just convert from API to internal model, and vice-versa.

This application decomposition allows for easier modifications of internal layer implementation. As long as we keep the interface intact, we can add additional levels of necessary logic, and not worry about affecting other layers. This way we can split responsibility between team members or whole teams.

Nx workspace comes with a great toolset for managing dependencies between the internal libraries. A great starting point to get a grasp of the repository structure is to visualize the repository structure, and its dependencies. The following command will show us all libraries within a monorepo and dependencies between those libraries:

nx dep-graph

It will open a dependency graph in a browser. From the left side menu, you can choose which projects you want to include in the visualization. After clicking Select all, you should see the following graph:

Nx Dependency Graph - Horizontal layers

You can read more about dependecy graph here:

Enforce boundaries

As you may see in the dependency graph above, our application layer is accessing only certain other parts/libraries. As the project grows, we would probably like to make sure that the code still follows a given structure. I.e. we would not like UI presentational components to access any data access functionality of the application. Their only responsibility should be to display the provided data, and propagate user's interactions via output properties. This is where Nx tags comes in very handy. We can assign each library its own set of predefined tags, and then create boundaries base on those tags. For this example application, let's define the following set of tags:

  • type:application
  • type:feature
  • type:data-access
  • type:ui
  • type:model
  • type:api-model
  • type:be

Now, within the nx.json file, we can assign those tags to specific libraries to reflect its intent:

  "projects": {
    "photo-api-model": {
      "tags": [
        "type:api-model"
      ]
    },
    "photo-data-access": {
      "tags": [
        "type:data-access"
      ]
    },
    "photo-feature-list": {
      "tags": [
        "type:feature"
      ]
    },
    "photo-model": {
      "tags": [
        "type:model"
      ]
    },
    "photo-ui": {
      "tags": [
        "type:ui"
      ]
    },
    "photo-fe": {
      "tags": [
        "type:app"
      ]
    },
    "photo-api": {
      "tags": [
        "type:be"
      ]
    }
  }

Now that we have our tags defined, we can use either an ESLint or TSLint rule provided by Nrwl Nx to restrict access between libraries. Those rules are named @nrwl/nx/enforce-module-boundaries and nx-enforce-module-boundaries for ESLint and TSLint respectively. Let's define our allowed libraries anteriactions as follows:

  • type:application - can only access type:feature libraries
  • type:feature - can only access type:data-access, type:model, type:ui libraries
  • type:data-access - can only access type:api-model, type:model libraries
  • type:ui - can only access type:ui, type:model libraries
  • type:model - can not access other libraries
  • type:api-model - can not access other libraries
  • type:be - can only access type:api-model libraries

To enforce those constraints we can add each of the rules mentioned above to the @nrwl/nx/enforce-module-boundaries, or nx-enforce-module-boundaries configuration. Let's open the top level .eslintrc.json or .tslint.json files, and replace the default configuration with the following one:

"@nrwl/nx/enforce-module-boundaries": [
  "error",
  {
    "enforceBuildableLibDependency": true,
    "allow": [],
    "depConstraints": [
      {
        "sourceTag": "type:app",
        "onlyDependOnLibsWithTags": ["type:feature"]
      },
      {
        "sourceTag": "type:feature",
        "onlyDependOnLibsWithTags": ["type:data-access","type:model", "type:ui"]
      },
      {
        "sourceTag": "type:data-access",
        "onlyDependOnLibsWithTags": ["type:api-model", "type:model"]
      },
      {
        "sourceTag": "type:ui",
        "onlyDependOnLibsWithTags": ["type:ui", "type:model"]
      },
      {
        "sourceTag": "type:be",
        "onlyDependOnLibsWithTags": ["type:api-model"]
      }

    ]
  }
]

For type:model and type:api-model, we can either not include any configuration, or explicitly add configuration with an empty array of allowed tags:

{
  "sourceTag": "type:model",
  "onlyDependOnLibsWithTags": []
},
{
  "sourceTag": "type:api-model",
  "onlyDependOnLibsWithTags": []
}

Now, you can run the following command to verify that all constraints are met:

nx run-many --target=lint --all

You can set up the CI to run this check for all the PRs to the repository, and therefore, avoid including code that does not follow the architectural pattern that you decided for your project.

If any of the aforementioned constrains were violated, the linting process would produce an error like this

A project tagged with "type:data-access" can only depend on projects tagged with "type:api-model" or "type:model".

This gives a clear message on what the problem is, and tells the developer that they are trying to do something that should not be done.

You can read more about Nx tags & constraints in the documentation.

Conclusion

When designing a software solution that is expected to grow and be maintained for a long time, it is crucial to create an architecture that will support that goal. Composing an application out of well-defined and separated horizontal layers is a great tool that can be applied to a variety of projects - even the smaller ones. Nx comes with a built-in generic mechanism that allows system architects to impose their architectural decisions on a project and prevent unrestrained access between libraries. Additionally, with a help of Nx CLI, it is just as fast and easy to create new libraries as with creating a new module. So why not take advantage of it?

In case you have any questions, you can always tweet or DM me @ktrz. I'm always happy to help!

This Dot Labs is a development consultancy that is trusted by top industry companies, including Stripe, Xero, Wikimedia, Docusign, and Twilio. This Dot takes a hands-on approach by providing tailored development strategies to help you approach your most pressing challenges with clarity and confidence. Whether it's bridging the gap between business and technology or modernizing legacy systems, you’ll find a breadth of experience and knowledge you need. Check out how This Dot Labs can empower your tech journey.

You might also like

Drizzle ORM: A performant and type-safe alternative to Prisma cover image

Drizzle ORM: A performant and type-safe alternative to Prisma

Introduction I’ve written an article about a similar, more well-known TypeScript ORM named Prisma in the past. While it is a fantastic library that I’ve used and have had success with personally, I noted a couple things in particular that I didn’t love about it. Specifically, how it handles relations with add-on queries and also its bulk that can slow down requests in Lambda and other similar serverless environments. Because of these reasons, I took notice of a newer player in the TypeScript ORM space named Drizzle pretty quickly. The first thing that I noticed about Drizzle and really liked is that even though they call it an ‘ORM’ it’s more of a type-safe query builder. It reminds me of a JS query builder library called ‘Knex’ that I used to use years ago. It also feels like the non-futuristic version of EdgeDB which is another technology that I’m pretty excited about, but committing to it still feels like a gamble at this stage in its development. In contrast to Prisma, Drizzle is a ‘thin TypeScript layer on top of SQL’. This by default should make it a better candidate for Lambda’s and other Serverless environments. It could also be a hard sell to Prisma regulars that are living their best life using the incredibly developer-friendly TypeScript API’s that it generates from their schema.prisma files. Fret not, despite its query-builder roots, Drizzle has some tricks up its sleeve. Let’s compare a common query example where we fetch a list of posts and all of it’s comments from the Drizzle docs: ` // Drizzle query const posts = await db.query.posts.findMany({ with: { comments: true, }, }); // Prisma query const posts = await prisma.post.findMany({ include: { comments: true, }, }); ` Sweet, it’s literally the same thing. Maybe not that hard of a sale after all. You will certainly find some differences in their APIs, but they are both well-designed and developer friendly in my opinion. The schema Similar to Prisma, you define a schema for your database in Drizzle. That’s pretty much where the similarities end. In Drizzle, you define your schema in TypeScript files. Instead of generating an API based off of this schema, Drizzle just infers the types for you, and uses them with their TypeScript API to give you all of the nice type completions and things we’re used to in TypeScript land. Here’s an example from the docs: ` import { integer, pgEnum, pgTable, serial, uniqueIndex, varchar } from 'drizzle-orm/pg-core'; // declaring enum in database export const popularityEnum = pgEnum('popularity', ['unknown', 'known', 'popular']); export const countries = pgTable('countries', { id: serial('id').primaryKey(), name: varchar('name', { length: 256 }), }, (countries) => { return { nameIndex: uniqueIndex('nameidx').on(countries.name), } }); export const cities = pgTable('cities', { id: serial('id').primaryKey(), name: varchar('name', { length: 256 }), countryId: integer('countryid').references(() => countries.id), popularity: popularityEnum('popularity'), }); ` I’ll admit, this feels a bit clunky compared to a Prisma schema definition. The trade-off for a lightweight TypeScript API to work with your database can be worth the up-front investment though. Migrations Migrations are an important piece of the puzzle when it comes to managing our applications databases. Database schemas change throughout the lifetime of an application, and the steps to accomplish these changes is a non-trivial problem. Prisma and other popular ORMs offer a CLI tool to manage and automate your migrations, and Drizzle is no different. After creating new migrations, all that is left to do is run them. Drizzle gives you the flexibility to run your migrations in any way you choose. The simplest of the bunch and the one that is recommended for development and prototyping is the drizzle-kit push command that is similar to the prisma db push command if you are familiar with it. You also have the option of running the .sql files directly or using the Drizzle API's migrate function to run them in your application code. Drizzle Kit is a companion CLI tool for managing migrations. Creating your migrations with drizzle-kit is as simple as updating your Drizzle schema. After making some changes to your schema, you run the drizzle-kit generate command and it will generate a migration in the form of a .sql file filled with the needed SQL commands to migrate your database from point a → point b. Performance When it comes to your database, performance is always an extremely important consideration. In my opinion this is the category that really sets Drizzle apart from similar competitors. SQL Focused Tools like Prisma have made sacrifices and trade-offs in their APIs in an attempt to be as database agnostic as possible. Drizzle gives itself an advantage by staying focused on similar SQL dialects. Serverless Environments Serverless environments are where you can expect the most impactful performance gains using Drizzle compared to Prisma. Prisma happens to have a lot of content that you can find on this topic specifically, but the problem stems from cold starts in certain serverless environments like AWS Lambda. With Drizzle being such a lightweight solution, the time required to load and execute a serverless function or Lambda will be much quicker than Prisma. Benchmarks You can find quite a few different open-sourced benchmarks of common database drivers and ORMs in JavaScript land. Drizzle maintains their own benchmarks on GitHub. You should always do your own due diligence when it comes to benchmarks and also consider the inputs and context. In Drizzle's own benchmarks, it’s orders of magnitudes faster when compared to Prisma or TypeORM, and it’s not far off from the performance you would achieve using the database drivers directly. This would make sense considering the API adds almost no overhead, and if you really want to achieve driver level performance, you can utilize the prepared statements API. Prepared Statements The prepared statements API in Drizzle allows you to pre-generate raw queries that get sent directly to the underlying database driver. This can have a very significant impact on performance, especially when it comes to larger, more complex queries. Prepared statements can also provide huge performance gains when used in serverless environments because they can be cached and reused. JOINs I mentioned at the beginning of this article that one of the things that bothered me about Prisma is the fact that fetching relations on queries generates additional sub queries instead of utilizing JOINs. SQL databases are relational, so using JOINs to include data from another table in your query is a core and fundamental part of how the technology is supposed to work. The Drizzle API has methods for every type of JOIN statement. Properly using JOINs instead of running a bunch of additional queries is an important way to get better performance out of your queries. This is a huge selling point of Drizzle for me personally. Other bells and whistles Drizzle Studio UIs for managing the contents of your database are all the rage these days. You’ve got Prisma Studio and EdgeDB UI to name a couple. It's no surprise that these are so popular. They provide a lot of value by letting you work with your database visually. Drizzle also offers Drizzle Studio and it’s pretty similar to Prisma Studio. Other notable features - Raw Queries - The ‘magic’ sql operator is available to write raw queries using template strings. - Transactions - Transactions are a very common and important feature in just about any database tools. It’s commonly used for seeding or if you need to write some other sort of manual migration script. - Schemas - Schemas are a feature specifically for Postgres and MySQL database dialects - Views -Views allow you to encapsulate the details of the structure of your tables, which might change as your application evolves, behind consistent interfaces. - Logging - There are some logging utilities included useful for debugging, benchmarking, and viewing generated queries. - Introspection - There are APIs for introspecting your database and tables - Zod schema generation - This feature is available in a companion package called drizzle-zod that will generate Zod schema’s based on your Drizzle tables Seeding At the time of this writing, I’m not aware of Drizzle offering any tools or specific advice on seeding your database. I assume this is because of how straightforward it is to handle this on your own. If I was building a new application I would probably provide a simple seed script in JS or TS and use a runtime like node to execute it. After that, you can easily add a command to your package.json and work it into your CI/CD setup or anything else. Conclusion Drizzle ORM is a performant and type-safe alternative to Prisma. While Prisma is a fantastic library, Drizzle offers some advantages such as a lightweight TypeScript API, a focus on SQL dialects, and the ability to use JOINs instead of generating additional sub queries. Drizzle also offers Drizzle Studio for managing the contents of your database visually, as well as other notable features such as raw queries, transactions, schemas, views, logging, introspection, and Zod schema generation. While Drizzle may require a bit more up-front investment in defining your schema, it can be worth it for the performance gains, especially in serverless environments....

Nuxt DevTools v1.0: Redefining the Developer Experience Beyond Conventional Tools cover image

Nuxt DevTools v1.0: Redefining the Developer Experience Beyond Conventional Tools

In the ever-evolving world of web development, Nuxt.js has taken a monumental leap with the launch of Nuxt DevTools v1.0. More than just a set of tools, it's a game-changer—a faithful companion for developers. This groundbreaking release, available for all Nuxt projects and being defaulted from Nuxt v3.8 onwards, marks the beginning of a new era in developer tools. It's designed to simplify our development journey, offering unparalleled transparency, performance, and ease of use. Join me as we explore how Nuxt DevTools v1.0 is set to revolutionize our workflow, making development faster and more efficient than ever. What makes Nuxt DevTools so unique? Alright, let's start delving into the features that make this tool so amazing and unique. There are a lot, so buckle up! In-App DevTools The first thing that caught my attention is that breaking away from traditional browser extensions, Nuxt DevTools v1.0 is seamlessly integrated within your Nuxt app. This ensures universal compatibility across browsers and devices, offering a more stable and consistent development experience. This setup also means the tools are readily available in the app, making your work more efficient. It's a smart move from the usual browser extensions, making it a notable highlight. To use it you just need to press Shift + Option + D` (macOS) or `Shift + Alt + D` (Windows): With simple keystrokes, the Nuxt DevTools v1.0 springs to life directly within your app, ready for action. This integration eliminates the need to toggle between windows or panels, keeping your workflow streamlined and focused. The tools are not only easily accessible but also intelligently designed to enhance your productivity. Pages, Components, and Componsables View The Pages, Components, and Composables View in Nuxt DevTools v1.0 are a clear roadmap for your app. They help you understand how your app is built by simply showing its structure. It's like having a map that makes sense of your app's layout, making the complex parts of your code easier to understand. This is really helpful for new developers learning about the app and experienced developers working on big projects. Pages View lists all your app's pages, making it easier to move around and see how your site is structured. What's impressive is the live update capability. As you explore the DevTools, you can see the changes happening in real-time, giving you instant feedback on your app's behavior. Components View is like a detailed map of all the parts (components) your app uses, showing you how they connect and depend on each other. This helps you keep everything organized, especially in big projects. You can inspect components, change layouts, see their references, and filter them. By showcasing all the auto-imported composables, Nuxt DevTools provides a clear overview of the composables in use, including their source files. This feature brings much-needed clarity to managing composables within large projects. You can also see short descriptions and documentation links in some of them. Together, these features give you a clear picture of your app's layout and workings, simplifying navigation and management. Modules and Static Assets Management This aspect of the DevTools revolutionizes module management. It displays all registered modules, documentation, and repository links, making it easy to discover and install new modules from the community! This makes managing and expanding your app's capabilities more straightforward than ever. On the other hand, handling static assets like images and videos becomes a breeze. The tool allows you to preview and integrate these assets effortlessly within the DevTools environment. These features significantly enhance the ease and efficiency of managing your app's dynamic and static elements. The Runtime Config and Payload Editor The Runtime Config and Payload Editor in Nuxt DevTools make working with your app's settings and data straightforward. The Runtime Config lets you play with different configuration settings in real time, like adjusting settings on the fly and seeing the effects immediately. This is great for fine-tuning your app without guesswork. The Payload Editor is all about managing the data your app handles, especially data passed from server to client. It's like having a direct view and control over the data your app uses and displays. This tool is handy for seeing how changes in data impact your app, making it easier to understand and debug data-related issues. Open Graph Preview The Open Graph Preview in Nuxt DevTools is a feature I find incredibly handy and a real time-saver. It lets you see how your app will appear when shared on social media platforms. This tool is crucial for SEO and social media presence, as it previews the Open Graph tags (like images and descriptions) used when your app is shared. No more deploying first to check if everything looks right – you can now tweak and get instant feedback within the DevTools. This feature not only streamlines the process of optimizing for social media but also ensures your app makes the best possible first impression online. Timeline The Timeline feature in Nuxt DevTools is another standout tool. It lets you track when and how each part of your app (like composables) is called. This is different from typical performance tools because it focuses on the high-level aspects of your app, like navigation events and composable calls, giving you a more practical view of your app's operation. It's particularly useful for understanding the sequence and impact of events and actions in your app, making it easier to spot issues and optimize performance. This timeline view brings a new level of clarity to monitoring your app's behavior in real-time. Production Build Analyzer The Production Build Analyzer feature in Nuxt DevTools v1.0 is like a health check for your app. It looks at your app's final build and shows you how to make it better and faster. Think of it as a doctor for your app, pointing out areas that need improvement and helping you optimize performance. API Playground The API Playground in Nuxt DevTools v1.0 is like a sandbox where you can play and experiment with your app's APIs. It's a space where you can easily test and try out different things without affecting your main app. This makes it a great tool for trying out new ideas or checking how changes might work. Some other cool features Another amazing aspect of Nuxt DevTools is the embedded full-featured VS Code. It's like having your favorite code editor inside the DevTools, with all its powerful features and extensions. It's incredibly convenient for making quick edits or tweaks to your code. Then there's the Component Inspector. Think of it as your code's detective tool. It lets you easily pinpoint and understand which parts of your code are behind specific elements on your page. This makes identifying and editing components a breeze. And remember customization! Nuxt DevTools lets you tweak its UI to suit your style. This means you can set up the tools just how you like them, making your development environment more comfortable and tailored to your preferences. Conclusion In summary, Nuxt DevTools v1.0 marks a revolutionary step in web development, offering a comprehensive suite of features that elevate the entire development process. Features like live updates, easy navigation, and a user-friendly interface enrich the development experience. Each tool within Nuxt DevTools v1.0 is thoughtfully designed to simplify and enhance how developers build and manage their applications. In essence, Nuxt DevTools v1.0 is more than just a toolkit; it's a transformative companion for developers seeking to build high-quality web applications more efficiently and effectively. It represents the future of web development tools, setting new standards in developer experience and productivity....

Introduction to Directives Composition API in Angular cover image

Introduction to Directives Composition API in Angular

In version 15, Angular introduced a new directives composition API that allows developers to compose existing directives into new more complex directives or components. This allows us to encapsulate behaviors into smaller directives and reuse them across the application more easily. In this article, we will explore the new API, and see how we can use it in our own components. All the examples from this article (and more) can be found on Stackblitz here. Starting point In the article, I will use two simple directives as an example `HighlightDirective` - a directive borrowed from Angular's Getting started guide. This directive will change an element's background color whenever the element hovers. `ts import { Directive, ElementRef, HostListener, Input } from '@angular/core'; @Directive({ selector: '[appHighlight]', standalone: true }) export class HighlightDirective { @Input() color = 'yellow' constructor(private el: ElementRef) { } @HostListener('mouseenter') onMouseEnter() { this.highlight(this.color); } @HostListener('mouseleave') onMouseLeave() { this.highlight(''); } private highlight(color: string) { this.el.nativeElement.style.backgroundColor = color; } } ` Fig. 1 `BorderDirective` - a similar directive that will apply a border of a specified color to the element whenever it hovers `ts import { Directive, ElementRef, HostListener, Input, OnInit } from '@angular/core'; @Directive({ selector: '[appBorder]', standalone: true, }) export class BorderDirective implements OnInit { @Input() color: string = 'red' constructor(private el: ElementRef) { } ngOnInit() { this.border('') } @HostListener('mouseenter') onMouseEnter() { this.border(this.color); } @HostListener('mouseleave') onMouseLeave() { this.border(''); } private border(color: string) { this.el.nativeElement.style.border = 2px solid ${color || 'transparent'}`; } } ` Fig. 2 We can now easily apply our directives to any element we want ie. a paragraph: `html Paragraph with a highlight directive Paragraph with a border directive ` Fig. 3 However, if we wanted to apply both highlighting and border on hover we would need to add both directives explicitly: `html Paragraph with a highlight and border directive ` Fig. 4 With the new directives composition API, we can easily create another directive that composes behaviors of our 2 directives. Host Directives Angular 15 added a new property to the @Directive` and `@Component` decorators. In this property, we can specify an array of different directives that we want our new component or directive to apply on a host element. We can do it as follows: `ts @Directive({ selector: '[appHighlightAndBorder]', hostDirectives: [HighlightDirective, BorderDirective], standalone: true, }) export class HighlightAndBorderDirective {} ` As you can see in the above example, by just defining the hostDirectives` property containing our highlight and border directives, we created a new directive that composes both behaviors into one directive. We can now achieve the same result as in Fig. 4 by using just a single directive: `html Paragraph with a highlight and border directive using a single composed directive ` Fig. 5 Passing inputs and outputs Our newly composed directive works nicely already, but there is a problem. How do we pass properties to the directives that are defined in the hostDirectives` array? They are not passed by default, but we can configure them to do so pretty easily by using an extended syntax: `ts hostDirectives: [ { directive: HighlightDirective, inputs: ['color'], }, { directive: BorderDirective, inputs: ['color'], }, ], ` Fig. 6 This syntax takes exposes the "inner" directives\ `color` input from the `HighlightAndBorderDirective`, and passes them down to both highlight and border directives. `html Paragraph with a highlight and border directive using a single composed directive ` Fig. 7 This works, but we ended up with a border and highlight color both being blue. Luckily Angular's API allows us to easily redefine the properties' names using the : ` syntax. So let's remap out properties to `highlightColor` and `borderColor` so that the names don't collide with each other: `ts hostDirectives: [ { directive: HighlightDirective, inputs: ['color: highlightColor'], }, { directive: BorderDirective, inputs: ['color: borderColor'], }, ], ` Fig. 8 Now we can control both colors individually: `html Paragraph with a highlight and border directive using a single composed directive ` Fig. 9 We could apply the same approach to mapping directive's outputs eg. `ts outputs: ['stateChanged'], ` Fig. 10 or `ts outputs: ['stateChanged: changed'], ` Fig. 11 Adding host directives to a component Similarly to composing a directive out of other directives, we can apply the same approach to adding behavior to components using hostDirectives` API. This way, we could, for example, create a more specialized component or just apply the behavior of the directive to a whole host element: `ts @Component({ selector: 'app-highlight-and-border', standalone: true, template: My first component with border and highlight , styles: [ :host { cursor: pointer; display: block; padding: 16px; width: 500px; } , ], hostDirectives: [HighlightDirective, BorderDirective], }) export class HighlightAndBorderComponent {} ` Fig. 12 This component will render the paragraph, and apply both directives' behavior to the host element: `html ` Fig. 13 Just like we did for the directive, we can also expose and remap the directives inputs using the extended syntax. But if we would like to access and modify the directives inputs from within our component, we can also do that. This is where Angular's dependency injection comes in handy. We can inject the host directives via a constructor just like we would do for a service. After we have the directives instances available, we can modify them ie. in the ngOnInit` lifecycle hook: `ts export class HighlightAndBorderComponent { constructor( public highlight: HighlightDirective, public border: BorderDirective ) {} ngOnInit(): void { this.highlight.color = 'lightcoral'; this.border.color = 'red'; } } ` Fig. 14 With this change, the code from Fig. 13 will use lightcoral` as a background color and `red` as a border color. Performance Note While this API gives us a powerful tool-set for reusing behaviors across different components, it can impact the performance of our application if used excessively. For each instance of a given composed component Angular will create objects of the component class itself as well as an instance of each directive that it is composed of. If the component appears only a couple of times in the application. then it won't make a significant difference. However, if we create, for example, a composed checkbox component that appears hundreds of times in the app, this may have a noticeable performance impact. Please make sure you use this pattern with caution, and profile your application in order to find the right composition pattern for your application. Summary As I have shown in the above examples, the directives composition API can be a quite useful but easy-to-use tool for extracting behaviors into smaller directives and combining them into more complex behaviors. In case you have any questions, you can always tweet or DM me at @ktrz. I'm always happy to help!...

Intro to DevRel: What's the Difference Between External and Internal DevRel Programs? cover image

Intro to DevRel: What's the Difference Between External and Internal DevRel Programs?

Developer Relations (DevRel__) is a proactive, multifaceted discipline that bridges the gap between developers and companies to drive adoption while cultivating an energetic and supportive developer community for their product, service, or technology. The term and the profession are often misunderstood even among those in other technical roles. Some have never heard of DevRel before, and others believe it’s a kind of tech support for developers. Many organizations even think starting a DevRel program means just giving away free software and hoping it catches on. But DevRel is none of these things. At its core, a successful DevRel program builds strong bonds within their target market to ensure that developers can interface with a company or organization behind the product they’re using. Great teams establish authentic connections with developers, cultivate trust, and actively engage with them. DevRel defies traditional marketing strategies. Instead of prioritizing numbers and eyes that contribute to a sales funnel, it focuses on enhancing developer satisfaction. This creates a feedback loop between users and a company to better meet their needs, and foster a sense of collaboration within a product’s user community. The Two Main Domains of Developer Relations DevRel is split into 2 main domains__: __external__ and __internal__. External: Accessing an existing developer community If a company already has a product with an existing community or a product that may appeal to an existing community, and they want to establish a DevRel program around it, this would fall within the external domain. A successful external program will establish credibility and support developers through a number of evangelistic measures like blog posts, tutorials, webinars, giving talks at meetups and conferences, or creating useful code examples to teach concepts. These activities and their goals are rarely product-specific. Instead, they incorporate a number of technologies within their product’s technical ecosystem to demonstrate its value to a developer’s workflow. I had the pleasure of working with Doron Sherman during his tenure at Cloudinary as VP of Developer Relations. Doron has extensive experience with building developer communities, and successfully advocated internally to build a website called Media Jams, a learning resource for developers working with media in their apps. By having this initiative live under Developer Relations, and not under Product, Marketing, or Engineering, Doron and his team built quickly and created a site that prioritized education, without needing to meet the business objectives of other parts of the organization. > “Media Jams has had great organic growth as a community resource. We were able to attract non-Cloudinary users as well as organic search traffic of those looking for media use cases who would have otherwise gotten lost in the Cloudinary docs and/or could not find help through the Cloudinary blog or knowledge base.” says Doron. Internal: Building a developer community In order to support the adoption and retention of developers using a product, companies must have a space where developers can interface with them. Building their own community around a product is the best way to do this. By creating open lines of communication, developers can provide immediate feedback about a product in a productive way to product and engineering teams thereby shortening the feedback loop and improving the speed at which a team is able to innovate based on user needs. This strategy falls under the internal domain. These forums also provide synergistic opportunities for developers that are using a product to learn from each other. By working on similar problems, developers are able to bond and feel more ownership or excitement toward a product, increasing user retention. Danny Thompson, a developer influencer and mentor who has built a community of over a quarter million followers, says that he admires Appwrite’s DevRel program, helmed by Tessa Mero, Head of Developer Relations: > “The Appwrite DevRel team is great at answering questions. They are on Discord, jumping on calls with developers, answering questions, and doing office hours, all of which are super valuable in building that community. The main difference between Appwrite DevRel and other teams is, a lot of communities are run very passively and not always available or taking an active approach within community forums to help out.” - Danny Thompson on Appwrite. > “When we think about how to become successful as a company through DevRel, our first consideration is, what made us successful in the first place? Appwrite became an open-source company and a successful open-source project because of community, so we focus on a community-first approach. Contributors and developers that have supported us since before we were a company are what led us to where we are now. Every initiative, every planning, and everything we do on our team, we consider the community's feedback and perspective before we make any decisions.” - Tessa Mero at Appwrite. The Value-First Approach to Developer Relations Successful DevRel programs prioritize delivering value to cultivate credibility among developers and support product adoption free from reciprocal demands. External efforts involve engaging with existing technology communities, establishing credibility through various evangelistic measures, and delivering value to the community. On the other hand, internal programs build communities around their product, facilitating direct communication between developers and the company. These internal forums not only enhance user retention but also foster a space for developers to learn from each other, creating a sense of ownership and excitement around the product. And by diverting equity to these two programs, DevRel teams find new users, retain them, and receive invaluable feedback. Real-world examples, such as Doron Sherman's work at Cloudinary and Tessa Mero's leadership at Appwrite, showcase the effectiveness of DevRel in action, and highlight how DevRel programs contribute to the success and sustainability of developer-focused products. In the ever-evolving landscape of technology, DevRel emerges not only as a bridge between developers and organizations, but as a crucial driver of innovation, ensuring products remain relevant, adaptive, and deeply integrated into the communities they serve. If you’re thinking about building a successful DevRel program for the first time, the best place to start is to reflect on some of your favorite brands and how they connect with the developer community. Do they simply distribute discount codes and free swag, or are they reaching out to their users, and providing them a platform to learn, collaborate with others, and contribute? If they are, what methods do they use, and how do those methods coincide with your team’s existing strengths? And if you ever have any questions or want to connect with a DevRel specialist, do not hesitate to reach out!...