In a previous post, I explained how you can handle your HTML Forms using RxJS and TypeScript.
Using a Reactive approach, I will show you some techniques to validate an HTML Form using static types, and the help of some powerful RxJS operators.
The HTML Form
Let's define the following HTML Form as a starting point.
<div class="container">
  <div class="wrapper">
    <form class="form" novalidate>
      <div class="form-group needs-validation">
        <label for="email">Email address</label>
        <input type="email" class="form-control" id="email" required />
        <span class="invalid-feedback"></span>
      </div>
      <div class="form-group needs-validation">
        <label for="password">Password</label>
        <input type="password" class="form-control" id="password" required />
        <span class="invalid-feedback"></span>
      </div>
      <button disabled id="submit" type="button" class="btn btn-primary">Submit</button>
    </form>
  </div>
</div>
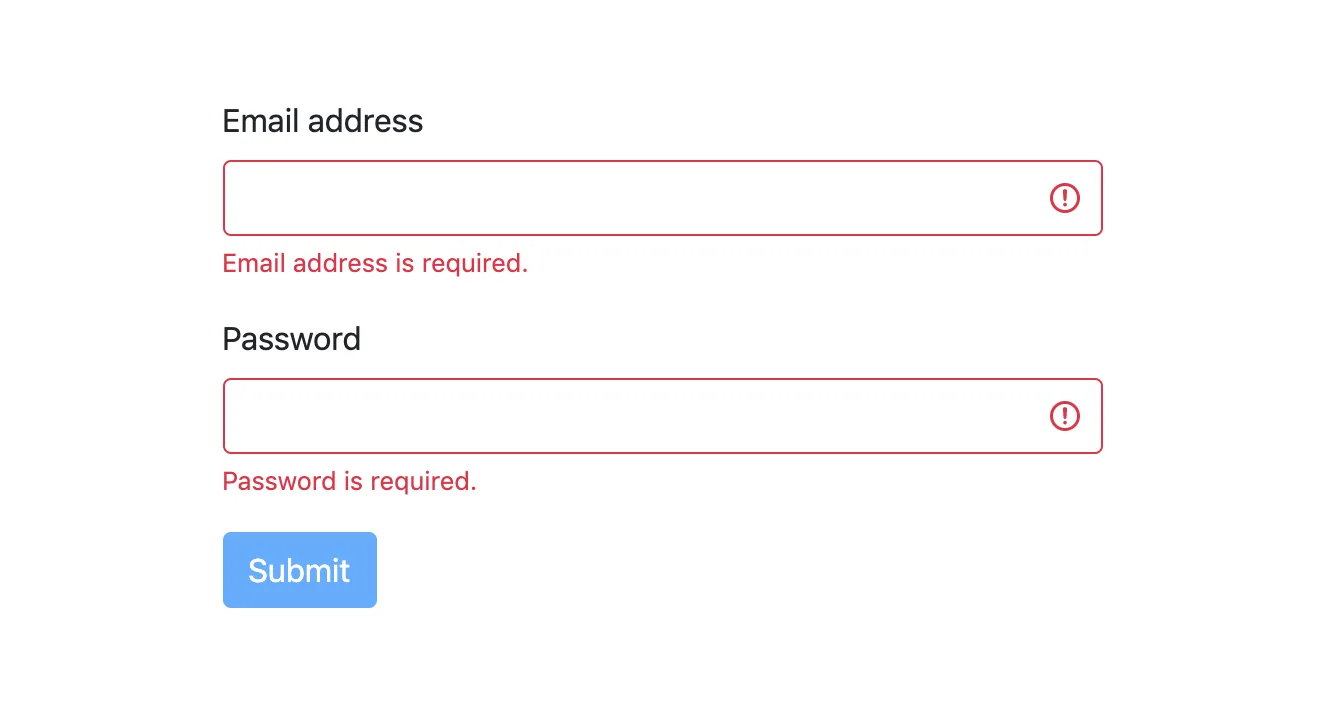
The previous markup is using Bootstrap which is a powerful CSS framework that contains several styles ready to use. At the same time, we can rely on Bootstrap Validation to provide actionable feedback to the users as the next screen shows.
The Validation Rules
In a real-world scenario, the HTML Form will add a set of validation rules. The HTML code defined above sets the "Email Address" and "Password" as required fields.
You may be interested in adding more validation rules to your input elements. In that case, please see the Form Input attributes.
The TypeScript Model and the DOM Elements
As an easy way to define a model for the data associated with the HTML Form, let's create a TypeScript Interface:
// user.ts
export interface User {
  email?: string;
  password?: string;
}
Then, we can create a variable to store the User model:
let userModel: User = {};
Now we're ready to declare some variables to provide access to the most important DOM Elements:
// DOM Elements - declaration
let emailInput: HTMLInputElement;
let passwordInput: HTMLInputElement;
let buttonElement: HTMLButtonElement;
In the TypeScript world, it's important to set the appropriate data type to the variables. In this case, we use the HTMLInputElement and HTMLButtonElement interfaces.
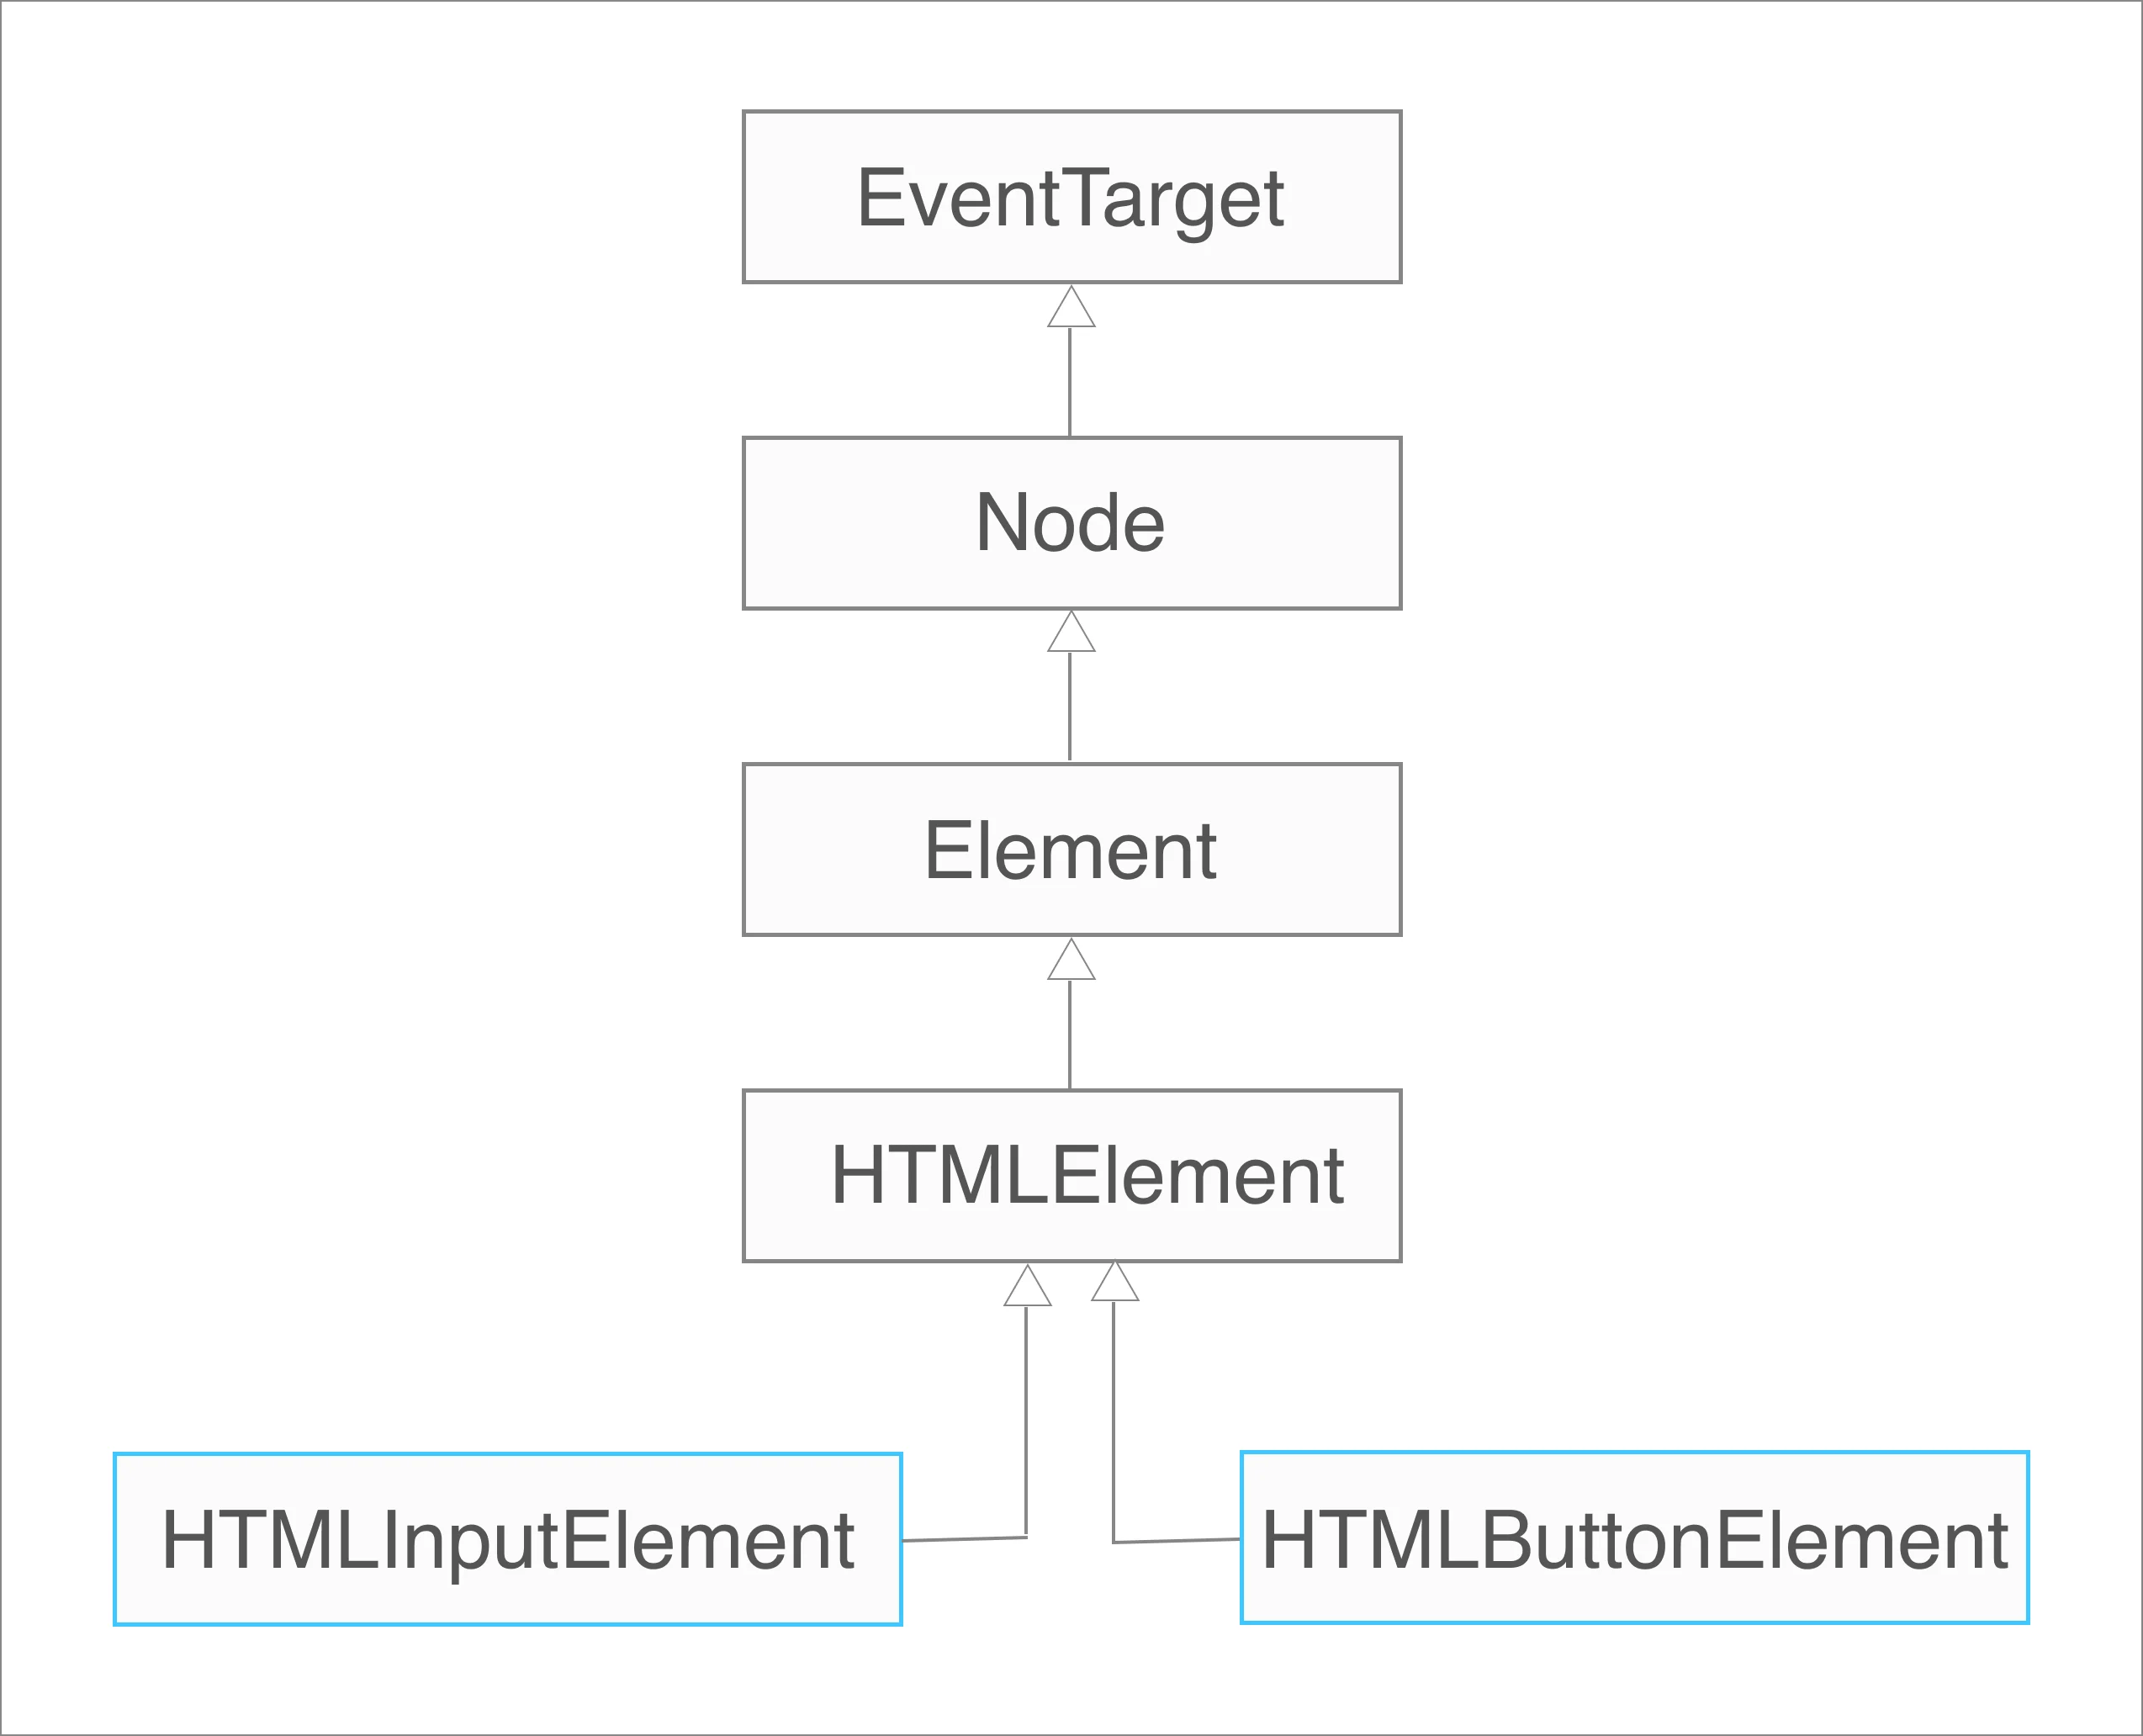
Both Interfaces provide special properties and methods for manipulating <input> and <button> elements, respectively.
The Input Events as Observables
Following a Reactive Programming approach, we'll need to consider streams and Observables to process all events in the HTML Form.
// DOM Elements validation as Observables - declaration
let emailValidation$: Observable<InputEvent>;
let passwordValidation$: Observable<InputEvent>;
let submit$: Observable<MouseEvent>;
RxJS provides the fromEvent operator(a creation operator) to turn any event into an Observable:
// DOM events as Observables - assignation
emailValidation$ = fromEvent<InputEvent>(emailInput, "keyup");
passwordValidation$ = fromEvent<InputEvent>(passwordInput, "keyup");
submit$ = fromEvent<MouseEvent>(buttonElement, "click");
From this point, we're ready to receive the keyup events from <input> elements. The same applies to the click event from the <button> component.
Let's see how we can process the stream of events we have already in the next section.
The Inputs Validation as an Observable
Keep in mind, we have two streams to process the <input> events. Both of them are available in emailValidation$ and passwordValidation$ variables.
Since we applied the same validation rule for them, we can create a single stream to process the "required" rule as follows:
const inputsValidation$ = merge(emailValidation$, passwordValidation$);
The previous code snippet shows a use of the merge operator from RxJS, which can be used to turn multiple observables into a single one.
In that way, we can define a single block to process both <input> events.
// Inputs Validation processing
inputsValidation$
  .pipe(
    map((event: InputEvent) => event.target as HTMLInputElement),
    map((input: HTMLInputElement) => ({ input, validity: input.validity }))
  )
  .subscribe(({ input, validity }) => {
    console.log({ input, validity });
    validateAsRequired(input, validity);
  });
Here is what is happening:
- inputsValidation$ is an Observable. No matter if it's the "email" or the "password" input event, it will be processed using pipeable operators(RxJS).
- pipe() function provides a readable way to use operators together, one operation after another.
- The first map() operator applies a "transformation" over the event object: Extracts the
targetproperty and returns it as anHTMLInputElement. - The second map() operator takes the
HTMLInputElementas input and "transforms" it to a new object that contains:{input: HTMLInputElement, validity: ValidityState}. - subscribe() call is needed to run the Observable. It receives the final object returned by the latest
mapoperator, and is used to call thevalidateAsRequiredfunction.
Handle the DOM to Show/Hide the Error Messages
Luckily, in the JavaScript world, we can find a set of APIs to access and update the DOM. We do use some of them to add or remove classes, and even update the displayed text from an <span> element:
function validateAsRequired(input: HTMLInputElement, validity: ValidityState) {
  const formGroup = input.closest(".form-group") as HTMLDivElement;
  const labelElement = formGroup.querySelector("label") as HTMLLabelElement;
  const errorElement = formGroup.querySelector(
    ".invalid-feedback"
  ) as HTMLSpanElement;
  const valueMissing = validity.valueMissing;
  if (valueMissing) {
    formGroup.classList.remove("needs-validation");
    formGroup.classList.add("was-validated");
    errorElement.textContent = `${labelElement.textContent} is required.`;
  } else {
    formGroup.classList.remove("was-validated");
    formGroup.classList.add("needs-validation");
  }
}
Again, pay attention to the used Interfaces to ensure you have the right types, and then perform the right function calls, and access attributes of the DOM elements.
The Submit Button Validation as Observable
It only makes sense to have the "submit" button enabled if the validation rules are met in the HTML form, right?
Let's manage the disabled attribute in a Reactive Approach again:
const submitValidation$ = combineLatest(emailValidation$, passwordValidation$);
The previous code shows a use of the combineLatest operator from RxJS, which can emit a value from the last emitted values from each Observable.
// Submit button validation processing
submitValidation$
  .pipe(
    map(
      ([emailEvent, passwordEvent]) =>
        [emailEvent.target, passwordEvent.target] as [
          HTMLInputElement,
          HTMLInputElement
        ]
    ),
    map(
      ([emailInput, passwordInput]) =>
        emailInput.validity.valueMissing || passwordInput.validity.valueMissing
    )
  )
  .subscribe(formInvalid => {
    console.log({ formInvalid });
    if (formInvalid) {
      buttonElement.setAttribute("disabled", "true");
    } else {
      buttonElement.removeAttribute("disabled");
    }
  });
What is happening in that code block?
- submitValidation$ is an Observable which emits the
<input>events for both "email" and "password" at the same time - pipe() function, again, provides a readable way to use operators together
- The first map operator will take both events as
[InputEvent, InputEvent]and "transforms" it to[HTMLInputElement, HTMLInputElement](a TypeScript tuple with the<input>elements for "email" and "password") - The second map operator takes the
[HTMLInputElement, HTMLElement]tuple as input and "transforms" it to a boolean value that says if the HTML form is "invalid". - subscribe() call runs the Observable. It receives the boolean value, which is used to add or remove the "disabled" attribute to the submit button.
Processing the Submit action
The HTML form is ready to send the data, already validated. The "click" event processing is detailed below.
submit$.subscribe(() => {
  const email = emailInput.value;
  const password = passwordInput.value;
  userModel = { email, password };
  console.log("Sending User Model", { userModel });
});
We can be sure that this observable will be executed once the button is enabled as a consequence of having valid data.
Source Code Project
Find the complete project running in StackBlitz. Don't forget to open the browser's console to see the results.
You can follow me on Twitter and GitHub to see more about my work.