Skip to content

How to Resolve Nested Queries in Apollo Server

When working with relational data, there will be times when you will need to access information within nested queries. But how would this work within the context of Apollo Server?

In this article, we will take a look at a few code examples that explore different solutions on how to resolve nested queries in Apollo Server. I have included all code examples in CodeSandbox if you are interested in trying them out on your own.

Prerequisites

This article assumes that you have a basic knowledge of GraphQL terminology.

Table of Contents

How to resolve nested queries: An approach using resolvers and the filter method

In this first example, we are going to be working with two data structures called musicBrands and musicAccessories. musicBrands is a collection of entities consisting of id and name. musicAccessories is a collection of entities consisting of the product name, price, id and an associated brandId. You can think of the brandId as a foreign key that connects the two database tables.

We also need to set up the schemas for the brands and accessories.

const typeDefs = gql`
  scalar USCurrency

  type MusicBrand {
    id: ID!
    brandName: String
  }

  type MusicAccessories {
    id: ID!
    product: String
    price: USCurrency
    brandId: Int
    brand: MusicBrand
  }

  type Query {
    accessories: [MusicAccessories]
  }
`;

The next step is to set up a resolver for our Query to return all of the music accessories.

const resolvers = {
  Query: {
    accessories: () => musicAccessories,
  },
};

When we run the following query and start the server, we will see this JSON output:

query Query {
  accessories {
    product
    brand {
      brandName
    }
  }
}
{
  "data": {
    "accessories": [
      {
        "product": "NS Micro Violin Tuner Standard",
        "brands": null
      },
      {
        "product": "Standard Gong Stand",
        "brands": null
      },
      {
        "product": "Black Cymbal Mallets",
        "brands": null
      },
      {
        "product": "Classic Series XLR Microphone Cable",
        "brands": null
      },
      {
        "product": "Folding 5-Guitar Stand Standard",
        "brands": null
      },
      {
        "product": "Black Deluxe Drum Rug",
        "brands": null
      }
    ]
  }
}

As you can see, we are getting back the value of null for the brands field. This is because we haven't set up that relationship yet in the resolvers.

Inside our resolver, we are going to create another query for the MusicAccessories and have the value for the brands key be a filtered array of results for each brand.

const resolvers = {
  Query: {
    accessories: () => musicAccessories,
  },
  MusicAccessories: {
    // parent represents each music accessory
   brand: (parent) => {
      const isBrandInAccessory = (brand) => brand.id === parent.brandId;
      return musicBrands.find(isBrandInAccessory);
    },
  },
};

When we run the query, this will be the final result:

query Query {
  accessories {
    product
    brand {
      brandName
    }
  }
}
{
  "data": {
    "accessories": [
      {
        "product": "NS Micro Violin Tuner Standard",
        "brands": [
          {
            "brandName": "D'Addario"
          }
        ]
      },
      {
        "product": "Standard Gong Stand",
        "brands": [
          {
            "brandName": "Zildjian"
          }
        ]
      },
      {
        "product": "Black Cymbal Mallets",
        "brands": [
          {
            "brandName": "Zildjian"
          }
        ]
      },
      {
        "product": "Classic Series XLR Microphone Cable",
        "brands": [
          {
            "brandName": "D'Addario"
          }
        ]
      },
      {
        "product": "Folding 5-Guitar Stand Standard",
        "brands": [
          {
            "brandName": "Fender"
          }
        ]
      },
      {
        "product": "Black Deluxe Drum Rug",
        "brands": [
          {
            "brandName": "Zildjian"
          }
        ]
      }
    ]
  }
}

This single query makes it easy to access the data we need on the client side as compared to the REST API approach. If this were a REST API, then we would be dealing with multiple API calls and a Promise.all which could get a little messy.

You can find the entire code in this CodeSandbox example.

A refactored approach using Data Loaders and Data Sources

Even though our first approach does solve the issue of resolving nested queries, we still have an issue fetching the same data repeatedly. Let’s look at this example query:

query MyAccessories {
  accessories {
    id
    brand {
      id
      brandName
    }
  }
}

If we take a look at the results, we are making additional queries for the brand each time we request the information. This leads to the N+1 problem in our current implementation. We can solve this issue by using Data Loaders and Data Sources.

What are Data Loaders

Data Loaders are used to batch and cache fetch requests. This allows us to fetch the same data and work with cached results, and reduce the number of API calls we have to make.

To learn more about Data Loaders in GraphQL, please read this helpful article.

How to setup a Data Source

In this example, we will be using the following packages:

We first need to create a BrandAccessoryDataSource class which will simulate the fetching of our data.

class BrandAccessoryDataSource extends DataSource {
  ...
}

We will then set up a constructor with a custom Dataloader.

 constructor() {
    super();
    this.loader = new DataLoader((ids) => {
      if (!ids.length) {
        return musicAccessories;
      }

      return musicAccessories.filter((accessory) => ids.includes(accessory.id));
    });
  }

Right below our constructor, we will set up the context and cache.

 initialize({ context, cache } = {}) {
    this.context = context;
    this.cache = cache || new InMemoryLRUCache();
  }

We then want to set up the error handling and cache keys for both the accessories and brands. To learn more about how caching works with GraphQL, please read through this article.


  didEncounterError(error) {
    throw new Error(`There was an error loading data: ${error}`);
  }

  cacheKey(id) {
    return `music-acc-${id}`;
  }

  cacheBrandKey(id) {
    return `brand-acc-${id}`;
  }

Next, we are going to set up an asynchronous function called get which takes in an id. The goal of this function is to first check if there is anything in the cached results and if so return those cached results. Otherwise, we will set that data to the cache and return it. We will set the ttl(Time to Live in cache) value to 15 seconds.

  async get(id) {
    const cacheDoc = await this.cache.get(this.cacheKey(id));
    if (cacheDoc) {
      return JSON.parse(cacheDoc);
    }
    const doc = await this.loader.load(id);
    this.cache.set(this.cacheKey(id), JSON.stringify(doc), { ttl: 15 });
    return doc;
  }

Below the get function, we will create another asynchronous function called getByBrand which takes in a brand. This function will have a similar setup to the get function but will filter out the data by brand.

 async getByBrand(brand) {
    const cacheDoc = await this.cache.get(this.cacheBrandKey(brand.id));
    if (cacheDoc) {
      return JSON.parse(cacheDoc);
    }

   const musicBrandAccessories = musicAccessories.filter(
      (accessory) => accessory.brandId === brand.id
    );

    this.cache.set(
      this.cacheBrandKey(brand.id),
      JSON.stringify(musicBrandAccessories),
      { ttl: 15 }
    );

    return musicBrandAccessories;
  }

Setting up our schemas and resolvers

The last part of this refactored example includes modifying the resolvers. We first need to add an accessory key to our Query schema.

type Query {
  brands: [Brand]
  accessory(id: Int): Accessory
}

Inside the resolver, we will add the accessories key with a value for the function that returns the data source we created earlier.

  // this is the custom scalar type we added to the Accessory schema
  USCurrency,
  Query: {
    brands: () => musicBrands,
    accessory: (_, { id }, context) => context.dataSources.brandAccessories.get(id),
  },

We also need to refactor our Brand resolver to include the data source we set up earlier.

  Brand: {
    accessories: (brand, _, context) =>
      context.dataSources.brandAccessories.getByBrand(brand),
  },

Lastly, we need to modify our ApolloServer object to include the BrandAccessoryDataSource.

const server = new ApolloServer({
  typeDefs,
  resolvers,
  dataSources: () => ({ brandAccessories: new BrandAccessoryDataSource() }),
});

Here is the entire CodeSandbox example.

When the server starts up, click on the Query your server button and run the following query:

query Query {
  brands {
    id
    brandName
    accessories {
      id
      product
      price
    }
  }
}

Resolving nested queries when microservices are involved

Microservices is a type of architecture that will split up your software into smaller independent services. All of these smaller services can interact with a single API data layer. In this case, this data layer would be GraphQL. The client will interact directly with this data layer, and will consume API data from a single entry point.

microservices diagram

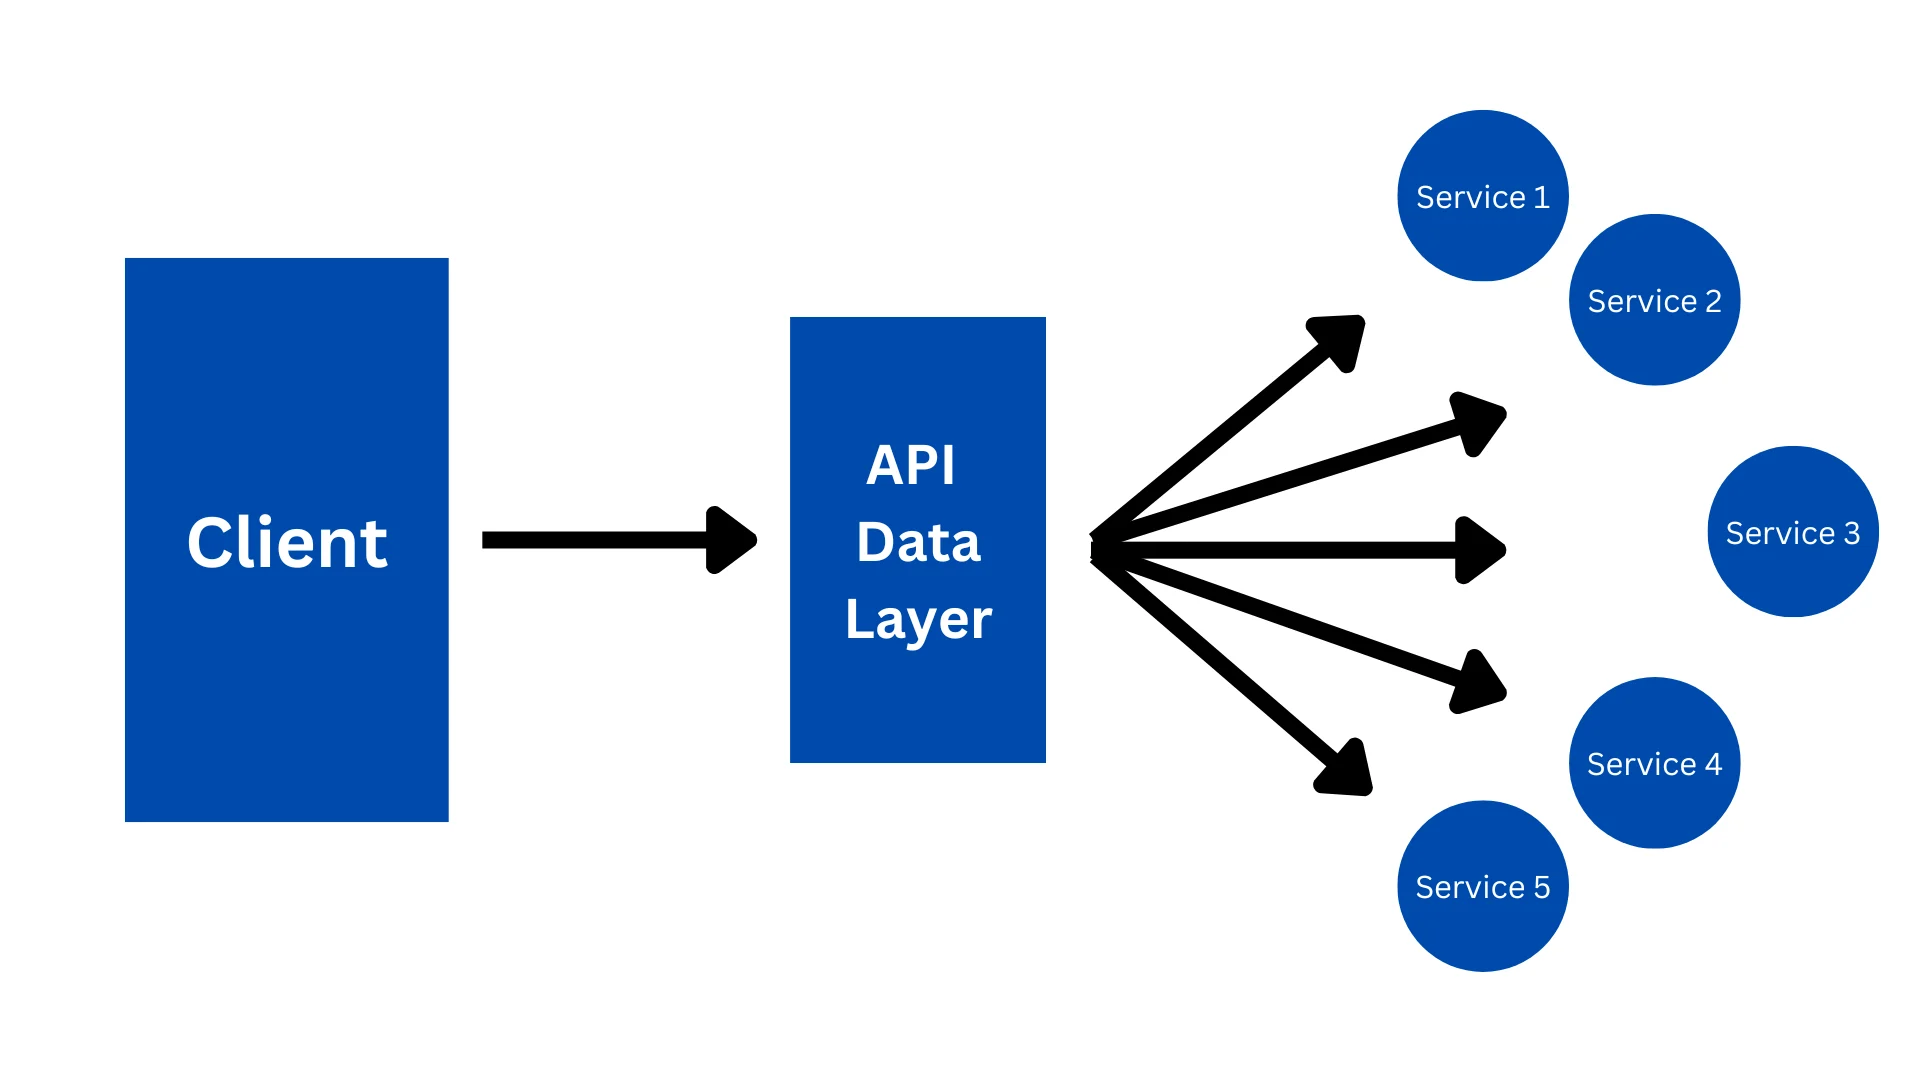
You would similarly resolve your nested queries as before because, at the end of the day, there are just functions. But now, this single API layer will reduce the number of requests made by the client because only the data layer will be called. This simplifies the data fetching experience on the client side.

Conclusion

In this article, we looked at a few code examples that explored different solutions on how to resolve nested queries in Apollo Server. The first approach involved creating custom resolvers and then using the filter method to filter out music accessories by brand. We then refactored that example to use a custom DataLoader and Data Source to fix the "N+1 problem". Lastly, we briefly touched on how to approach this solution if microservices were involved.

If you want to get started with Apollo Server and build your own nested queries and resolvers using these patterns, check out our serverless-apollo-contentful starter kit!

This Dot Labs is a development consultancy that is trusted by top industry companies, including Stripe, Xero, Wikimedia, Docusign, and Twilio. This Dot takes a hands-on approach by providing tailored development strategies to help you approach your most pressing challenges with clarity and confidence. Whether it's bridging the gap between business and technology or modernizing legacy systems, you’ll find a breadth of experience and knowledge you need. Check out how This Dot Labs can empower your tech journey.

You might also like

How to Create a GraphQL Rest API Wrapper and Enhance Your Data cover image

How to Create a GraphQL Rest API Wrapper and Enhance Your Data

Intro Today we will talk about wrapping a REST API with a GraphQL wrapper, which means that the REST API will be accessible via a different GraphQL API. We’ll be using Apollo Server for the implementation. This article assumes you have a basic understanding of REST API endpoints, and some knowledge of GraphQL. Here is the code repo if you want to review it while reading. With that said, we will be looking at why you would wrap a REST API, how to wrap an existing REST API, and how you can enhance your data using GraphQL. Why wrap a REST API with GraphQL There are a couple of different reasons to wrap a REST API. The first is migrating from an existing REST API, which you can learn about in detail here, and the second is creating a better wrapper for existing data. Granted, this can be done using REST. But for this article, we will focus on a GraphQL version. A reason for creating a better wrapper would be using a CMS that provides custom fields. For instance, you get a field that is listed as C435251, and it has a value of 532. This doesn’t mean anything to us. But when looking at the CMS these values could indicate something like “Breakfast Reservation” is set to “No”. So, with our wrapping, we can return it to a more readable value. Another example is connecting related types. For instance, in the code repo for this blog, we have a type Person with a connection to the type Planet. __Connection example__* ` type Person { """The name of this person.""" name: String """A planet that this person was born on or inhabits.""" homeworld: Planet } type Planet { """The name of this planet.""" name: String } ` How to Wrap a REST API Alright, you have your REST API, and you might wonder how to wrap it with GraphQL? First, you will call your REST API endpoint, which is inside your rest-api-sources file inside your StarwarsAPI class. __REST API example__* ` class StarwarsAPI { constructor() { this.axios = axios.create({ baseURL: 'https://swapi.dev/api/', }); } async getPerson(id) { const { data } = await this.axios.get(people/${id}`); return data } async getHomeworld(id) { const { data } = await this.axios.get(planets/${id}`); return data } } ` This above class will then be imported and used in the server/index file to set up your new Apollo server. __Apollo server example__* ` const StarwarsAPI = require('./rest-api-sources/starwars-rest-api'); const server = new ApolloServer({ typeDefs, resolvers, dataSources: () => ({}), context: () => { return { starwarsAPI: new StarwarsAPI(), }; }, }); ` Now, in your GraphQL resolver, you will make a person query and retrieve your starWarsAPI from it, which contains the information you want to call. __GraphQL resolver__* ` const resolvers = { Query: { person: async (, { id }, { starwarsAPI }) => { return await starwarsAPI.getPerson(id); }, }, }; ` With the above done, let's start on how to enhance your data in the resolver. Enhancing your data With our resolver up and running, we’ll now use it to enhance some of our data. For now, we’ll make the name we get back returned in a first name, and the last initial format. To do so above our Query, we’ll start a Person object and put the variable name inside it. We’ll then grab the name from our Query and proceed to tweak it into the format we want. __Enhancing in resolver__* ` Person: { name: ({ name }) => { if (!name) { return null; } const [first, last] = name.split(" ") if (last === undefined) { return first } return ${first} ${last[0].toUpperCase()}.` } }, ` Tada! Now, when we call our GraphQL, our name will return formatted in a first name, and last initial state. Conclusion Today's article covered why you want to wrap a REST API with GraphQL for migration or to provide a better API layer, how to wrap an existing REST API with GraphQL, and how you can use the resolver to enhance your data for things like name formatting. I hope it was helpful, and will give others a good starting point. If you want to learn more about GraphQL and REST API wrappers, read up on our resources available at graphql.framework.dev....

Ship Less JavaScript with GraphQL Resolvers cover image

Ship Less JavaScript with GraphQL Resolvers

In the past year or two, I’ve noticed a lot of folks online putting an emphasis on the size and amount of code we are shipping as JavaScript bundles in our web applications. And this makes sense. A lean JavaScript bundle is advantageous for many reasons like accessibility, mobile device/network experience, SEO, and overall speed of your web pages and applications. There are many ways that we can reduce the size of the JavaScript bundles that we ship without sacrificing using the tools and frameworks that we’re familiar with to build high-quality websites and applications. In this article, I want to highlight some ways that we can use GraphQL and tools like Apollo Server to reduce the amount of JavaScript that gets shipped in our bundles. This article assumes that you have some experience and familiarity with GraphQL. If you need an introduction to these concepts, check out this fantastic post from our blog: Migrating from REST to GraphQL. Otherwise, let's dig right into some different strategies and examples we can use to speed up our websites! For the sake of our examples going forward, we are going to pretend that we are working on an IMDB-like website for movies. **Defining schemas to get the most out of your API** One of the key benefits of GraphQL is the ability to define a schema that specifies the shape of the data that is available through the API. Defining a well-crafted GraphQL schema provides the ability to ship only the data that is actually needed by the client. In a REST API, it is common to fetch entire entities from a database, even if only a small portion of that data is actually needed by the client. With GraphQL, you have granular control over the data that is returned, allowing you to ship only the data that is required. Here’s a simple example schema to describe our movie API. It includes a query to fetch a list of films, and another to fetch a list of actors. as well as the shape of those entities, that we can request some or all of the fields from, using our GraphQL API. `graphql type Query { films(limit: Int): [Film] people(limit: Int): [Person] } type Film { title: String releaseDate: String actors: [Person] } type Person { name: String films: [Film] } ` Sub-query resolvers One particularly powerful feature of GraphQL is the ability to define sub-query resolvers. This allows you to specify relationships between different types of data in your schema, allowing the client to request related data in a single query. This can greatly reduce the number of API calls needed to fetch all of the data required by the client, ultimately leading to the shipment of less JavaScript. Based on our schema above, we can easily write a query to request a list of actors that played in a particular film. `graphql query { films(limit: 5) { title actors { name } } } ` Our Apollo Server sub-query resolver might look something like this: `graphql const resolvers = { Film: { actors: (film, , { dataSources }) => dataSources.peopleAPI.getActorsByFilm(film.id), }, } ` A quality GraphQL schema will provide more granular control to its clients, and will help prevent over-fetching of data. This is an easy way to reduce bytes sent across the wire, which will lead to improved performance in our applications. Moving client logic ito resolvers Resolvers are just functions that we write to fetch and aggregate the data that we defined in our schema. A simple concept that provides a powerful layer between our data sources and the contract we have defined with our GraphQL API. They are called by the GraphQL engine and are passed the arguments defined in our queries and a reference to the calling object. Let's update our films query to accept some additional arguments: `graphql type Query { films(limit: Int, title: String, year: Int, offset: Int): [Film] } ` Using the arguments defined on our films query, our client now has more control to only fetch the data they need. The limit and offset arguments that allow them to paginate the results so a single page will need to fetch and render a smaller amount of items at a time. Here’s what our resolver might look like using these new arguments to fetch a subset of the data that is available: `graphql const resolvers = { Query: { films: async (, { limit, title, year, offset }, { dataSources }) => { return dataSources.filmAPI.getFilms({ limit, title, year, offset }); }, }, } ` Magic Fields Another way to use resolvers is to create "magic fields" that are single-purpose data transformations. For example, we could create a field on the Person` type called `latestFilm` that returns the actor’s most recent film, rather than returning a list of all of the user's posts and having the client filter through them. This can save on both the amount of data shipped, and the amount of processing required by the client. `graphql type Person { name: String films: [Film] latestFilm: Film } ` Transformational Resolvers Transformational resolvers allow you to perform transformations on the data before it is returned to the client, reducing the need for complex data manipulation logic on the client side. For example, in your film type, you can use an `enum`** to allow the client to request the release date in different formats, such as **`SHORT`** or **`LONG`**. `graphql enum DateFormat { SHORT LONG } ` Then, you can use this format in your film query as a variable and pass it to the releaseDate field: `graphql query Film($id: ID!, $format: DateFormat) { film(id: $id) { id releaseData(format: $format) } } ` On the server side, you can define a resolver for the `releaseData`** field that takes the **`format`** variable as an argument, and performs the appropriate transformation before returning the data to the client. `graphql const resolvers = { Film: { releaseData: (film, { format }, { dataSources }) => { if (format === DateFormat.SHORT) { // Perform short format transformation return shortFormatDate(film.releaseDate); } else if (format === DateFormat.LONG) { // Perform long format transformation return longFormatDate(film.releaseDate); } }, }, } ` This way, the client can request the release date in the format they need, and the server can handle the transformation before returning the data. This reduces the amount of code needed on the client side to manipulate the data and improves the performance of the application. It's worth noting that in some cases, it may make sense to keep some of the data manipulation logic on the client side. The goal is to find the right balance between server and client-side code, and to make sure that the code you ship to the client only contains the logic that is necessary for the user experience. **Wrapping REST APIs to leverage GraphQL features** In some cases, you may not have the ability to create a new GraphQL API from scratch. Fortunately, it is possible to wrap existing REST APIs with GraphQL using tools such as Apollo Server. This allows you to take advantage of the benefits of GraphQL, even if you don't have control over the underlying API(s). In our movie application, instead of having our own database of films and actors we might have used the IMDB API instead. Apollo Server specifically provides us with abstractions around the data sources that we use to resolve our data from. Conclusion In conclusion, GraphQL is a powerful tool that can be used to ship less JavaScript to the client, resulting in improved performance for your web application. By defining well-crafted schemas, and utilizing resolvers effectively, you can reduce the amount of data shipped over the network and the amount of processing required by the client. If you are working with existing REST APIs already, you can use tools like Apollo Server to wrap them and take advantage of the benefits of GraphQL. Whether you are building a new application or optimizing an existing one, consider using GraphQL to ship less JavaScript, and improve the performance of your app. If you want to learn more about GraphQL, check out graphql.framework.dev, our open-source library filled with curated GraphQL resources!...

Introducing the Next.js 12 and Chakra UI Starter Kit cover image

Introducing the Next.js 12 and Chakra UI Starter Kit

Next.js is a very popularly used React framework, and to help support developers using Next, This Dot Labs has just created a new starter kit that they can use to bootstrap their next projects. This Next.js 12 starter kit comes with formatting, linting, example components, unit testing and styling with Chakra UI. In this article, we will take a deeper look into what this kit has to offer. Table of Contents - How to initialize a new project - Technologies and tools included with the kit - Next.js v.12 - Chakra UI - Jest - Storybook - ESLint and Prettier - A note about state management - Deployment options - Reasons for using this kit - Conclusion How to initialize a new project 1. Run npm create @this-dot/starter -- --kit next12-chakra-ui` or `yarn create @this-dot/starter --kit next12-chakra-ui` 2. Follow the prompts to select the next12-chakra-ui` starter kit, and name your new project. 3. cd` into your project directory and run `npm install` or `yarn install` . 4. Run npm run dev` or `yarn run dev` to start the development server. 5. Open your browser to http://localhost:3000` to see the included example code running. Technologies and tools included with the kit Next.js v.12 This starter kit uses version 12 of Next.js with the TypeScript configuration. We have also included an example inside the src/pages/api/hello.ts` file on how to work with the built-in types for API routes. `js import type { NextApiRequest, NextApiResponse } from "next"; type Data = { name: string, }; export default function handler( req: NextApiRequest, res: NextApiResponse ) { res.status(200).json({ name: "This Dot Labs" }); } ` Chakra UI This starter kit uses Chakra UI for all of the styling. We have already setup the ChakraProvider` inside the `src/pages/_app.tsx` file, which includes extended theme objects for colors, font weights, and breakpoints that you can customize to your liking. `js const colors = { brand: { 50: "#1a365d", 100: "#153e75", 500: "#2464ec", }, }; const fontWeights = { normal: 400, medium: 600, bold: 800, }; const breakpoints = { sm: "320px", md: "768px", lg: "960px", xl: "1200px", }; export const theme = extendTheme({ colors, fontWeights, breakpoints }); function MyApp({ Component, pageProps }: AppProps) { return ( ); } ` You can take a look at any of the example components inside of the src/components` folder on how to best use Chakra's components. Jest This starter kit uses the Jest testing framework for its unit tests. The unit tests for the home page can be found in the __tests__` directory. ` . ├── Counter.test.tsx ├── Greeting.test.tsx └── index.test.tsx ` Storybook This starter kit comes with Storybook so you can test out your UI components in isolation. We have also included the @storybook/addon-a11y` addon, which is used to check for common accessibility errors in your components. When you run Storybook, each story will show detailed explanations with suggested fixes if errors are found. Examples of stories can be found in the components directory. ESLint and Prettier This start kit uses ESLint for linting and Prettier for formatting. All of the configurations have been setup for you so you can get to building out your project faster. A note about state management This starter kit does not use a global state management library. Instead we are managing state within the routing system. For examples, please look at the /src/pages/counter-example.tsx` and `src/pages/fetch-example.tsx` files. Deployment options You can use services like Netlify or Vercel to deploy your application. Both of these services will come with a built-in CI/CD pipeline and live previews. Reasons for using this kit Next.js is a versatile framework, and can be used for a variety of situations. Here are some examples of what you can use our starter kit for. - personal blog - e commerce application - user dashboard application - MVP (Minimum Viable Product) Conclusion Next.js has a lot to offer, and this new starter kit will help you bootstrap your next project. Study the example components to learn about best practices with Next.js and Chakra UI. Get started building out new features for your project with our new starter kit!...

Testing a Fastify app with the NodeJS test runner cover image

Testing a Fastify app with the NodeJS test runner

Introduction Node.js has shipped a built-in test runner for a couple of major versions. Since its release I haven’t heard much about it so I decided to try it out on a simple Fastify API server application that I was working on. It turns out, it’s pretty good! It’s also really nice to start testing a node application without dealing with the hassle of installing some additional dependencies and managing more configurations. Since it’s got my stamp of approval, why not write a post about it? In this post, we will hit the highlights of the testing API and write some basic but real-life tests for an API server. This server will be built with Fastify, a plugin-centric API framework. They have some good documentation on testing that should make this pretty easy. We’ll also add a SQL driver for the plugin we will test. Setup Let's set up our simple API server by creating a new project, adding our dependencies, and creating some files. Ensure you’re running node v20 or greater (Test runner is a stable API as of the 20 major releases) Overview `index.js` - node entry that initializes our Fastify app and listens for incoming http requests on port 3001 `app.js` - this file exports a function that creates and returns our Fastify application instance `sql-plugin.js` - a Fastify plugin that sets up and connects to a SQL driver and makes it available on our app instance Application Code A simple first test For our first test we will just test our servers index route. If you recall from the app.js` code above, our index route returns a 501 response for “not implemented”. In this test, we're using the createApp` function to create a new instance of our Fastify app, and then using the `inject` method from the Fastify API to make a request to the `/` route. We import our test utilities directly from the node. Notice we can pass async functions to our test to use async/await. Node’s assert API has been around for a long time, this is what we are using to make our test assertions. To run this test, we can use the following command: By default the Node.js test runner uses the TAP reporter. You can configure it using other reporters or even create your own custom reporters for it to use. Testing our SQL plugin Next, let's take a look at how to test our Fastify Postgres plugin. This one is a bit more involved and gives us an opportunity to use more of the test runner features. In this example, we are using a feature called Subtests. This simply means when nested tests inside of a top-level test. In our top-level test call, we get a test parameter t` that we call methods on in our nested test structure. In this example, we use `t.beforeEach` to create a new Fastify app instance for each test, and call the `test` method to register our nested tests. Along with `beforeEach` the other methods you might expect are also available: `afterEach`, `before`, `after`. Since we don’t want to connect to our Postgres database in our tests, we are using the available Mocking API to mock out the client. This was the API that I was most excited to see included in the Node Test Runner. After the basics, you almost always need to mock some functions, methods, or libraries in your tests. After trying this feature, it works easily and as expected, I was confident that I could get pretty far testing with the new Node.js core API’s. Since my plugin only uses the end method of the Postgres driver, it’s the only method I provide a mock function for. Our second test confirms that it gets called when our Fastify server is shutting down. Additional features A lot of other features that are common in other popular testing frameworks are also available. Test styles and methods Along with our basic test` based tests we used for our Fastify plugins - `test` also includes `skip`, `todo`, and `only` methods. They are for what you would expect based on the names, skipping or only running certain tests, and work-in-progress tests. If you prefer, you also have the option of using the describe` → `it` test syntax. They both come with the same methods as `test` and I think it really comes down to a matter of personal preference. Test coverage This might be the deal breaker for some since this feature is still experimental. As popular as test coverage reporting is, I expect this API to be finalized and become stable in an upcoming version. Since this isn’t something that’s being shipped for the end user though, I say go for it. What’s the worst that could happen really? Other CLI flags —watch` - https://nodejs.org/dist/latest-v20.x/docs/api/cli.html#--watch —test-name-pattern` - https://nodejs.org/dist/latest-v20.x/docs/api/cli.html#--test-name-pattern TypeScript support You can use a loader like you would for a regular node application to execute TypeScript files. Some popular examples are tsx` and `ts-node`. In practice, I found that this currently doesn’t work well since the test runner only looks for JS file types. After digging in I found that they added support to locate your test files via a glob string but it won’t be available until the next major version release. Conclusion The built-in test runner is a lot more comprehensive than I expected it to be. I was able to easily write some real-world tests for my application. If you don’t mind some of the features like coverage reporting being experimental, you can get pretty far without installing any additional dependencies. The biggest deal breaker on many projects at this point, in my opinion, is the lack of straightforward TypeScript support. This is the test command that I ended up with in my application: I’ll be honest, I stole this from a GitHub issue thread and I don’t know exactly how it works (but it does). If TypeScript is a requirement, maybe stick with Jest or Vitest for now 🙂...