Skip to content

How to Setup Your Own Infrastructure Using the AWS Toolkit and CDK v2

This article was written over 18 months ago and may contain information that is out of date. Some content may be relevant but please refer to the relevant official documentation or available resources for the latest information.

Suppose you want to set up your infrastructure on AWS, but avoid going over the manual steps, or you want reproducible results. In that case, CDK might be the thing for you.

CDK stands for Cloud Development Kit; it allows you to program your hosting setup using either TypeScript, JavaScript, Python, Java, C#, or Go. CDK does require you to be familiar with AWS terminology. This series will explain the services used, but it might be a good idea to read up on what AWS offers. Or read one of our earlier articles on AWS.

CDK is imperative, which means you can code your infrastructure. There is a point to be made, however, that it behaves more like a declarative tool. All the code one writes ends up in a stack definition. This definition is sent to AWS to set up the desired services, or alter an already running stack. The imperative approach allows one to do easy conditional statements or loops without learning a new language.

AWS Toolkit

To make things easier for us, AWS offers the AWS Toolkit for VS code. The installation of the plugin in VS Code is straightforward. We had some issues with the authentication, and recommend using the "Edit credentials" route over the "Add a new connection" option.
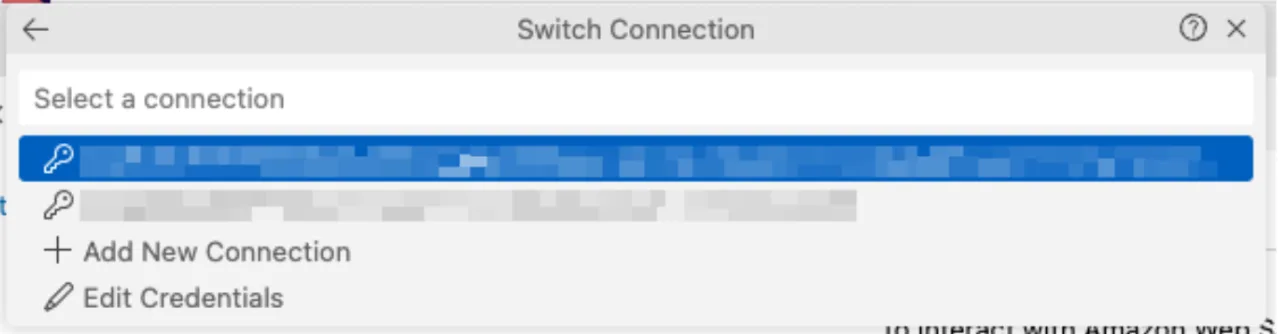
Screenshot 2023-03-02 202842

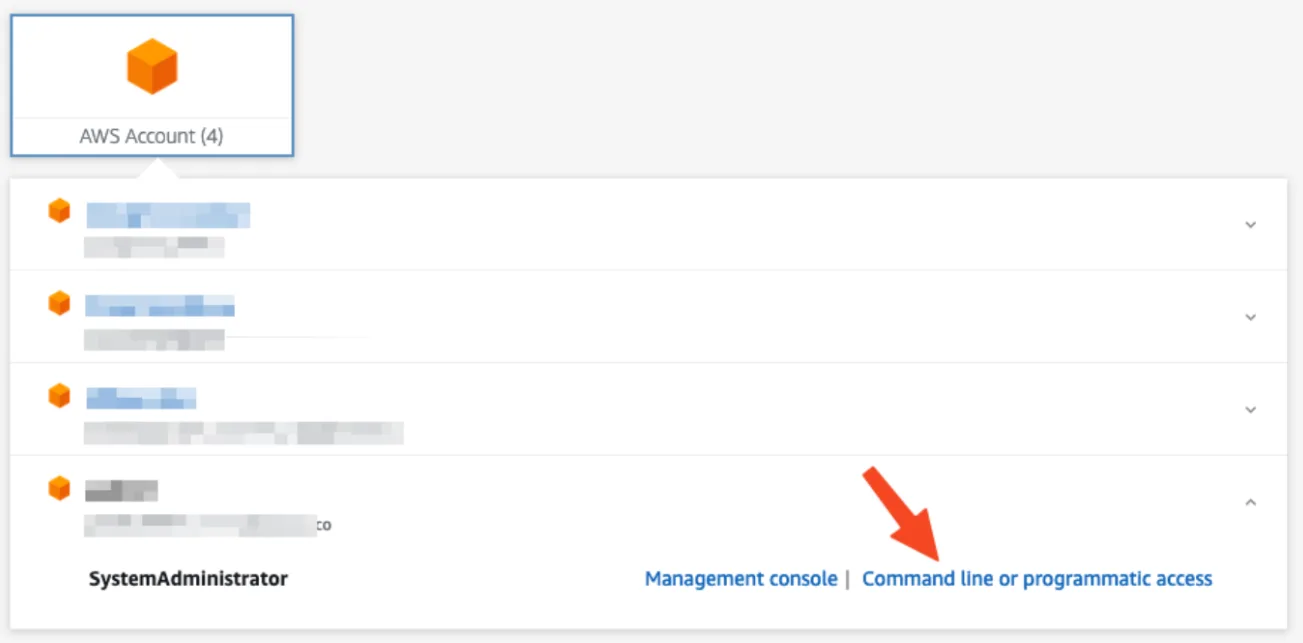
When on the account start page, select the profile you'd like to use. Open the accordion, so it shows the authentication options. Pick "Command line or programmatic access" to open a dialog with the required values.
Screenshot 2023-03-02 203049

Click the text underneath the heading "Option 2: Add a profile to your AWS credentials file". This will automatically copy the values for you. Next, go back to VS Code, and paste these values into your credentials file. Feel free to change the name between the square brackets to something more human-readable. You can now pick this profile when connecting to AWS in VS Code.

First stack

With our handy toolkit ready, let's deploy our first stack to AWS using CDK. For this, the CDK needs to make a CloudFormation stack. In your terminal, create a new empty directory (the default name of the app will be the same as your directory's name) and navigate into it. Scaffold a new project with

cdk init app --language typescript

This will create all the required files to create your stack in AWS. From here on, we can bootstrap our AWS environment for use with CDK. Run the bootstrap command with the profile you’ve configured earlier. For example, I pasted my credentials, and named the profile ‘sandbox’.

cdk bootstrap –profile sandbox

CDK will now create the required AWS resources to deploy our stack. Having all our prerequisites met, let’s create a lambda to test if our stack is working properly. Create a new JavaScript file lambda/Hello.js containing this handler

exports.handler = async function (event) {
  return {
	statusCode: 200,
	headers: { "Content-Type": "text/plain" },
	body: `Hello, CDK! You've hit ${event.requestContext.domainName}\n`,
  };
};

And add our lambda to our stack in the constructor in lib/<name>-stack.ts

const helloLambda = new lambda.Function(this, "HelloHandler", {
  runtime: lambda.Runtime.NODEJS_18_X,
  code: lambda.Code.fromAsset("lambda"),
  handler: "Hello.handler",
});

That’s all we need to deploy our lambda to our stack. We can now run the deploy command, which will compare our new local configuration with what is already deployed. Before any changes are pushed, this diff will be displayed on your terminal, and ask for confirmation. This is a good moment to evaluate whether what you’ve written has correctly translated to the desired infrastructure.

cdk deploy –profile sandbox

This same command will push updates. Note that you will only see the diff and confirmation prompt when CDK is about to create new resources. When updating the contents of your Lambda function, it simply pushes the code changes.

Now in VS Code, within your AWS view, you’ll find a new CloudFormation, Lambda, and S3 bucket in the explorer view. Right click your Lambda to “Invoke on AWS”. This opens a new window for that specific Lambda. In the right-hand corner, click “Invoke”. The output window will open, and you should see the returned payload including the message we set in our handler.

This is not very practical yet. We’re still missing an endpoint to call from our client or browser. This can be done by adding a FunctionURL. Simply add the following line in your stack definition. The authentication is disabled for now, but this makes it possible to make a GET request to the lambda, and see its result. This might not be the desired situation, and AWS offers options to secure your endpoints.

  helloLambda.addFunctionUrl({ authType: lambda.FunctionUrlAuthType.NONE });

After redeploying this change, right click your Lambda in VS Code and copy the URL. Paste it in your browser and you should see the result of your Lambda! Our first stack is deployed and working.

Cleanup

By following this article, you should remain within the free tier of AWS and not incur any costs. To keep costs low, it’s a good practice to clean up your stacks that are no longer in use.

cdk destroy –profile sandbox

The CDK destroy command will remove your stack, but leaves the CDK bootstrapped for future deployments. If you want to fully remove all resources created by following this article, also remove the CloudFormation and S3 bucket. This can be done through VS Code by right clicking your CloudFormation and selecting “Delete CloudFormation Stack” and simply “Delete” for the associated S3 bucket. This brings you back to a completely clean slate and future use of the CDK should be bootstrapped again.

Round up

You should now be able to bootstrap CDK, Create a stack, and run a Lambda function within the stack which is accessible through a FunctionURL. You can grow your stack by adding more Lambda functions, augmenting the logic of those functions, or adding other AWS resources not covered in this article.

The setup created can be torn down and recreated in the exact same way over and over, making it easy to share with your team. Changes are incremental, and can be rolled back if need be. This should offer confidence in managing your infrastructure, over manually creating it through the AWS console.

Have fun building your own infrastructure!

This Dot is a consultancy dedicated to guiding companies through their modernization and digital transformation journeys. Specializing in replatforming, modernizing, and launching new initiatives, we stand out by taking true ownership of your engineering projects.

We love helping teams with projects that have missed their deadlines or helping keep your strategic digital initiatives on course. Check out our case studies and our clients that trust us with their engineering.

You might also like

How to automatically deploy your full-stack JavaScript app with AWS CodePipeline cover image

How to automatically deploy your full-stack JavaScript app with AWS CodePipeline

How to automatically deploy your full-stack JavaScript app from an NX monorepo with AWS CodePipeline In our previous blog post (How to host a full-stack JavaScript app with AWS CloudFront and Elastic Beanstalk) we set up a horizontally scalable deployment for our full-stack javascript app. In this article, we would like to show you how to set up AWS CodePipeline to automatically deploy changes to the application. APP Structure Our application is a simple front-end with an API back-end set up in an NX monorepo. The production built API code is hosted in Elastic Beanstalk, while the front-end is stored in S3 and hosted through CloudFront. Whenever we are ready to make a new release, we want to be able to deploy the new API and front-end versions to the existing distribution. In this article, we will set up a CodePipeline to deploy changes to the main branch of our connected repository. CodePipeline CodeBuild and the buildspec file First and foremost, we should set up the build job that will run the deploy logic. For this, we are going to need to use CodeBuild. Let's go into our repository and set up a build-and-deploy.buildspec.yml file. We put this file under the tools/aws/ folder. ` This buildspec file does not do much so far, we are going to extend it. In the installation phase, it will run npm ci to install the dependencies and in the build phase, we are going to run the build command using the ENVIRONMENT_TARGET variable. This is useful, because if you have more environments, like development and staging you can have different configurations and builds for those and still use the same buildspec file. Let's go to the Codebuild page in our AWS console and create a build project. Add a descriptive name, such as your-appp-build-and-deploy. Please provide a meaningful description for your future self. For this example, we are going to restrict the number of concurrent builds to 1. The next step is to set up the source for this job, so we can keep the buildspec file in the repository and make sure this job uses the steps declared in the yaml file. We use an access token that allows us to connect to GitHub. Here you can read more on setting up a GitHub connection with an access token. You can also connect with Oauth, or use an entirely different Git provider. We set our provider to GitHub and provided the repository URL. We also set the Git clone depth to 1, because that makes checking out the repo faster. In the Environment section, we recommend using an AWS CodeBuild managed image. We use the Ubuntu Standard runtime with the aws/codebuild/standard:7.0 version. This version uses Node 18. We want to always use the latest image version for this runtime and as the Environment type we are good with Linux EC2. We don't need elevated privileges, because we won't build docker images, but we do want to create a new service role. In the Buildspec section select Use a buildspec file and give the path from your repository root as the Buildspec name. For our example, it is tools/aws/build-and-deploy.buildspec.yml. We leave the Batch configuration and the Artifacts sections as they are and in the Logs section we select how we want the logs to work. For this example, to reduce cost, we are going to use S3 logs and save the build logs in the aws-codebuild-build-logs bucket that we created for this purpose. We are finished, so let's create the build project. CodePipeline setup To set up automated deployment, we need to create a CodePipeline. Click on Create pipeline and give it a name. We also want a new service role to be created for this pipeline. Next, we should set up the source stage. As the source provider, we need to use GitHub (version2) and set up a connection. You can read about how to do it here. After the connection is set up, select your repository and the branch you want to deploy from. We also want to start the pipeline if the source code changes. For the sake of simplicity, we want to have the Output artefact format as CodePipeline default. At the Build stage, we select AWS CodeBuild as the build provider and let's select the build that we created above. Remember that we have the ENVIRONMENT_TARGET as a variable used in our build, so let's add it to this stage with the Plaintext value prod. This way the build will run the build:prod command from our package.json. As the Build type we want Single build. We can skip the deployment stage because we are going to set up deployment in our build job. Review our build pipeline and create it. After it is created, it will run for the first time. At this time it will not deploy anything but it should run successfully. Deployment prerequisites To be able to deploy to S3 and Elastic Beanstalk, we need our CodeBuild job to be able to interact with those services. When we created the build, we created a service role for it. In this example, the service role is codebuild-aws-test-build-and-deploy-service-role. Let's go to the IAM page in the console and open the Roles page. Search for our codebuild role and let's add permissions to it. Click the Add permissions button and select Attach policies. We need two AWS-managed policies to be added to this service role. The AdministratorAccess-AWSElasticBeanstalk will allow us to deploy the API and the AmazonS3FullAccess will allow us to deploy the front-end. The CloudFrontFullAccess will allow us to invalidate the caches so CloudFront will send the new front-end files after the deployment is ready. Deployment Upload the front-end to S3 Uploading the front-end should be pretty straightforward. We use an AWS CodeBuild managed image in our pipeline, therefore, we have access to the aws command. Let's update our buildspec file with the following changes: ` First, we upload the fresh front-end build to the S3 bucket, and then we invalidate the caches for the index.html file, so CloudFront will immediately serve the changes. If you have more static files in your app, you might need to invalidate caches for those as well. Before we push the above changes up, we need to update the environment variables in our CodePipeline. To do this open the pipeline and click on the Edit button. This will then enable us to edit the Build stage. Edit the build step by clicking on the edit button. On this screen, we add the new environment variables. For this example, it is aws-hosting-prod as Plaintext for the FRONT_END_BUCKET and E3FV1Q1P98H4EZ as Plaintext for the CLOUDFRONT_DISTRIBUTION_ID Now if we add changes to our index.html file, for example, change the button to HELLO 2, commit it and push it. It gets deployed. Deploying the API to Elastic Beanstalk We are going to need some environment variables passed down to the build pipeline to be able to deploy to different environments, like staging or prod. We gathered these below: - COMMIT_ID: #{SourceVariables.CommitId} - This will have the commit id from the checkout step. We include this, so we can always check what commit is deployed. - ELASTIC_BEANSTALK_APPLICATION_NAME: Test AWS App - This is the Elastic Beanstalk app which has your environment associated. - ELASTIC_BEANSTALK_ENVIRONMENT_NAME: TestAWSApp-prod - This is the Elastic Beanstalk environment you want to deploy to - API_VERSION_BUCKET: elasticbeanstalk-us-east-1-474671518642 - This is the S3 bucket that was created by Elastic Beanstalk With the above variables, we can make some new variables during the build time, so we can make sure that every API version is unique and gets deployed. We set this up in the install phase. ` The APP_VERSION variable is the version property from the package.json file. In a release process, the application's version is stored here. The API_VERSION variable will contain the APP_VERSION and as a suffix, we include the build number. We want to upload this API version by indicating the commit ID, so the API_ZIP_KEY will have this information. The APP_VERSION_DESCRIPTION will be the description of the deployed version in Elastic Beanstalk. Finally, we are going to update the buildspec file with the actual Elastic Beanstalk deployment steps. ` Let's make a change in the API, for example, the message sent back by the /api/hello endpoint and push up the changes. --- Now every time a change is merged to the main branch, it gets pushed to our production deployment. Using these guides, you can set up multiple environments, and you can configure separate CodePipeline instances to deploy from different branches. I hope this guide proved to be helpful to you....

How to host a full-stack app with AWS CloudFront and Elastic Beanstalk cover image

How to host a full-stack app with AWS CloudFront and Elastic Beanstalk

How to host a full-stack JavaScript app with AWS CloudFront and Elastic Beanstalk Let's imagine that you have finished building your app. You have a Single Page Application (SPA) with a NestJS back-end. You are ready to launch, but what if your app is a hit, and you need to be prepared to serve thousands of users? You might need to scale your API horizontally, which means that to serve traffic, you need to have more instances running behind a load balancer. Serving your front-end using a CDN will also be helpful. In this article, I am going to give you steps on how to set up a scalable distribution in AWS, using S3, CloudFront and Elastic Beanstalk. The NestJS API and the simple front-end are both inside an NX monorepo The sample application For the sake of this tutorial, we have put together a very simple HTML page that tries to reach an API endpoint and a very basic API written in NestJS. The UI The UI code is very simple. There is a "HELLO" button on the UI which when clicked, tries to reach out to the /api/hello endpoint. If there is a response with status code 2xx, it puts an h1 tag with the response contents into the div with the id result. If it errors out, it puts an error message into the same div. ` The API We bootstrap the NestJS app to have the api prefix before every endpoint call. ` We bootstrap it with the AppModule which only has the AppController in it. ` And the AppController sets up two very basic endpoints. We set up a health check on the /api route and our hello endpoint on the /api/hello route. ` Hosting the front-end with S3 and CloudFront To serve the front-end through a CMS, we should first create an S3 bucket. Go to S3 in your AWS account and create a new bucket. Name your new bucket to something meaningful. For example, if this is going to be your production deployment I recommend having -prod in the name so you will be able to see at a glance, that this bucket contains your production front-end and nothing should get deleted accidentally. We go with the defaults for this bucket setting it to the us-east-1 region. Let's set up the bucket to block all public access, because we are going to allow get requests through CloudFront to these files. We don't need bucket versioning enabled, because these files will be deleted every time a new front-end version will be uploaded to this bucket. If we were to enable bucket versioning, old front-end files would be marked as deleted and kept, increasing the storage costs in the long run. Let's use server-side encryption with Amazon S3-managed keys and create the bucket. When the bucket is created, upload the front-end files to the bucket and let's go to the CloudFront service and create a distribution. As the origin domain, choose your S3 bucket. Feel free to change the name for the origin. For Origin access, choose the Origin access control settings (recommended). Create a new Control setting with the defaults. I recommend adding a description to describe this control setting. At the Web Application Firewall (WAF) settings we would recommend enabling security protections, although it has cost implications. For this tutorial, we chose not to enable WAF for this CloudFront distribution. In the Settings section, please choose the Price class that best fits you. If you have a domain and an SSL certificate you can set those up for this distribution, but you can do that later as well. As the Default root object, please provide index.html and create the distribution. When you have created the distribution, you should see a warning at the top of the page. Copy the policy and go to your S3 bucket's Permissions tab. Edit the Bucket policy and paste the policy you just copied, then save it. If you have set up a domain with your CloudFront distribution, you can open that domain and you should be able to see our front-end deployed. If you didn't set up a domain the Details section of your CloudFront distribution contains your distribution domain name. If you click on the "Hello" button on your deployed front-end, it should not be able to reach the /api/hello endpoint and should display an error message on the page. Hosting the API in Elastic Beanstalk Elastic beanstalk prerequisites For our NestJS API to run in Elastic Beanstalk, we need some additional setup. Inside the apps/api/src folder, let's create a Procfile with the contents: web: node main.js. Then open the apps/api/project.json and under the build configuration, extend the production build setup with the following (I only ) ` The above settings will make sure that when we build the API with a production configuration, it will generate a package.json and a package-lock.json near the output file main.js. To have a production-ready API, we set up a script in the package.json file of the repository. Running this will create a dist/apps/api and a dist/apps/frontend folder with the necessary files. ` After running the script, zip the production-ready api folder so we can upload it to Elastic Beanstalk later. ` Creating the Elastic Beanstalk Environment Let's open the Elastic Beanstalk service in the AWS console. And create an application. An application is a logical grouping of several environments. We usually put our development, staging and production environments under the same application name. The first time you are going to create an application you will need to create an environment as well. We are creating a Web server environment. Provide your application's name in the Application information section. You could also provide some unique tags for your convenience. In the Environment information section please provide information on your environment. Leave the Domain field blank for an autogenerated value. When setting up the platform, we are going to use the Managed Node.js platform with version 18 and with the latest platform version. Let's upload our application code, and name the version to indicate that it was built locally. This version label will be displayed on the running environment and when we set up automatic deployments we can validate if the build was successful. As a Preset, let's choose Single instance (free tier eligible) On the next screen configure your service access. For this tutorial, we only create a new service-role. You must select the aws-elasticbeanstalk-ec2-role for the EC2 instance profile. If can't select this role, you should create it in AWS IAM with the AWSElasticBeanstalkWebTier, AWSElasticBeanstalkMulticontainerDocker and the AWSElasticBeanstalkRoleWorkerTier managed permissions. The next step is to set up the VPC. For this tutorial, I chose the default VPC that is already present with my AWS account, but you can create your own VPC and customise it. In the Instance settings section, we want our API to have a public IP address, so it can be reached from the internet, and we can route to it from CloudFront. Select all the instance subnets and availability zones you want to have for your APIs. For now, we are not going to set up a database. We can set it up later in AWS RDS but in this tutorial, we would like to focus on setting up the distribution. Let's move forward Let's configure the instance traffic and scaling. This is where we are going to set up the load balancer. In this tutorial, we are keeping to the defaults, therefore, we add the EC2 instances to the default security group. In the Capacity section we set the Environment type to Load balanced. This will bring up a load balancer for this environment. Let's set it up so that if the traffic is large, AWS can spin up two other instances for us. Please select your preferred tier in the instance types section, We only set this to t3.micro For this tutorial, but you might need to use larger tiers. Configure the Scaling triggers to your needs, we are going to leave them as defaults. Set the load balancer's visibility to the public and use the same subnets that you have used before. At the Load Balancer Type section, choose Application load balancer and select Dedicated for exactly this environment. Let's set up the listeners, to support HTTPS. Add a new listener for the 443 port and connect your SSL certificate that you have set up in CloudFront as well. For the SSL policy choose something that is over TLS 1.2 and connect this port to the default process. Now let's update the default process and set up the health check endpoint. We set up our API to have the health check endpoint at the /api route. Let's modify the default process accordingly and set its port to 8080. For this tutorial, we decided not to enable log file access, but if you need it, please set it up with a separate S3 bucket. At the last step of configuring your Elastic Beanstalk environment, please set up Monitoring, CloudWatch logs and Managed platform updates to your needs. For the sake of this tutorial, we have turned most of these options off. Set up e-mail notifications to your dedicated alert e-mail and select how you would like to do your application deployments. At the end, let's configure the Environment properties. We have set the default process to occupy port 8080, therefore, we need to set up the PORT environment variable to 8080. Review your configuration and then create your environment. It might take a few minutes to set everything up. After the environment's health transitions to OK you can go to AWS EC2 / Load balancers in your web console. If you select the freshly created load balancer, you can copy the DNS name and test if it works by appending /api/hello at the end of it. Connect CloudFront to the API endpoint Let's go back to our CloudFront distribution and select the Origins tab, then create a new origin. Copy your load balancer's URL into the Origin domain field and select HTTPS only protocol if you have set up your SSL certificate previously. If you don't have an SSL certificate set up, you might use HTTP only, but please know that it is not secure and it is especially not recommended in production. We also renamed this origin to API. Leave everything else as default and create a new origin. Under the Behaviors tab, create a new behavior. Set up the path pattern as /api/* and select your newly created API origin. At the Viewer protocol policy select Redirect HTTP to HTTPS and allow all HTTP methods (GET, HEAD, OPTIONS, PUT, POST, PATCH, DELETE). For this tutorial, we have left everything else as default, but please select the Cache Policy and Origin request policy that suits you the best. Now if you visit your deployment, when you click on the HELLO button, it should no longer attach an error message to the DOM. --- Now we have a distribution that serves the front-end static files through CloudFront, leveraging caching and CDN, and we have our API behind a load balancer that can scale. But how do we deploy our front-end and back-end automatically when a release is merged to our main branch? For that we are going to leverage AWS CodeBuild and CodePipeline, but in the next blog post. Stay tuned....

Git Strategies For Teams, Another Take cover image

Git Strategies For Teams, Another Take

Recently we published an article about a pragmatic approach to using Git in teams. It outlines a strategy which is easy to implement while safeguarding against common issues when using git. It is, however, in my opinion, a compromise. Allowing some issues with edge cases as a trade-off for ease of use. Status Quo Before jumping into another strategy, let us establish the pros and cons of what we’re up against. This will give us a reference for determining whether we did better, or not. Pro: Squash Merging One of the stronger arguments is the squash merge. It offers freedom to all developers within the team to develop as they see fit. One might prefer to develop all at the same time, and push a big commit in the end. Others might like to play it safe and simply commit every 5 minutes, allowing them to roll back or backup changes. The only rule is that at the end of the work, all changes get squashed into a single commit that has to adhere to the team's standards. Con: You Get A Single Commit Each piece of work gets a single commit. To circumvent this, one could create multiple PRs and break-up the work into bite-size chunks. This is, undeniably, a good practice. But it can be cumbersome and distributive when trying to keep pace. In addition, you put the team at risk of getting git conflicts. Say you’re in the middle of building your feature and uncover a bug which requires fixing. As a good scout, you implement the fix and create a separate PR to deliver the fix to the team. At the same time, you keep the fix in your branch as you need it for your feature. At the point of squashing, your newly squashed commit conflicts with the stand-alone fix you’ve delivered to your team. This is nothing that git can’t fix, but it is a nuisance nonetheless. Con: Review Potential A good PR shouldn’t have too many changes, making it easy to review. In the real world however, things get messy. Commits can give us some insight into how the complete changeset came to be. This requires the team to write well-curated commits though. This conflicts with the strength we’re getting from allowing freedom to commit as one sees fit. The History Rewriting Controversy It is good to know that what I’m about to suggest is considered blasphemy by many. Rewriting history is not without its dangers. Changes can go missing, and others who have based their work on now-changed history need to deal with conflicts. However, when applied prudently, rewriting history can yield benefits as well. In this context, some advanced git knowledge is required. The Alternative There was a soft hint towards using conventional commits in Dustin’s article. Let's go ahead and fully endorse adopting it. The convention is simple enough, and the documentation is exhaustive. Now I hear you think, “but we just concluded that allowing us to commit as we like was a good thing”. And you are not wrong. This is where history rewriting comes into play. As you’re working, commit as you like. Then, when it’s time to put your changes up for review, start editing your branch to ensure each change is nicely wrapped and documented in a proper commit. Finally, after getting a thumbs-up on the PR, rebase your changes on top of the branch you’re merging into, and finally do a normal merge. Most git hosting services offer this workflow for you. While I endorse rewriting history in your own branch, restrain from altering shared branches like “main” or “develop”. By sticking to this small rule, you’ve already negated most disadvantages of rewriting history. Shared Changes If we look back at our scenario where both the main and our feature branch include a fix, we get to the same point where we want to merge. However in this case, given that you’ve made the same commit in both branches, git is clever enough to fix the flow of history and remove the fix from your new changes. The following flow... ... will look like this after merging: Fixes On Your Own Features Although this is part of the conventional commit strategy, I feel it deserves some special attention. If you have introduced a new feature in your branch, and committed the changes. It can happen that you introduced a bug. Your first intuition might be to create a “fix” commit. Instead, consider going back to your feature commit and amending the fix to it. This has two advantages. First of all, the history will be less cluttered. Looking back at what changed, it's easy to see which features got introduced and what bugs we found along the way. On top of that, it will prevent confusion for your reviewers. Now, the code presented to others is fixed code. At no time in its history does it ever contain the bug. Your co-workers are not going to have any comments on it. How To Rewrite Your Branch Now we know why to clean-up, let's look at strategies to actually do the orchestration. The most obvious route is to keep the changeset you want to present in mind. Doing so, one prevents having to go back and rewrite everything from scratch. As an added bonus, I’ve found that it helps me better separate concerns. Complete Wipe If you like making periodic commits (or some other strategy that results in you creating arbitrary commits) chances are you are going to completely wipe all commits (not the changes) in your branch. The simplest way to accomplish this is by doing a soft reset to where you forked from the main branch. This can be achieved by rebasing and resetting to main (given main is where you want to merge into). This is a good approach as you also prepare your branch for being merged back. ` This can also be accomplished by counting the amount of commits and making that amount of steps back from HEAD. For example, if you have made 4 commits in your branch. ` And lastly, you can do this by knowing where you started off. One can find this by looking at the logs: ` Using either of these methods will leave you with no commits in your branch, and all your changes in your workspace. From this point, you can start cherry-picking your changes, and making well-curated commits. Interactive Rebase If you already have somewhat of a structure, interactive rebasing might be a better solution for you. This will allow you to go over each commit, and decide on how to alter them. The most interesting options being: s, squash - this will add the changes from this commit to its parent, followed by allowing you to change the commit message, and thus appending the message with the squashed changes. e, edit - using this option, the rebase will stop right before the commit gets added to the branch as if you went back in time and just did the development work. From this point, you can add files, split the commit in multiple different commits, change the commit message, or do whatever you’d like to do. d, drop - in the rare occasion you simply don’t want this commit anymore. r, reword - like edit, but you’re only offered the option to change the commit message. To start an interactive rebase, simply run ` Conclusion By embracing history rewriting and dropping squash merging. A team could produce an even cleaner git history. This option might not be for everyone, as it requires a little work and git knowledge. But if done well, it will circumvent some of the drawbacks of our pragmatic approach....

What does it actually look like to build software with AI today? Not in theory, but in practice. cover image

What does it actually look like to build software with AI today? Not in theory, but in practice.

What does it actually look like to build software with AI today? Not in theory, but in practice. At the Leadership Exchange, this was the question at the center of the Developer Panel, where leaders from across the industry unpacked what’s really changing inside engineering teams and what organizations need to do right now to keep up. The Developer Panel at the Leadership Exchange explored the cutting edge of AI in software engineering and examined what organizations should focus on today to prepare for the future. Moderated by Jeff Cross, Co-Founder & CEO at Nx, the panel featured Victor Savkin, Cofounder & CTO at Nx, Alex Sover, Vice President of Engineering at OpenAP, Brent Zucker, Senior Director of Engineering at Visa, and Jonathan Fontanez, AI Engineering Lead at This Dot Labs. Panelists shared insights into how AI is transforming the software development lifecycle and how teams can adopt tools effectively while preparing for organizational change. Panelists discussed emerging workflows, including CI-in-the-loop, agentic healing, and context engineering. They examined how validation, code reviews, and PRDs are evolving alongside AI capabilities and how teams are integrating external sources such as production traces to improve quality and reliability. The discussion also covered what the next generation of agentic tools might look like and how these capabilities will shape engineering practices in the near future. Adoption of AI comes with challenges. Teams often rely on plugins or extensions without foundational understanding, and individual contributors may fear displacement. Panelists emphasized that education, governance, and skill-building are essential for teams to manage AI agents effectively while maintaining quality. They also highlighted the need to standardize workflows and ensure organizational alignment to fully leverage AI capabilities. The conversation extended beyond technical challenges to organizational implications. Panelists discussed how teams can avoid issues like Conway’s Law, manage distributed teams effectively, and evolve engineering practices alongside AI adoption. Leadership and management strategies play a crucial role in ensuring that AI integration delivers meaningful outcomes while maintaining efficiency and alignment with business objectives. Key Takeaways - AI workflows require both technical and organizational preparation. - Education, governance, and skill development are essential for successful implementation. - Forward-looking teams are rethinking validation, CI pipelines, and context management to fully leverage agentic AI. The discussion highlighted that adopting AI at the cutting edge is not just about new tools - it is about rethinking processes, workflows, and organizational culture. Companies that embrace this holistic approach are most likely to succeed in leveraging AI to its full potential. Are you interested in more conversations like this? Message us for an invite to the next, or for a private discussion around these topics. Tracy can be reached at tlee@thisdot.co....

Let's innovate together!

We're ready to be your trusted technical partners in your digital innovation journey.

Whether it's modernization or custom software solutions, our team of experts can guide you through best practices and how to build scalable, performant software that lasts.

Prefer email? hi@thisdot.co