AWS Rekognition
What is AWS Rekognition?
Rekognition is a AWS service that provides deep learning visual analysis for your images. Rekognition is very easy to integrate into your application by providing an image or video to the AWS Rekognition API. The service will identify some following: objects, people, text, scenes, and activities. "Amazon Rekognition also provides highly accurate facial analysis and facial recognition. You can detect, analyze, and compare faces for a wide variety of use cases, including user verification, cataloging, people counting, and public safety." - AWS Official Docs
Now let's start using AWS Rekognition
Let's start with trying some of their demos to see how AWS Recognition works.
- Go to the following link and play with the demos.
Time to get our hands dirty
Warning🚨 :
- You need to have an AWS Management Console account.
- It will ask you for your credit card info, but YOU won't be charged for what you use in this tutorial since it's part of the FREE TIER.
Setting up our S3 Bucket
- Go to Find services and look for S3

- Click on CREATE A BUCKET
- Enter the bucket name as thisdot-rk-YOUR_NAME
- Click on NEXT twice
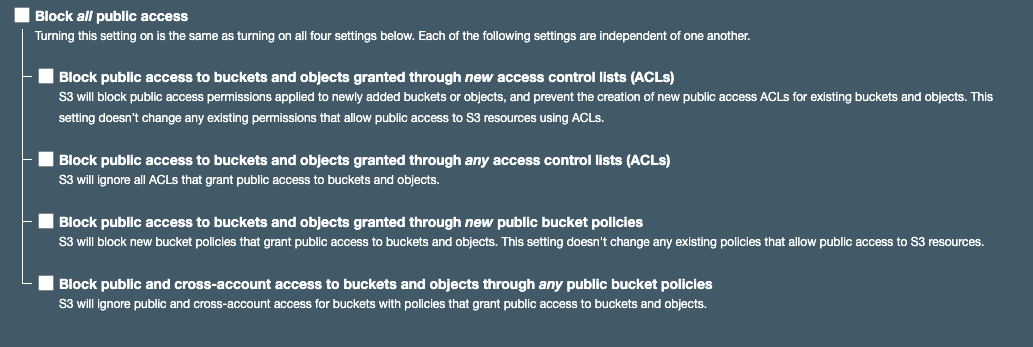
- Uncheck all the boxes to grant public access to the bucket. Click NEXT
Note: I'm making this bucket public, because for the purpose of this tutorial, I'm not worried about security.
Setting up our Lambda Function
- Go to Find services, and look for Lambda

- Click on CREATE FUNCTION
- For Lambda function name, enter thisdot-rk-YOUR_NAME
- Under Runtime, click on the dropdown, and select Python 3.7.
- Click on CREATE FUNCTION
 6)Scroll down to where it says Function code. You should see something like this:
 8)Erase everything you see in the editor, and paste the following code in there:
Note: Change the name of the bucket to the bucket name you created thisdot-rk-YOUR_NAME.
The following code is going to help us finding the text inside of the images. Using the .detect_text method.
 import json
 import boto3

 s3 = boto3.resource('s3')
 def lambda_handler(event, context):
  print(event)
  dump = json.loads(json.dumps(event))
  fileName = dump['image']
  print(fileName)

  bucket='thisdot-rk-YOUR_NAME'

  client=boto3.client('rekognition')
  text=client.detect_text(Image={'S3Object':
  {'Bucket':bucket,'Name':str(fileName)}})
  res = {
   "textFound": text
  }
  return res
Note: To Learn more about other AWS Boto Rekognition functions, visit this website.
- Scroll down to change the BASIC SETTINGS< of the lambda.
- Change Memory to 512MB, and Timeout to 2min 30sec. This is to ensure your lambda doesn't timeout when processing images.
- Scroll all the way to the top. In the upper right corner, you should see the SAVE button. Click on it.
Setting up our Security Roles Using IAM
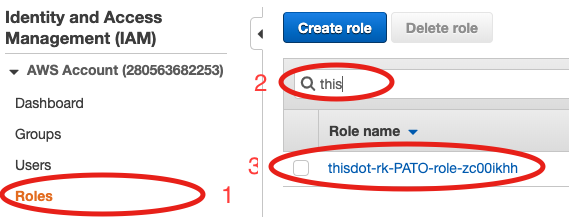
- Search for the IAM Service (Services IAM)
- On the left navigation bar, click on ROLES.
- You can select any lambda you have created to give it a specific role. In this tutorial, we will select the following to give it access to AWS Rekognition.
- Then click on ATTACH POLICIES
- Search for rekognition
- Select AmazonRekognitionFUllAccess

- Click on ATTACH POLICY Note: You can have multiple policies attached
Time to Test
- Go back to your lambda function.
- In the top right corner, select the dropdown that says "Select a test event"
- Then select "Configure test events"
- Give a name to your event
- Then enter the following JSON object
     {
       "image": "thisdot.png"
     }
Where "thisdot.png" is the name of your image inside of your S3 bucket.
- Click CREATE
- On Your top right corner, you will see the TEST button. Click on it.
- You should see a green box. Click on expand details.

- Take a look at the response object. As you can see, it has found our text inside of the image.

Awesome!!!, right?
Now, let's jump to compare faces. Imagine you want to see if one person appears in the same picture. Rekognition can do this. Imagine all the possibilities!
- Download these 2 images.
Source Image https://thepracticaldev.s3.amazonaws.com/i/ktpt1lx1ubzt3ilupph7.jpg
Target Image https://thepracticaldev.s3.amazonaws.com/i/p5j8z6hiey8z8rkspms6.jpg
-
Upload them to S3, following the steps previously mentioned.
-
Go back to your lambda, and create a new test, or edit the existing test. Your test will look like this:
{ "sourceImage": "source.jpg", "targetImage": "target.jpg" } -
Then, we are going to modify our lambda code to be able to compare faces
import json import boto3 s3 = boto3.resource('s3') def lambda_handler(event, context): print(event) dump = json.loads(json.dumps(event)) sourceImage = dump['sourceImage'] targetImage = dump['targetImage'] bucket='thisdot-rk-YOUR_NAME' client = boto3.client('rekognition') faceComparison= client.compare_faces( SourceImage={'S3Object': {'Bucket':bucket,'Name':str(sourceImage)}}, TargetImage={'S3Object': {'Bucket':bucket,'Name':str(targetImage)}} ) res = { "faceRecognition": faceComparison } return res -
Look at the Execution results, and analyze the data.
Tell me what you think about this tutorial on twitter or comment below!


