Skip to content

Introduction to Vite - Next Generation Frontend Tooling

Introduction

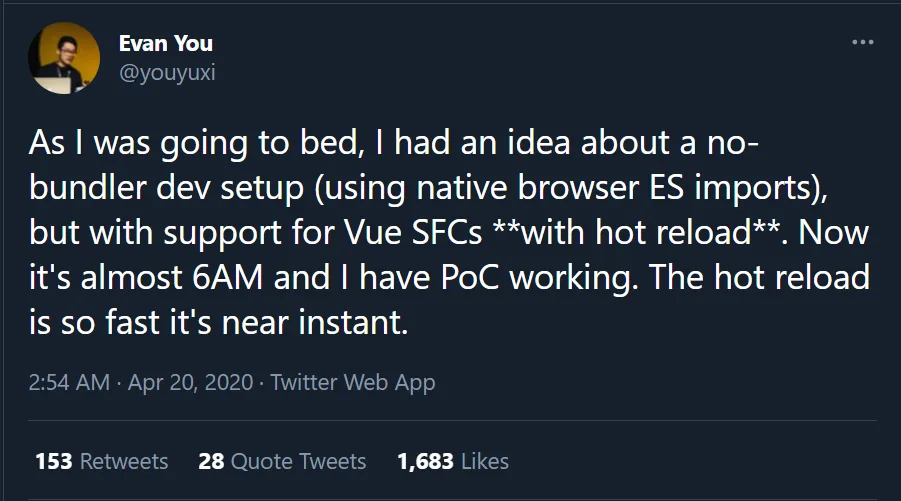
In April 2020, Evan You, the creator of Vue, started to share some work on a new development server called Vite. Here is the first tweet about the idea that Evan shared.

Evan You's first tweet about Vite

At the time, it was an experiment to see what could be done to improve the development experience for Vue applications. Evan You joked that Vite was created to power an improved version of VuePress for blogging purposes.

Recently, Vite 2 was released as the first stable version, and in Vue Contributer Days 2021 Evan discussed that Vite would be, "the foundation that we are going to be focusing on for future Vue-oriented tooling."

At Vue Contributor Days, Evan noted that, "putting [new developers] through webpack doesn't feel like the ideal experience for a progressive framework," and that Vite was going to be highlighted as the next step as a developer

But what exactly is Vite? How does it work? And how can it be used in development today?

Vite - Next Generation Frontend Tooling

According to the official Vite site, Vite is, "a build tool that aims to provide a faster and leaner development experience for modern web projects." It achieves this in two parts.

First, while in development, application code is not bundled (which is currently how development is done using Vue CLI or Create React App). Instead, the code is imported into the browser using ES Modules, the native module system for Javascript. Since ESM is supported in all modern browsers, Vite can leverage this to completely remove a build step while in development.

Any libraries that need to be imported are still compiled, but for that, Vite uses esbuilt a fast build tool written in Go. Per the Vite website, "Esbuild pre-bundles dependencies 10-100x faster than JavaScript-based bundlers."

Second, Vite provides a build step using Rollup that has been highly optimized for generating static assets. By leveraging Rollup, Vite also provides a diverse plugin ecosystem. Standard Rollup plugins can be used with Vite, as well as custom Vite-specific plugins. [From the documentation]:(https://vitejs.dev/guide/api-plugin.html) "Vite plugins extends Rollup's well-designed plugin interface with a few extra vite-specific options. As a result, you can write a Vite plugin once and have it work for both dev and build."

Vite also provides built-in support for:

  • Typescript
  • JSX and TSX
  • Importing CSS files and CSS preprocessor files like .scss and .less
  • Static assets such as images and JSON files

One key thing to note is that Vite is not Vue-specific. While the original versions of Vite were geared towards Vue 3, the current release of Vite supports any frontend framework, with supported templates for Vue, React, Preact, Lit Element, Svelte, and vanilla Javascript. At its core, Vite is simply a build tool and development environment that can be leveraged by anyone.

Getting Started

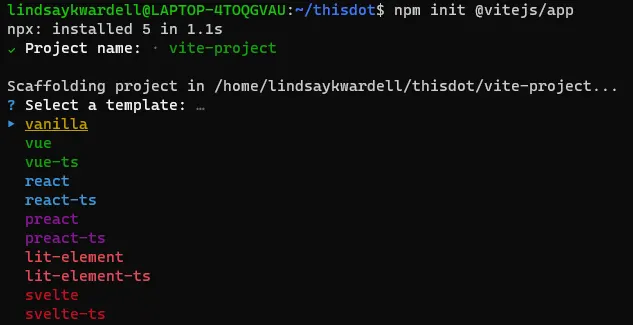
To start working with a Vite-based app, open your terminal and run the below command:

# NPM
npm init @vitejs/app

# Yarn
yarn create @vitejs/app

A prompt will guide you to select a name for your app and the template you want to use. For this article, we will be looking at a Vue application, but as noted above, there are many options available for building apps in Vite.

npm init @vitejs/app

Once you select your name and template, you will be guided to navigate to the newly created folder, run npm install (or yarn). And that's it! Compared to both Create React App and the Vue CLI, this step is much faster, because there's less to install.

Now that your local setup is ready, let's get to work! In your terminal, run the following to get Vite running:

# NPM
npm run dev

# Yarn
yarn dev
vite-project npm run dev

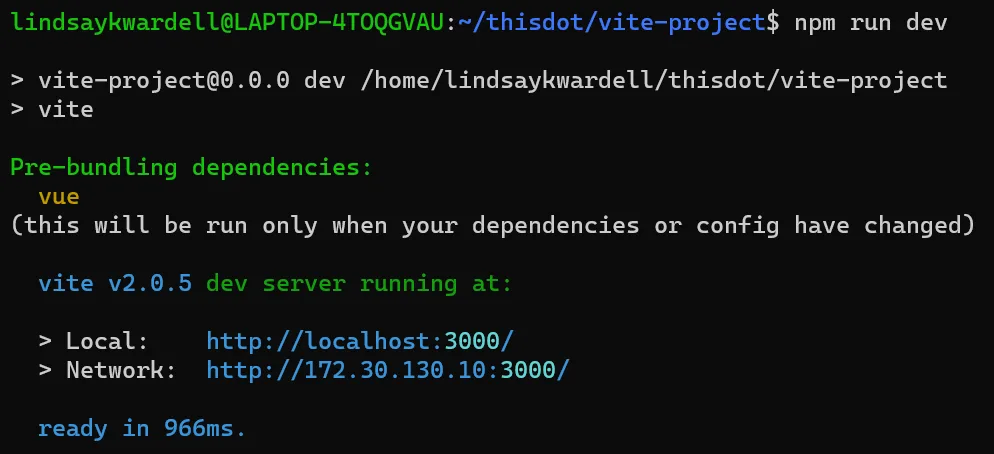
When the dev command is run, esbuild is used to pre-bundle any dependencies you are using (in this case, the only dependency we have is Vue), then provides the URL to open the app itself. For this test, that build step took less than a second (subsequent startup times were around 200ms). For larger applications, it might take longer, but it's only run when Vite finds that your dependencies or configuration has changed. In general, this will only happen occassionally.

Open your browser to the provided URL (by default, localhost:3000), and you will see your app load as expected. If we open the network tab, you will also see that each component is imported into your application separately. This is because we are using ES Modules, rather than bundling everything into a single import. Neat!

vite-network-tab

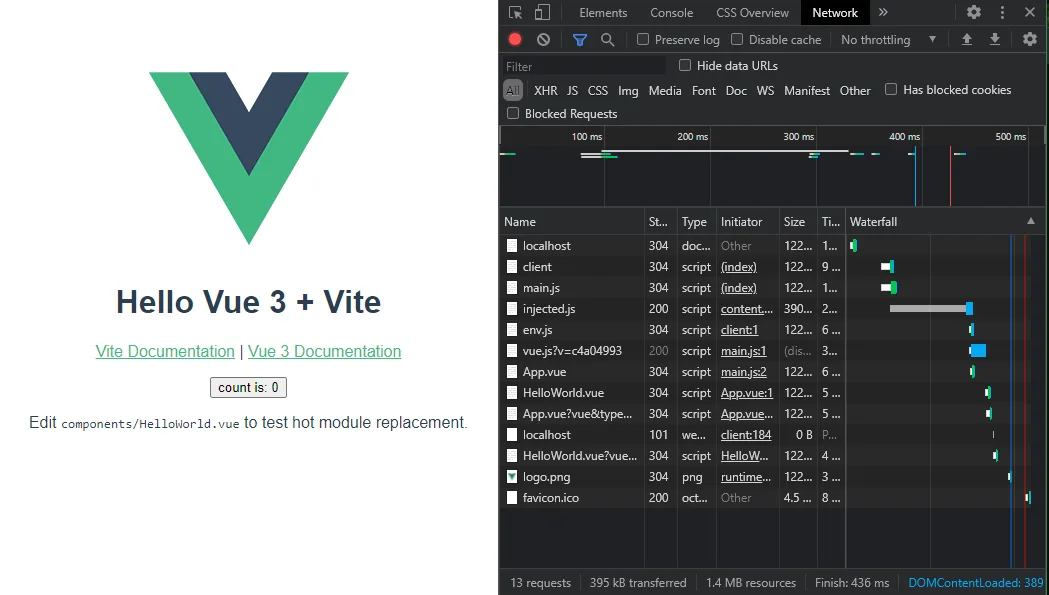
Also of note: As you build out your application, only the relevant code is fetched into the browser. If you have multiple pages, each with unique components, those components will only be loaded as you navigate to those pages.

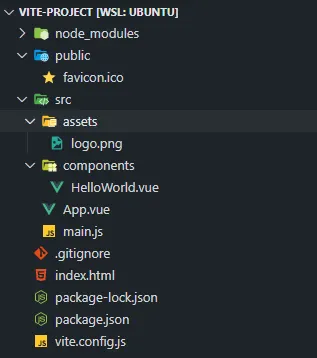
Let's take a quick look at the file structure. If you're familiar with the Vue CLI, the output from Vite is very similar. The main difference is that the index.html file is located in the root folder, rather than in the public folder. Otherwise, it should be very familiar.

vite-file-structure

Development using Vite is also very familiar. Create components, import files- everything you are used to doing with Vue CLI or Create React App should work as expected. When you're ready to deploy your app, run the below command:

# NPM
npm run build

# Yarn
yarn build

Configuration and Plugins

Vite provides a helpful way to manage any configuration for your project. From the Vite documentation, "When running vite from the command line, Vite will automatically try to resolve a config file named vite.config.js inside project root."

As with a Vue CLI app, vite.config.js allows for a wide variety of configurations, including setting a base URL, any proxies to a backend service, and where to output the build files. In addition, plugins are also added to Vite in this file. Despite being a young platform, there are a wide range of plugins already available (some Rollup plugins can also be used in Vite).

Here's a few notable plugins to be aware of:

There are a lot more plugins and other community contributions to look at as well. Check out this list of awesome Vite plugins for more examples!

Why Use Vite?

The primary benefit of Vite is the development experience. Vite starts fast, loads fast, and allows you as a developer to get your job done better. In addition, the plugin ecosystem allows you to extend your app in numerous ways, all depending on what you want to do. Some opinionated templates also exist, such as Vitesse by Anthony Fu of the Vue core team, that provide additional built-in functionality.

Taking that into consideration, Vite can be used for:

  • Single-page applications: This is the default when starting a Vite app. The final build will be a standard SPA using Rollup that can be deployed to Netlify or any other provider that supports this type of application.
  • Server-side Rendering: While it doesn't come built in or as a template, the documentation explains how to use Vite for SSR. Note that it is described as experimental. There is also a plugin that provides this functionality.
  • Static Site Generation: Want a static site? There's a plugin for Vue that does exactly that. See it in action!
  • Backend Integration: If you're building a site with a backend framework such as Rails or Laravel, you may want a more complete integration between the two development environments. Vite provides documentation on how to do just that.

Comparisons

As Evan noted, Vite is the foundation for Vue tooling going forward. At Vue Contributor Days, Evan noted that, "putting new developers through webpack doesn't feel like the ideal experience for a progressive framework." So how does it compare to existing solutions?

Keep in mind that Vite is a development environment, not a framework. The closest true comparisons to Vite are tools like Snowpack or WMR from the Preact team. The Vite site has a complete writeup on comparisons with other build tools. Rather than focusing on build tools, let's compare Vite with existing ways to build applications.

Vue CLI/Create React App (webpack-based SPA)

We've already touched on Vue CLI and Create React App, but it's important to point out that Vite is, first and foremost, a development environment and build tool. In the end, it will build a single-page application, just like existing tools. The main benefit to Vite is the plugin ecosystem and the next-generation tooling. If you're comfortable with webpack, then that's fine!

As an aside, at Vue Contributor Days, Evan and the panel talked about the potential for integrating Vite into existing tools such as Vue CLI, and leveraging it for other uses such as Nuxt or Ionic. I strongly encourage listening to it when you have a moment.

Nuxt/Next.js (Server-Side Rendered apps)

While Vite can provide SSR, it is still in an experimental state, and not recommended for production. If you are needing server-side rendering in your application, it's probably best to stick with the existing tooling for that.

That said, there's some work going on at Nuxt to provide Vite for your local development environment. Here's an experimental plugin for integrating Vite into Nuxt 2, with a polished version of this planned for Nuxt 3 later this year.

Gatsby (Static Site Generators)

This one really depends on the kind of website that you're building. Gatsby (and other SSG tools like 11ty, Gridsome, etc) provides plugins to integrate with headless CMS platforms like Contentful or Sanity.io, as well as ways to manage image assets, RSS feed generation, and other features of blogs or documentation sites.

Vite, by comparison, provides none of that for you out of the box. What it can provide is excellent tooling for building a simple site, and generate static assets. We already see that in the Vue ecosystem, both with the SSG plugin mentioned above as well as VitePress, which can provide a fast-loading documentation site (or any other static site you want).

Conclusion

As a build tool, Vite is still fairly new. However, it has already proven itself to be a fast development environment, leveraging modern tooling and language features to provide an excellent developer experience. While it may not replace existing tooling such as Vue CLI for some time, Evan has decided that it is the way forward for Vue tooling. Its fast uptime and vibrant community will only grow with time.

Next time you need to spin up a quick app in Vue or React, try using Vite for yourself! I look forward to see what you think!

This Dot Labs is a development consultancy that is trusted by top industry companies, including Stripe, Xero, Wikimedia, Docusign, and Twilio. This Dot takes a hands-on approach by providing tailored development strategies to help you approach your most pressing challenges with clarity and confidence. Whether it's bridging the gap between business and technology or modernizing legacy systems, you’ll find a breadth of experience and knowledge you need. Check out how This Dot Labs can empower your tech journey.

You might also like

Angular 17: Continuing the Renaissance cover image

Angular 17: Continuing the Renaissance

Angular 17: A New Era November 8th marked a significant milestone in the world of Angular with the release of Angular 17. This wasn't just any ordinary update; it was a leap forward, signifying a new chapter for the popular framework. But what made this release truly stand out was the unveiling of Angular's revamped website, complete with a fresh brand identity and a new logo. This significant transformation represents the evolving nature of Angular, aligning with the modern demands of web development. To commemorate this launch, we also hosted a release afterparty, where we went deep into its new features with Minko Gechev from the Angular core team, and Google Developer Experts (GDEs) Brandon Roberts, Deborah Kurata, and Enea Jahollari. But what exactly are these notable new features in the latest version? Let's dive in and explore. The Angular Renaissance Angular has been undergoing a significant revival, often referred to as Angular's renaissance, a term coined by Sarah Drasner, the Director of Engineering at Google, earlier this year. This revival has been particularly evident in its recent versions. The Angular team has worked hard to introduce many new improvements, focusing on signal-based reactivity, hydration, server-side rendering, standalone components, and migrating to esbuild and Vite for a better and faster developer experience. This latest release, in particular, marks many of these features as production-ready. Standalone Components About a year ago, Angular began a journey toward modernity with the introduction of standalone components. This move significantly enhanced the developer experience, making Angular more contemporary and user-friendly. In Angular's context, a standalone component is a self-sufficient, reusable code unit that combines logic, data, and user interface elements. What sets these components apart is their independence from Angular's NgModule system, meaning they do not rely on it for configuration or dependencies. By setting a standalone: true` flag, you no longer need to embed your component in an NgModule and you can bootstrap directly off that component: `typescript // ./app/app.component.ts @Component({ selector: 'app', template: 'hello', standalone: true }) export class AppComponent {} // ./main.ts import { bootstrapApplication } from '@angular/platform-browser'; import { AppComponent } from './app/app.component'; bootstrapApplication(AppComponent).catch(e => console.error(e)); ` Compared to the NgModules way of adding components, as shown below, you can immediately see how standalone components make things much simpler. `ts // ./app/app.component.ts import { Component } from '@angular/core'; @Component({ selector: 'app-root', templateUrl: './app.component.html', styleUrls: ['./app.component.css'], }) export class AppComponent { title = 'CodeSandbox'; } // ./app/app.module.ts import { NgModule } from '@angular/core'; import { BrowserModule } from '@angular/platform-browser'; import { AppComponent } from './app.component'; @NgModule({ declarations: [ AppComponent ], imports: [ BrowserModule ], providers: [], bootstrap: [AppComponent] }) export class AppModule { } // .main.ts import { platformBrowserDynamic } from '@angular/platform-browser-dynamic'; import { AppModule } from './app/app.module'; platformBrowserDynamic() .bootstrapModule(AppModule) .catch((err) => console.error(err)); ` In this latest release, the Angular CLI now defaults to generating standalone components, directives, and pipes. This default setting underscores the shift towards a standalone-centric development approach in Angular. New Syntax for Enhanced Control Flow Angular 17 introduces a new syntax for control flow, replacing traditional structural directives like ngIf` or `ngFor`, which have been part of Angular since version 2. This new syntax is designed for fine-grained change detection and eventual zone-less operation when Angular completely migrates to signals. It's more streamlined and performance-efficient, making handling conditional or list content in templates easier. The @if` block replaces `*ngIf` for expressing conditional parts of the UI. `ts @if (a > b) { {{a}} is greater than {{b}} } @else if (b > a) { {{a}} is less than {{b}} } @else { {{a}} is equal to {{b}} } ` The @switch` block replaces `ngSwitch`, offering benefits such as not requiring a container element to hold the condition expression or each conditional template. It also supports template type-checking, including type narrowing within each branch. ```ts @switch (condition) { @case (caseA) { Case A. } @case (caseB) { Case B. } @default { Default case. } } ``` The @for` block replaces `*ngFor` for iteration and presents several differences compared to its structural directive predecessor, `ngFor`. For example, the tracking expression (calculating keys corresponding to object identities) is mandatory but offers better ergonomics. Additionally, it supports `@empty` blocks. `ts @for (item of items; track item.id) { {{ item.name }} } ` Defer Block for Lazy Loading Angular 17 introduces the @defer` block, a dramatically improving lazy loading of content within Angular applications. Within the `@defer` block framework, several sub-blocks are designed to elegantly manage different phases of the deferred loading process. The main content within the `@defer` block is the segment designated for lazy loading. Initially, this content is not rendered, becoming visible only when specific triggers are activated or conditions are met, and after the required dependencies have been loaded. By default, the trigger for a `@defer` block is the browser reaching an idle state. For instance, take the following block: it delays the loading of the calendar-imp` component until it comes into the viewport. Until that happens, a placeholder is shown. This placeholder displays a loading message when the `calendar-imp` component begins to load, and an error message if, for some reason, the component fails to load. `ts @defer (on viewport) { } @placeholder { Calendar placeholder } @loading { Loading calendar } @error { Error loading calendar } ` The on` keyword supports a wide a variety of other conditions, such as: - idle` (when the browser has reached an idle state) - interaction` (when the user interacts with a specified element) - hover` (when the mouse has hovered over a trigger area) - timer(x)` (triggers after a specified duration) - immediate` (triggers the deferred load immediately) The second option of configuring when deferring happens is by using the when` keyword. For example: `ts @defer (when isVisible) { } ` Server-Side Rendering (SSR) Angular 17 has made server-side rendering (SSR) much more straightforward. Now, a --ssr` option is included in the `ng new` command, removing the need for additional setup or configurations. When creating a new project with the `ng new` command, the CLI inquires if SSR should be enabled. As of version 17, the default response is set to 'No'. However, for version 18 and beyond, the plan is to enable SSR by default in newly generated applications. If you prefer to start with SSR right away, you can do so by initializing your project with the `--ssr` flag: `shell ng new --ssr ` For adding SSR to an already existing project, utilize the ng add` command of the Angular CLI: `shell ng add @angular/ssr ` Hydration In Angular 17, the process of hydration, which is essential for reviving a server-side rendered application on the client-side, has reached a stable, production-ready status. Hydration involves reusing the DOM structures rendered on the server, preserving the application's state, and transferring data retrieved from the server, among other crucial tasks. This functionality is automatically activated when server-side rendering (SSR) is used. It offers a more efficient approach than the previous method, where the server-rendered tree was completely replaced, often causing visible UI flickers. Such re-rendering can adversely affect Core Web Vitals, including Largest Contentful Paint (LCP), leading to layout shifts. By enabling hydration, Angular 17 allows for the reuse of the existing DOM, effectively preventing these flickers. Support for View Transitions The new View Transitions API, supported by some browsers, is now integrated into the Angular router. This feature, which must be activated using the withViewTransitions` function, allows for CSS-based animations during route transitions, adding a layer of visual appeal to applications. To use it, first you need to import withViewTransitions`: `ts import { provideRouter, withViewTransitions } from '@angular/router'; ` Then, you need to add it to the provideRouter` configuration: `ts bootstrapApplication(AppComponent, { providers: [ provideRouter(routes, withViewTransitions()) ] }) ` Other Notable Changes - Angular 17 has stabilized signals, initially introduced in Angular 16, providing a new method for state management in Angular apps. - Angular 17 no longer supports Node 16. The minimal Node version required is now 18.13. - TypeScript version 5.2 is the least supported version starting from this release of Angular. - The @Component` decorator now supports a `styleUrl` attribute. This allows for specifying a single stylesheet path as a string, simplifying the process of linking a component to a specific style sheet. Previously, even for a single stylesheet, an array was required under `styleUrls`. Conclusion With the launch of Angular 17, the Angular Renaissance is now in full swing. This release has garnered such positive feedback that developers are showing renewed interest in the framework and are looking forward to leveraging it in upcoming projects. However, it's important to note that it might take some time for IDEs to adapt to the new templating syntax fully. While this transition is underway, rest assured that you can still write perfectly valid code using the old templating syntax, as all the changes in Angular 17 are backward compatible. Looking ahead, the future of Angular appears brighter than ever, and we can't wait to see what the next release has in store!...

Drizzle ORM: A performant and type-safe alternative to Prisma cover image

Drizzle ORM: A performant and type-safe alternative to Prisma

Introduction I’ve written an article about a similar, more well-known TypeScript ORM named Prisma in the past. While it is a fantastic library that I’ve used and have had success with personally, I noted a couple things in particular that I didn’t love about it. Specifically, how it handles relations with add-on queries and also its bulk that can slow down requests in Lambda and other similar serverless environments. Because of these reasons, I took notice of a newer player in the TypeScript ORM space named Drizzle pretty quickly. The first thing that I noticed about Drizzle and really liked is that even though they call it an ‘ORM’ it’s more of a type-safe query builder. It reminds me of a JS query builder library called ‘Knex’ that I used to use years ago. It also feels like the non-futuristic version of EdgeDB which is another technology that I’m pretty excited about, but committing to it still feels like a gamble at this stage in its development. In contrast to Prisma, Drizzle is a ‘thin TypeScript layer on top of SQL’. This by default should make it a better candidate for Lambda’s and other Serverless environments. It could also be a hard sell to Prisma regulars that are living their best life using the incredibly developer-friendly TypeScript API’s that it generates from their schema.prisma files. Fret not, despite its query-builder roots, Drizzle has some tricks up its sleeve. Let’s compare a common query example where we fetch a list of posts and all of it’s comments from the Drizzle docs: ` // Drizzle query const posts = await db.query.posts.findMany({ with: { comments: true, }, }); // Prisma query const posts = await prisma.post.findMany({ include: { comments: true, }, }); ` Sweet, it’s literally the same thing. Maybe not that hard of a sale after all. You will certainly find some differences in their APIs, but they are both well-designed and developer friendly in my opinion. The schema Similar to Prisma, you define a schema for your database in Drizzle. That’s pretty much where the similarities end. In Drizzle, you define your schema in TypeScript files. Instead of generating an API based off of this schema, Drizzle just infers the types for you, and uses them with their TypeScript API to give you all of the nice type completions and things we’re used to in TypeScript land. Here’s an example from the docs: ` import { integer, pgEnum, pgTable, serial, uniqueIndex, varchar } from 'drizzle-orm/pg-core'; // declaring enum in database export const popularityEnum = pgEnum('popularity', ['unknown', 'known', 'popular']); export const countries = pgTable('countries', { id: serial('id').primaryKey(), name: varchar('name', { length: 256 }), }, (countries) => { return { nameIndex: uniqueIndex('nameidx').on(countries.name), } }); export const cities = pgTable('cities', { id: serial('id').primaryKey(), name: varchar('name', { length: 256 }), countryId: integer('countryid').references(() => countries.id), popularity: popularityEnum('popularity'), }); ` I’ll admit, this feels a bit clunky compared to a Prisma schema definition. The trade-off for a lightweight TypeScript API to work with your database can be worth the up-front investment though. Migrations Migrations are an important piece of the puzzle when it comes to managing our applications databases. Database schemas change throughout the lifetime of an application, and the steps to accomplish these changes is a non-trivial problem. Prisma and other popular ORMs offer a CLI tool to manage and automate your migrations, and Drizzle is no different. After creating new migrations, all that is left to do is run them. Drizzle gives you the flexibility to run your migrations in any way you choose. The simplest of the bunch and the one that is recommended for development and prototyping is the drizzle-kit push command that is similar to the prisma db push command if you are familiar with it. You also have the option of running the .sql files directly or using the Drizzle API's migrate function to run them in your application code. Drizzle Kit is a companion CLI tool for managing migrations. Creating your migrations with drizzle-kit is as simple as updating your Drizzle schema. After making some changes to your schema, you run the drizzle-kit generate command and it will generate a migration in the form of a .sql file filled with the needed SQL commands to migrate your database from point a → point b. Performance When it comes to your database, performance is always an extremely important consideration. In my opinion this is the category that really sets Drizzle apart from similar competitors. SQL Focused Tools like Prisma have made sacrifices and trade-offs in their APIs in an attempt to be as database agnostic as possible. Drizzle gives itself an advantage by staying focused on similar SQL dialects. Serverless Environments Serverless environments are where you can expect the most impactful performance gains using Drizzle compared to Prisma. Prisma happens to have a lot of content that you can find on this topic specifically, but the problem stems from cold starts in certain serverless environments like AWS Lambda. With Drizzle being such a lightweight solution, the time required to load and execute a serverless function or Lambda will be much quicker than Prisma. Benchmarks You can find quite a few different open-sourced benchmarks of common database drivers and ORMs in JavaScript land. Drizzle maintains their own benchmarks on GitHub. You should always do your own due diligence when it comes to benchmarks and also consider the inputs and context. In Drizzle's own benchmarks, it’s orders of magnitudes faster when compared to Prisma or TypeORM, and it’s not far off from the performance you would achieve using the database drivers directly. This would make sense considering the API adds almost no overhead, and if you really want to achieve driver level performance, you can utilize the prepared statements API. Prepared Statements The prepared statements API in Drizzle allows you to pre-generate raw queries that get sent directly to the underlying database driver. This can have a very significant impact on performance, especially when it comes to larger, more complex queries. Prepared statements can also provide huge performance gains when used in serverless environments because they can be cached and reused. JOINs I mentioned at the beginning of this article that one of the things that bothered me about Prisma is the fact that fetching relations on queries generates additional sub queries instead of utilizing JOINs. SQL databases are relational, so using JOINs to include data from another table in your query is a core and fundamental part of how the technology is supposed to work. The Drizzle API has methods for every type of JOIN statement. Properly using JOINs instead of running a bunch of additional queries is an important way to get better performance out of your queries. This is a huge selling point of Drizzle for me personally. Other bells and whistles Drizzle Studio UIs for managing the contents of your database are all the rage these days. You’ve got Prisma Studio and EdgeDB UI to name a couple. It's no surprise that these are so popular. They provide a lot of value by letting you work with your database visually. Drizzle also offers Drizzle Studio and it’s pretty similar to Prisma Studio. Other notable features - Raw Queries - The ‘magic’ sql operator is available to write raw queries using template strings. - Transactions - Transactions are a very common and important feature in just about any database tools. It’s commonly used for seeding or if you need to write some other sort of manual migration script. - Schemas - Schemas are a feature specifically for Postgres and MySQL database dialects - Views -Views allow you to encapsulate the details of the structure of your tables, which might change as your application evolves, behind consistent interfaces. - Logging - There are some logging utilities included useful for debugging, benchmarking, and viewing generated queries. - Introspection - There are APIs for introspecting your database and tables - Zod schema generation - This feature is available in a companion package called drizzle-zod that will generate Zod schema’s based on your Drizzle tables Seeding At the time of this writing, I’m not aware of Drizzle offering any tools or specific advice on seeding your database. I assume this is because of how straightforward it is to handle this on your own. If I was building a new application I would probably provide a simple seed script in JS or TS and use a runtime like node to execute it. After that, you can easily add a command to your package.json and work it into your CI/CD setup or anything else. Conclusion Drizzle ORM is a performant and type-safe alternative to Prisma. While Prisma is a fantastic library, Drizzle offers some advantages such as a lightweight TypeScript API, a focus on SQL dialects, and the ability to use JOINs instead of generating additional sub queries. Drizzle also offers Drizzle Studio for managing the contents of your database visually, as well as other notable features such as raw queries, transactions, schemas, views, logging, introspection, and Zod schema generation. While Drizzle may require a bit more up-front investment in defining your schema, it can be worth it for the performance gains, especially in serverless environments....

Vue 3.2 - Using Composition API with Script Setup cover image

Vue 3.2 - Using Composition API with Script Setup

Introduction Vue 3 introduced the Composition API as a new way to work with reactive state in a Vue application. Rather than organizing code by functionality, (data, computed, methods, watch, etc), you can group code by feature (users, API, form). This allows for a greater amount of flexibility while building a Vue application. We've already talked about the Composition in other articles (if you haven't read them, check them out!), but with the release of Vue 3.2, another Composition-related feature has been released as stable - `. In short, ` allows developers to define a component without having to export anything from your JavaScript block - simply define your variables and use them in your template! This style of writing a component resembles Svelte in many ways, and is a massive improvement for anyone coming into Vue for the first time. `` Basics Let's look at an example. If you were using the Options API (the standard of Vue 2), all of your single-file components would look something like this: `html Hello, {{ name }}! Submit export default { data() { return { name: '' } }, computed: { isNamePresent() { return this.name.length > 0 } }, methods: { submitName() { console.log(this.name) } } } ` We have our template (a simple form), and our script block. Within the script block, we export an object with three keys: name, computed, and methods. If you are familiar with Vue, this should look familiar to you. Now, let's switch this code to use the Composition API. `html Hello, {{ name }}! Submit import { ref, computed } from 'vue' export default { setup() { const name = ref('') const isNamePresent = computed(() => name.value.length > 0) function submitName() { console.log(name.value) } return { name, isNamePresent, submitName } } } ` Our component does the exact same thing as before. We define our state (name), a computed property (isNamePresent), and our submit function. If any of this is unfamiliar, check out my previous articles on the Vue Composition API. Rather than having to scaffold our application within an object being exported, we are free to define our variables as we want. This flexibility also allows us to extract repeated logic from the component if we want to, but in this case our component is pretty straightforward. However, we still have that awkward export default` statement. Our code all lives within the setup function, while the rest is really just boilerplate. Can't we just remove it? Actually, we can now! This is where `` comes in. Let's switch to use script setup instead of the standard script block. `html Hello, {{ name }}! Submit import { ref, computed } from 'vue' const name = ref('') const isNamePresent = computed(() => name.value.length > 0) function submitName() { console.log(name.value) } ` Let's go over what changed here. First, we added the word "setup" to our script tag, which enables this new mode for writing Vue components. Second, we took our code from within the setup` function, and replaced our existing exported object with just our code. And everything works as expected! Note that everything declared within the script tags is available in the template of your component. This includes non-reactive variables or constants, as well as utility functions or other libraries. The major benefit of this is that you don't need to manually bind an external file (Constants.js, for example) as a value of your component - Vue handles this for you now. Additional Features You may be wondering how to handle some of the core aspects of writing Vue components, like utilizing other components or defining props. Vue 3.2 has us covered for those use cases as well! Let's take a look at some of the additional features provided by this approach to building Vue single-file components. Defining Components When using `, we don't have to manually define our imported components any more. By importing a component into the file, the compiler is able to automatically add it to our application. Let's update our component by abstracting the form into its own component. We'll call it Form.vue. For now, it will simply be the template, and we'll get to the logic in a moment. `html Name Submit function submitHandler() { // Do something } Hello, {{ name }}! import { ref } from 'vue' import Form from './components/Form.vue' const name = ref('') function submitForm() { console.log(name.value) } ` That's it! Our component now has to be imported into our Vue file, and it's automatically available in our template. No more components` block taking up space in our file! Now, we need to pass name` into our child component as a prop. But wait, we can't define props! We don't have an object to add the props option to! Also, we need to emit that the form was submitted so that we can trigger our submission. How can we define what our child component emits? `defineProps` and `defineEmits` We can still define our components props and emits by using new helper methods defineProps` and `defineEmits`. From the Vue docs, "`defineProps` and `defineEmits` are compiler macros only usable inside ``. They do not need to be imported, and are compiled away when `` is processed." These compile-time functions take the same arguments as the standard keys would use with a full export object. Let's update our app to use `defineProps` and `defineEmits`. `html Name Submit import { computed } from 'vue' const props = defineProps({ modelValue: { type: String, default: '' } }) const emit = defineEmits(['update:modelValue', 'submit']); const name = computed({ get () { return props.modelValue }, set(val) { emit('update:modelValue', val); } }) function submitHandler() { emit('submit') } Hello, {{ name }}! import { ref } from 'vue' import Form from './components/Form.vue' const name = ref('') function submitForm() { console.log(name.value) } ` Let's go over what changed here. - First, we used defineProps` to expect a modelValue (the expected prop for use with v-model in Vue 3). - We then defined our emits with defineEmits`, so that we are both reporting what this component emits, and are also getting access to the `emit` function (previously available on `this.$emit). - Next, we create a computed property that utilizes a custom getter and setting. We do this so we can easily use v-model on our form input, but it's not a requirement. The getter returns our prop, where the setter emits the update event to our parent component. - Last of all, we hook up our submitHandler function to emit a submit event as well. Our App.vue component is more or less as we left it, with the addition of v-model="name"` and `@submit="submitForm"` to the Form child component. With that, our application is working as expected again! Other Features There are a lot more features available to us here, but they have fewer use cases in a typical application. - Dynamic Components** - Since our components are immediately available in the template, we can utilize them when writing a dynamic component (``, for example). - Namespaced Components** - If you have a number of components imported from the same file, these can be namespaced by using the `import * as Form` syntax. You then have access to `` or ``, for example, without any extra work on your part. - Top-Level Await** - If you need to make an API request as part of the setup for a component, you are free to use async/await syntax at the top level of your component - no wrapping in an async function required! Keep in mind that a component that utilizes this must be wrapped externally by a `` component - read more here to learn how to use Suspense in Vue. Another point to keep in mind is that you aren't locked into using `. If you are using this new syntax for a component and run into a case where you aren't able to get something done, or simply want to use the Options syntax for a particular case, you are free to do so by adding an additional `` block to your component. Vue will mix the two together for you, so your Composition code and Options code can remain separate. This can be extremely useful when using frameworks like Nuxt that provide additional methods to the standard Options syntax that are not exposed in ``. See the Vue docs for a great example of this. Conclusion This is a big step forward for Vue and the Composition API. In fact, Evan You has gone on the record as saying this is intended to be the standard syntax for Vue single-file components going forward. From a discussion on Github: > There's some history in this because the initial proposal for Composition API indicated the intention to entirely replace Options API with it, and was met with a backlash. Although we did believe that Composition API has the potential to be "the way forward" in the long run, we realized that (1) there were still ergonomics/tooling/design issues to be resolved and (2) a paradigm shift can't be done in one day. We need time and early adopters to validate, try, adopt and experiment around the new paradigm before we can confidently recommend something new to all Vue users. > That essentially led to a "transition period" during which we intentionally avoided declaring Composition API as "the new way" so that we can perform the validation process and build the surrounding tooling /ecosystem with the subset of users who proactively adopted it. > Now that ` has shipped, along with improvements in IDE tooling support, we believe Composition API has reached a state where it provides superior DX and scalability for most users. But we needed time to get to this point. Earlier in that same thread, Evan expressed his views on what development looks like going forward for Vue: > The current recommended approach is: > - Use SFC + ` + Composition API > - Use VSCode + Volar (or WebStorm once its support for ` ships soon) > - Not strictly required for TS, but if applicable, use Vite for build tooling. If you're looking to use Vue 3 for either a new or existing application, I highly recommend trying out this new format for writing Vue single-file components. Looking to try it out? Here's a Stackblitz project using Vite and the example code above....

Being a CTO at Any Level: A Discussion with Kathy Keating, Co-Founder of CTO Levels cover image

Being a CTO at Any Level: A Discussion with Kathy Keating, Co-Founder of CTO Levels

In this episode of the engineering leadership series, Kathy Keating, co-founder of CTO Levels and CTO Advisor, shares her insights on the role of a CTO and the challenges they face. She begins by discussing her own journey as a technologist and her experience in technology leadership roles, including founding companies and having a recent exit. According to Kathy, the primary responsibility of a CTO is to deliver the technology that aligns with the company's business needs. However, she highlights a concerning statistic that 50% of CTOs have a tenure of less than two years, often due to a lack of understanding and mismatched expectations. She emphasizes the importance of building trust quickly in order to succeed in this role. One of the main challenges CTOs face is transitioning from being a technologist to a leader. Kathy stresses the significance of developing effective communication habits to bridge this gap. She suggests that CTOs create a playbook of best practices to enhance their communication skills and join communities of other CTOs to learn from their experiences. Matching the right CTO to the stage of a company is another crucial aspect discussed in the episode. Kathy explains that different stages of a company require different types of CTOs, and it is essential to find the right fit. To navigate these challenges, Kathy advises CTOs to build a support system of advisors and coaches who can provide guidance and help them overcome obstacles. Additionally, she encourages CTOs to be aware of their own preferences and strengths, as self-awareness can greatly contribute to their success. In conclusion, this podcast episode sheds light on the technical aspects of being a CTO and the challenges they face. Kathy Keating's insights provide valuable guidance for CTOs to build trust, develop effective communication habits, match their skills to the company's stage, and create a support system for their professional growth. By understanding these key technical aspects, CTOs can enhance their leadership skills and contribute to the success of their organizations....