
Skip to content

Keeping Costs in Check When Hosting Next.js on Vercel

Keeping Costs in Check When Hosting Next.js on Vercel

Vercel is usually the go-to platform for hosting Next.js apps, and not without reason. Not only are they one of the sponsors of Next.js, but their platform is very straightforward to use, not just for Next.js but for other frameworks, too. So it's no wonder people choose it more and more over other providers.

Vercel, however, is a serverless platform, which means there are a few things you need to be aware of to keep your costs predictable and under control. This blog post covers the most important aspects of hosting a Next.js app on Vercel.

Vercel's Pricing Structure

Vercel's pricing structure is based on fixed and usage-based pricing, which is implemented through two big components of Vercel: the Developer Experience Platform (DX Platform) and the Managed Infrastructure.

The DX Platform offers a monthly-billed suite of tools and services focused on building, deploying, and optimizing web apps. Think of it as the developer-focused interface on Vercel, which assists you in managing your app and provides team collaboration tools, deployment infrastructure, security, and administrative services. Additionally, it includes Vercel support. Because the DX Platform is developer-focused, it's also charged per seat on a monthly basis. The more developers have access to the DX Platform, the more you're charged. In addition to charging per seat, there are also optional, fixed charges for non-included, extra features. Observability Plus is one such example feature.

The Managed Infrastructure, on the other hand, is what makes your app run and scale. It is a serverless platform priced per usage. Thanks to this infrastructure, you don't need to worry about provisioning, maintaining, or patching your servers. Everything is executed through serverless functions, which can scale up and down as needed. Although this sounds great, this is also one of the reasons many developers hesitate to adopt serverless; it may have unpredictable costs. One day, your site sees minimal traffic, and the next, it goes viral on Hacker News, leading to a sudden spike in costs.

Vercel addresses this uncertainty by including a set amount of free serverless usage in each of its DX Platform plans. Once you exceed those limits, additional charges apply based on usage.

Pricing Plans

The DX Platform can be used in three different pricing plans on a team level. A team can represent a single person, a team within a company, or even a whole company. When creating a team on Vercel, this team can have one or more projects.

The first of the three pricing plans is the Hobby plan, which is ideal for personal projects and experimentation. The Hobby plan is free and comes with some of the features and resources of the DX Platform and Managed Infrastructure out of the box, making it suitable for hosting small websites. However, note that the Hobby plan is limited to non-commercial, personal use only.

The Pro plan is the most recommended for most teams and can be used for commercial purposes. At the time of this writing, it costs $20 per team member and comes with generous resources that support most teams.

The third tier is the Enterprise plan, which is the most advanced and expensive option. This plan becomes necessary when your application requires specific compliance or performance features, such as isolated build infrastructure, Single Sign-On (SSO) for corporate user management or custom support with Service-Level Agreements. The Enterprise plan has a custom pricing model and is negotiated directly with Vercel.

What Contributes to Usage Costs and Limiting Them

Now that you've selected a plan for your team, you're ready to deploy Next.js. But how do you determine what contributes to your per-usage costs and ensure they stay within your plan limits?

The Vercel pricing page has a detailed breakdown of the resource usage limits for each plan, which can help you understand what affects your costs. However, in this section, we've highlighted some of the most impactful factors on pricing that we've seen on many of our client projects.

Number of Function Invocations

Each time a serverless function runs, it counts as an invocation. Most of the processing on Vercel for your Next.js apps happens through serverless functions. Some might think that only API endpoints or server actions count as serverless function invocations, but this is not true. Every request that comes to the backend goes through a serverless function invocation, which includes:

To give you an idea of the number of invocations included in a plan, the Pro plan includes 1 million invocations per month for free. After that, it costs $0.60 per million, which can total a significant amount for popular websites.

To minimize serverless function invocations, focus on reducing any of the above points. For example:

  • Batch up server actions: If you have multiple server actions, such as downloading a file and increasing its download count, you can combine them into one server action.
  • Minimize calls to the backend: Closely related to the previous point, unoptimized client components can call the backend more than they need to, contributing to increased function invocation count. If needed, consider using a library such as useSwr or TanStack Query to keep your backend calls under control.
  • Use API routes correctly: Next.js recommends using API routes for external systems invoking your app. For instance, Contentful can invoke a blog post through a webhook without incurring additional invocations. However, avoid invoking API routes from server component tree renders, as this counts as at least two invocations.

Reducing React server component renders is also possible. Not all pages need to be dynamic - convert dynamic routes to static content when you don’t expect them to change in real-time. On the client, utilize Next.js navigation primitives to use the client-side router cache.

Middleware in Next.js runs before every request. Although this doesn't necessarily count as a function invocation (for edge middleware, this is counted in a separate bucket), it's a good idea to minimize the number of times it has to run. To minimize middleware invocations, limit them only to requests that require it, such as protected routes. For static asset requests, you can skip middleware altogether using matchers. For example, the matcher configuration below would prevent invoking the middleware for most static assets:

export const config = {
  matcher: [
    /*
     * Match all request paths except for the ones starting with:
     * - api (API routes)
     * - _next/static (static files)
     * - _next/image (image optimization files)
     * - favicon.ico, sitemap.xml, robots.txt (metadata files)
     */
    '/((?!api|_next/static|_next/image|favicon.ico|sitemap.xml|robots.txt).*)',
  ],
}

Function Execution Time

The duration your serverless function takes to execute counts as the execution time, and it impacts your end bill unless it's within the limits of your plan. This means that any inefficient code that takes longer to execute directly adds up to the total function invocation time.

Many things can contribute to this, but one common pattern we've seen is not utilizing caching properly or under-caching. Next.js offers several caching techniques you can use, such as:

  • Using a data cache to prevent unnecessary database calls or API calls
  • Using memoization to prevent too many API or database calls in the same rendering pass

Another reason, especially now in the age of AI APIs, is having a function run too long due to AI processing. In this case, what we could do is utilize some sort of queuing for long-processing jobs, or enable Fluid Compute, a recent feature by Vercel that optimizes function invocations and reusability.

Bandwidth Usage

The volume of data transferred between users and Vercel, including JavaScript bundles, RSC payload, API responses, and assets, directly contributes to bandwidth usage. In the Pro plan, you receive 1 TB/month of included bandwidth, which may seem substantial but can quickly be consumed by large Next.js apps with:

  • Large JavaScript bundles
  • Many images
  • Large API JSON payloads

Image optimization is crucial for reducing bandwidth usage, as images are typically large assets. By implementing image optimization, you can significantly reduce the amount of data transferred.

To further optimize your bandwidth usage, focus on using the Link component efficiently. This component performs automatic prefetch of content, which can be beneficial for frequently accessed pages. However, you may want to disable this feature for infrequently accessed pages.

The Link component also plays a role in reducing bandwidth usage, as it aids in client-side navigation. When a page is cached client-side, no request is made when the user navigates to it, resulting in reduced bandwidth usage.

Additionally, API and RSC payload responses count towards bandwidth usage. To minimize this impact, always return only the minimum amount of data necessary to the end user.

Image Transformations

Every time Vercel transforms an image from an unoptimized image, this counts as an image transformation. After transformation, every time an optimized image is written to Vercel's CDN network and then read by the user's browser, this counts as an image cache read and an image cache write, respectively.

The Pro plan includes 10k transformations per month, 600k CDN cache reads, and 200k CDN cache writes. Given the high volume of image requests in many apps, it's worth checking if the associated costs can be reduced.

Firstly, not every image needs to be transformed. Certain types of images, such as logos and icons, small UI elements (e.g., button graphics), vector graphics, and other pre-optimized images you may have optimized yourself already, don't require transformation. You can store these images in the public folder and use the unoptimized property with the Image component to mark them as non-transformable.

Another approach is to utilize an external image provider like Cloudinary or AWS CloudFront, which may have already optimized the images. In this case, you can use a custom image loader to take advantage of their optimizations and avoid Vercel's image transformations.

Finally, Next.js provides several configuration options to fine-tune image transformation:

  • images.minimumCacheTTL: Controls the cache duration, reducing the need for rewritten images.
  • images.formats: Allows you to limit eligible image formats for transformation.
  • images.remotePatterns: Defines external sources for image transformation, giving you more control over what's optimized.
  • images.quality: Enables you to set the image quality for transformed images, potentially reducing bandwidth usage.

Monitoring

The "Usage" tab on the team page in Vercel provides a clear view of your team's resource usage. It includes information such as function invocation counts, function durations, and fast origin transfer amounts. You can easily see how far you are from reaching your team's limit, and if you're approaching it, you'll see the amount. This page is a great way to monitor regularity.
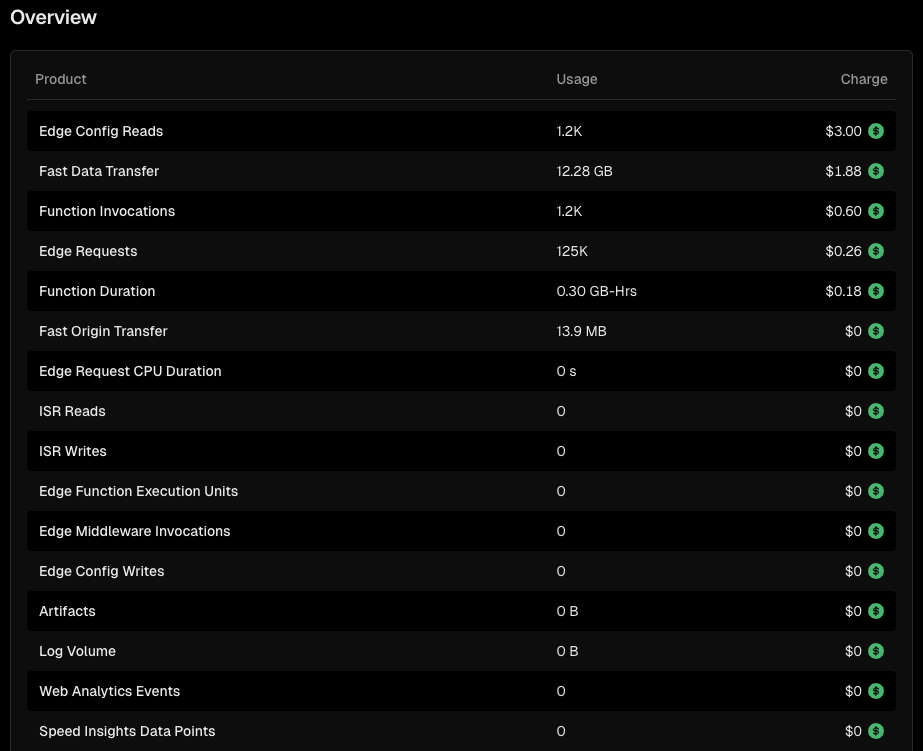
image-20250321091900340

However, you don't need to check it constantly. Vercel offers various aspects of spending management, and you can set alert thresholds to get notified when you're close to or exceed your limit. This helps you proactively manage your spending and avoid unexpected charges.

One good feature of Vercel is its ability to pause projects when your spending reaches a certain point, acting as an "emergency break" in the case of a DDoS attack or a very unusual spike in traffic. However, this will stop the production deployment, and the users will not be able to use your site, but at least you won't be charged for any extra usage. This option is enabled by default.

Conclusion

Hosting a Next.js app on Vercel offers a great developer experience, but it's also important to consider how this contributes to your end bill and keep it under control. Hopefully, this blog post will clear up some of the confusion around pricing and how to plan, optimize, and monitor your costs.

We hope you enjoyed this blog post. Be sure to check out our other blog posts on Next.js for more in-depth coverage of different features of this framework.


This Dot is a consultancy dedicated to guiding companies through their modernization and digital transformation journeys. Specializing in replatforming, modernizing, and launching new initiatives, we stand out by taking true ownership of your engineering projects.

We love helping teams with projects that have missed their deadlines or helping keep your strategic digital initiatives on course. Check out our case studies and our clients that trust us with their engineering.

You might also like

Next.js Rendering Strategies and how they affect core web vitals cover image

Next.js Rendering Strategies and how they affect core web vitals

When it comes to building fast and scalable web apps with Next.js, it’s important to understand how rendering works, especially with the App Router. Next.js organizes rendering around two main environments: the server and the client. On the server side, you’ll encounter three key strategies: Static Rendering, Dynamic Rendering, and Streaming. Each one comes with its own set of trade-offs and performance benefits, so knowing when to use which is crucial for delivering a great user experience. In this post, we'll break down each strategy, what it's good for, and how it impacts your site's performance, especially Core Web Vitals. We'll also explore hybrid approaches and provide practical guidance on choosing the right strategy for your use case. What Are Core Web Vitals? Core Web Vitals are a set of metrics defined by Google that measure real-world user experience on websites. These metrics play a major role in search engine rankings and directly affect how users perceive the speed and smoothness of your site. * Largest Contentful Paint (LCP): This measures loading performance. It calculates the time taken for the largest visible content element to render. A good LCP is 2.5 seconds or less. * Interaction to Next Paint (INP): This measures responsiveness to user input. A good INP is 200 milliseconds or less. * Cumulative Layout Shift (CLS): This measures the visual stability of the page. It quantifies layout instability during load. A good CLS is 0.1 or less. If you want to dive deeper into Core Web Vitals and understand more about their impact on your website's performance, I recommend reading this detailed guide on New Core Web Vitals and How They Work. Next.js Rendering Strategies and Core Web Vitals Let's explore each rendering strategy in detail: 1. Static Rendering (Server Rendering Strategy) Static Rendering is the default for Server Components in Next.js. With this approach, components are rendered at build time (or during revalidation), and the resulting HTML is reused for each request. This pre-rendering happens on the server, not in the user's browser. Static rendering is ideal for routes where the data is not personalized to the user, and this makes it suitable for: * Content-focused websites: Blogs, documentation, marketing pages * E-commerce product listings: When product details don't change frequently * SEO-critical pages: When search engine visibility is a priority * High-traffic pages: When you want to minimize server load How Static Rendering Affects Core Web Vitals * Largest Contentful Paint (LCP): Static rendering typically leads to excellent LCP scores (typically < 1s). The Pre-rendered HTML can be cached and delivered instantly from CDNs, resulting in very fast delivery of the initial content, including the largest element. Also, there is no waiting for data fetching or rendering on the client. * Interaction to Next Paint (INP): Static rendering provides a good foundation for INP, but doesn't guarantee optimal performance (typically ranges from 50-150 ms depending on implementation). While Server Components don't require hydration, any Client Components within the page still need JavaScript to become interactive. To achieve a very good INP score, you will need to make sure the Client Components within the page is minimal. * Cumulative Layout Shift (CLS): While static rendering delivers the complete page structure upfront which can be very beneficial for CLS, achieving excellent CLS requires additional optimization strategies: * Static HTML alone doesn't prevent layout shifts if resources load asynchronously * Image dimensions must be properly specified to reserve space before the image loads * Web fonts can cause text to reflow if not handled properly with font display strategies * Dynamically injected content (ads, embeds, lazy-loaded elements) can disrupt layout stability * CSS implementation significantly impacts CLS—immediate availability of styling information helps maintain visual stability Code Examples: 1. Basic static rendering: ` 2. Static rendering with revalidation (ISR): ` 3. Static path generation: ` 2. Dynamic Rendering (Server Rendering Strategy) Dynamic Rendering generates HTML on the server for each request at request time. Unlike static rendering, the content is not pre-rendered or cached but freshly generated for each user. This kind of rendering works best for: * Personalized content: User dashboards, account pages * Real-time data: Stock prices, live sports scores * Request-specific information: Pages that use cookies, headers, or search parameters * Frequently changing data: Content that needs to be up-to-date on every request How Dynamic Rendering Affects Core Web Vitals * Largest Contentful Paint (LCP): With dynamic rendering, the server needs to generate HTML for each request, and that can't be fully cached at the CDN level. It is still faster than client-side rendering as HTML is generated on the server. * Interaction to Next Paint (INP): The performance is similar to static rendering once the page is loaded. However, it can become slower if the dynamic content includes many Client Components. * Cumulative Layout Shift (CLS): Dynamic rendering can potentially introduce CLS if the data fetched at request time significantly alters the layout of the page compared to a static structure. However, if the layout is stable and the dynamic content size fits within predefined areas, the CLS can be managed effectively. Code Examples: 1. Explicit dynamic rendering: ` 2. Simplicit dynamic rendering with cookies: ` 3. Dynamic routes: ` 3. Streaming (Server Rendering Strategy) Streaming allows you to progressively render UI from the server. Instead of waiting for all the data to be ready before sending any HTML, the server sends chunks of HTML as they become available. This is implemented using React's Suspense boundary. React Suspense works by creating boundaries in your component tree that can "suspend" rendering while waiting for asynchronous operations. When a component inside a Suspense boundary throws a promise (which happens automatically with data fetching in React Server Components), React pauses rendering of that component and its children, renders the fallback UI specified in the Suspense component, continues rendering other parts of the page outside this boundary, and eventually resumes and replaces the fallback with the actual component once the promise resolves. When streaming, this mechanism allows the server to send the initial HTML with fallbacks for suspended components while continuing to process suspended components in the background. The server then streams additional HTML chunks as each suspended component resolves, including instructions for the browser to seamlessly replace fallbacks with final content. It works well for: * Pages with mixed data requirements: Some fast, some slow data sources * Improving perceived performance: Show users something quickly while slower parts load * Complex dashboards: Different widgets have different loading times * Handling slow APIs: Prevent slow third-party services from blocking the entire page How Streaming Affects Core Web Vitals * Largest Contentful Paint (LCP): Streaming can improve the perceived LCP. By sending the initial HTML content quickly, including potentially the largest element, the browser can render it sooner. Even if other parts of the page are still loading, the user sees the main content faster. * Interaction to Next Paint (INP): Streaming can contribute to a better INP. When used with React's <Suspense />, interactive elements in the faster-loading parts of the page can become interactive earlier, even while other components are still being streamed in. This allows users to engage with the page sooner. * Cumulative Layout Shift (CLS): Streaming can cause layout shifts as new content streams in. However, when implemented carefully, streaming should not negatively impact CLS. The initially streamed content should establish the main layout, and subsequent streamed chunks should ideally fit within this structure without causing significant reflows or layout shifts. Using placeholders and ensuring dimensions are known can help prevent CLS. Code Examples: 1. Basic Streaming with Suspense: ` 2. Nested Suspense boundaries for more granular control: ` 3. Using Next.js loading.js convention: ` 4. Client Components and Client-Side Rendering Client Components are defined using the React 'use client' directive. They are pre-rendered on the server but then hydrated on the client, enabling interactivity. This is different from pure client-side rendering (CSR), where rendering happens entirely in the browser. In the traditional sense of CSR (where the initial HTML is minimal, and all rendering happens in the browser), Next.js has moved away from this as a default approach but it can still be achievable by using dynamic imports and setting ssr: false. ` Despite the shift toward server rendering, there are valid use cases for CSR: 1. Private dashboards: Where SEO doesn't matter, and you want to reduce server load 2. Heavy interactive applications: Like data visualization tools or complex editors 3. Browser-only APIs: When you need access to browser-specific features like localStorage or WebGL 4. Third-party integrations: Some third-party widgets or libraries that only work in the browser While these are valid use cases, using Client Components is generally preferable to pure CSR in Next.js. Client Components give you the best of both worlds: server-rendered HTML for the initial load (improving SEO and LCP) with client-side interactivity after hydration. Pure CSR should be reserved for specific scenarios where server rendering is impossible or counterproductive. Client components are good for: * Interactive UI elements: Forms, dropdowns, modals, tabs * State-dependent UI: Components that change based on client state * Browser API access: Components that need localStorage, geolocation, etc. * Event-driven interactions: Click handlers, form submissions, animations * Real-time updates: Chat interfaces, live notifications How Client Components Affect Core Web Vitals * Largest Contentful Paint (LCP): Initial HTML includes the server-rendered version of Client Components, so LCP is reasonably fast. Hydration can delay interactivity but doesn't necessarily affect LCP. * Interaction to Next Paint (INP): For Client Components, hydration can cause input delay during page load, and when the page is hydrated, performance depends on the efficiency of event handlers. Also, complex state management can impact responsiveness. * Cumulative Layout Shift (CLS): Client-side data fetching can cause layout shifts as new data arrives. Also, state changes might alter the layout unexpectedly. Using Client Components will require careful implementation to prevent shifts. Code Examples: 1. Basic Client Component: ` 2. Client Component with server data: ` Hybrid Approaches and Composition Patterns In real-world applications, you'll often use a combination of rendering strategies to achieve the best performance. Next.js makes it easy to compose Server and Client Components together. Server Components with Islands of Interactivity One of the most effective patterns is to use Server Components for the majority of your UI and add Client Components only where interactivity is needed. This approach: 1. Minimizes JavaScript sent to the client 2. Provides excellent initial load performance 3. Maintains good interactivity where needed ` Partial Prerendering (Next.js 15) Next.js 15 introduced Partial Prerendering, a new hybrid rendering strategy that combines static and dynamic content in a single route. This allows you to: 1. Statically generate a shell of the page 2. Stream in dynamic, personalized content 3. Get the best of both static and dynamic rendering Note: At the time of this writing, Partial Prerendering is experimental and is not ready for production use. Read more ` Measuring Core Web Vitals in Next.js Understanding the impact of your rendering strategy choices requires measuring Core Web Vitals in real-world conditions. Here are some approaches: 1. Vercel Analytics If you deploy on Vercel, you can use Vercel Analytics to automatically track Core Web Vitals for your production site: ` 2. Web Vitals API You can manually track Core Web Vitals using the web-vitals library: ` 3. Lighthouse and PageSpeed Insights For development and testing, use: * Chrome DevTools Lighthouse tab * PageSpeed Insights * Chrome User Experience Report Making Practical Decisions: Which Rendering Strategy to Choose? Choosing the right rendering strategy depends on your specific requirements. Here's a decision framework: Choose Static Rendering when * Content is the same for all users * Data can be determined at build time * Page doesn't need frequent updates * SEO is critical * You want the best possible performance Choose Dynamic Rendering when * Content is personalized for each user * Data must be fresh on every request * You need access to request-time information * Content changes frequently Choose Streaming when * Page has a mix of fast and slow data requirements * You want to improve perceived performance * Some parts of the page depend on slow APIs * You want to prioritize showing critical UI first Choose Client Components when * UI needs to be interactive * Component relies on browser APIs * UI changes frequently based on user input * You need real-time updates Conclusion Next.js provides a powerful set of rendering strategies that allow you to optimize for both performance and user experience. By understanding how each strategy affects Core Web Vitals, you can make informed decisions about how to build your application. Remember that the best approach is often a hybrid one, combining different rendering strategies based on the specific requirements of each part of your application. Start with Server Components as your default, use Static Rendering where possible, and add Client Components only where interactivity is needed. By following these principles and measuring your Core Web Vitals, you can create Next.js applications that are fast, responsive, and provide an excellent user experience....

The simplicity of deploying an MCP server on Vercel cover image

The simplicity of deploying an MCP server on Vercel

The current Model Context Protocol (MCP) spec is shifting developers toward lightweight, stateless servers that serve as tool providers for LLM agents. These MCP servers communicate over HTTP, with OAuth handled clientside. Vercel’s infrastructure makes it easy to iterate quickly and ship agentic AI tools without overhead. Example of Lightweight MCP Server Design At This Dot Labs, we built an MCP server that leverages the DocuSign Navigator API. The tools, like `get_agreements`, make a request to the DocuSign API to fetch data and then respond in an LLM-friendly way. ` Before the MCP can request anything, it needs to guide the client on how to kick off OAuth. This involves providing some MCP spec metadata API endpoints that include necessary information about where to obtain authorization tokens and what resources it can access. By understanding these details, the client can seamlessly initiate the OAuth process, ensuring secure and efficient data access. The Oauth flow begins when the user's LLM client makes a request without a valid auth token. In this case they’ll get a 401 response from our server with a WWW-Authenticate header, and then the client will leverage the metadata we exposed to discover the authorization server. Next, the OAuth flow kicks off directly with Docusign as directed by the metadata. Once the client has the token, it passes it in the Authorization header for tool requests to the API. ` This minimal set of API routes enables me to fetch Docusign Navigator data using natural language in my agent chat interface. Deployment Options I deployed this MCP server two different ways: as a Fastify backend and then by Vercel functions. Seeing how simple my Fastify MCP server was, and not really having a plan for deployment yet, I was eager to rewrite it for Vercel. The case for Vercel: * My own familiarity with Next.js API deployment * Fit for architecture * The extremely simple deployment process * Deploy previews (the eternal Vercel customer conversion feature, IMO) Previews of unfamiliar territory Did you know that the MCP spec doesn’t “just work” for use as ChatGPT tooling? Neither did I, and I had to experiment to prove out requirements that I was unfamiliar with. Part of moving fast for me was just deploying Vercel previews right out of the CLI so I could test my API as a Connector in ChatGPT. This was a great workflow for me, and invaluable for the team in code review. Stuff I’m Not Worried About Vercel’s mcp-handler package made setup effortless by abstracting away some of the complexity of implementing the MCP server. It gives you a drop-in way to define tools, setup https-streaming, and handle Oauth. By building on Vercel’s ecosystem, I can focus entirely on shipping my product without worrying about deployment, scaling, or server management. Everything just works. ` A Brief Case for MCP on Next.js Building an API without Next.js on Vercel is straightforward. Though, I’d be happy deploying this as a Next.js app, with the frontend features serving as the documentation, or the tools being a part of your website's agentic capabilities. Overall, this lowers the barrier to building any MCP you want for yourself, and I think that’s cool. Conclusion I'll avoid quoting Vercel documentation in this post. AI tooling is a critical component of this natural language UI, and we just want to ship. I declare Vercel is excellent for stateless MCP servers served over http....

Implementing Dynamic Types in Docusign Extension Apps cover image

Implementing Dynamic Types in Docusign Extension Apps

Implementing Dynamic Types in Docusign Extension Apps In our previous blog post about Docusign Extension Apps, Advanced Authentication and Onboarding Workflows with Docusign Extension Apps, we touched on how you can extend the OAuth 2 flow to build a more powerful onboarding flow for your Extension Apps. In this blog post, we will continue explaining more advanced patterns in developing Extension Apps. For that reason, we assume at least basic familiarity with how Extension Apps work and ideally some experience developing them. To give a brief recap, Docusign Extension Apps are a powerful way to embed custom logic into Docusign agreement workflows. These apps are lightweight services, typically cloud-hosted, that integrate at specific workflow extension points to perform custom actions, such as data validation, participant input collection, or interaction with third-party services. Each Extension App is configured using a manifest file. This manifest defines metadata such as the app's author, support links, and the list of extension points it uses (these are the locations in the workflow where your app's logic will be executed). The extension points that are relevant for us in the context of this blog post are GetTypeNames and GetTypeDefinitions. These are used by Docusign to retrieve the types supported by the Extension App and their definitions, and to show them in the Maestro UI. In most apps, these types are static and rarely change. However, they don't have to be. They can also be dynamic and change based on certain configurations in the target system that the Extension App is integrating with, or based on the user role assigned to the Maestro administrator on the target system. Static vs. Dynamic Types To explain the difference between static and dynamic types, we'll use the example from our previous blog post, where we integrated with an imaginary task management system called TaskVibe. In the example, our Extension App enabled agreement workflows to communicate with TaskVibe, allowing tasks to be read, created, and updated. Our first approach to implementing the GetTypeNames and GetTypeDefinitions endpoints for the TaskVibe Extension App might look like the following. The GetTypeNames endpoint returns a single record named task: ` Given the type name task, the GetTypeDefinitions endpoint would return the following definition for that type: ` As noted in the Docusign documentation, this endpoint must return a Concerto schema representing the type. For clarity, we've omitted most of the Concerto-specific properties. The above declaration states that we have a task type, and this type has properties that correspond to task fields in TaskVibe, such as record ID, title, description, assignee, and so on. The type definition and its properties, as described above, are static and they never change. A TaskVibe task will always have the same properties, and these are essentially set in stone. Now, imagine a scenario where TaskVibe supports custom properties that are also project-dependent. One project in TaskVibe might follow a typical agile workflow with sprints, and the project manager might want a "Sprint" field in every task within that project. Another project might use a Kanban workflow, where the project manager wants a status field with values like "Backlog," "ToDo," and so on. With static types, we would need to return every possible field from any project as part of the GetTypeDefinitions response, and this introduces new challenges. For example, we might be dealing with hundreds of custom field types, and showing them in the Maestro UI might be too overwhelming for the Maestro administrator. Or we might be returning fields that are simply not usable by the Maestro administrator because they relate to projects the administrator doesn't have access to in TaskVibe. With dynamic types, however, we can support this level of customization. Implementing Dynamic Types When Docusign sends a request to the GetTypeNames endpoint and the types are dynamic, the Extension App has a bit more work than before. As we've mentioned earlier, we can no longer return a generic task type. Instead, we need to look into each of the TaskVibe projects the user has access to, and return the tasks as they are represented under each project, with all the custom fields. (Determining access can usually be done by making a query to a user information endpoint on the target system using the same OAuth 2 token used for other calls.) Once we find the task definitions on TaskVibe, we then need to return them in the response of GetTypeNames, where each type corresponds to a task for the given project. This is a big difference from static types, where we would only return a single, generic task. For example: ` The key point here is that we are now returning one type per task in a TaskVibe project. You can think of this as having a separate class for each type of task, in object-oriented lingo. The type name can be any string you choose, but it needs to be unique in the list, and it needs to contain the minimum information necessary to be able to distinguish it from other task definitions in the list. In our case, we've decided to form the ID by concatenating the string "task_" with the ID of the project on TaskVibe. The implementation of the GetTypeDefinitions endpoint needs to: 1. Extract the project ID from the requested type name. 1. Using the project ID, retrieve the task definition from TaskVibe for that project. This definition specifies which fields are present on the project's tasks, including all custom fields. 1. Once the fields are retrieved, map them to the properties of the Concerto schema. The resulting JSON could look like this (again, many of the Concerto properties have been omitted for clarity): ` Now, type definitions are fully dynamic and project-dependent. Caching of Type Definitions on Docusign Docusign maintains a cache of type definitions after an initial connection. This means that changes made to your integration (particularly when using dynamic types) might not be immediately visible in the Maestro UI. To ensure users see the latest data, it's useful to inform them that they may need to refresh their Docusign connection in the App Center UI if new fields are added to their integrated system (like TaskVibe). As an example, a newly added custom field on a TaskVibe project wouldn't be reflected until this refresh occurs. Conclusion In this blog post, we've explored how to leverage dynamic types within Docusign Extension Apps to create more flexible integrations with external systems. While static types offer simplicity, they can be constraining when working with external systems that offer a high level of customization. We hope that this blog post provides you with some ideas on how you can tackle similar problems in your Extension Apps....

This Dot AI Field Notes - Anatomy of a Coding Harness cover image

This Dot AI Field Notes - Anatomy of a Coding Harness

A coding agent is not magic, it’s a loop. We call this a harness. The harness is a deterministic layer of code that wraps an LLM. Claude Code is a harness. Codex is a harness. Pi is a harness. The harness, on initialization, provides to the LLM a system prompt defining all tools the harness implements for the LLM. Without the harness, you cannot read or modify files on the user’s local filesystem without them having to copy-and-pasting by hand. The harness is the final place where engineers can customize how coding agents do work before the LLM takes over. Think of the LLM as a train and the harness as the rails the train rides on. Below… one full task executed by a harness, traced step by step....

Let's innovate together!

We're ready to be your trusted technical partners in your digital innovation journey.

Whether it's modernization or custom software solutions, our team of experts can guide you through best practices and how to build scalable, performant software that lasts.

Prefer email? hi@thisdot.co