This is Part One of a three part series on Migrating an Amplify Backend on Serverless Framework. You can find Part Two here and Part Three here.
We've used Amplify extensively here at This Dot on various projects. It is a great service by AWS that lets you develop and deploy frontends and backends with ease. While Amplify frontends are relatively straightforward to work with, working with Amplify backends is a bit tricky.
In one project, we have had many challenges working on an Amplify backend in a large team. Amplify does quite a bit of code generation whenever you make a change in the backend, and it was challenging for multiple people to work on backend features in parallel. More often than not, we ran into nasty merge conflicts, and occasionally, we've even had cases where developers were losing entire Amplify environments due to bad merges.
Since we have expertise in Serverless Framework, we decided to try migrating our Amplify backend to Serverless Framework so we can speed up development by leveraging Serverless Framework's offline capabilities as well as generally faster deploys. Also, in Serverless Framework, there's usually only a handful of configuration files that you have to edit, so resolving merge issues is pretty straightforward.
This is the story of that migration. It will be a series of blog posts where we will show, step by step, how to migrate an Amplify backend to Serverless Framework so that you can use Serverless Framework alone to deploy your backend services. Note that we recommend having at least some knowledge of Amplify, AWS, and Serverless Framework.
Sample Application
To start off, we've scaffolded a to-do application that we named "Amplified ToDo". We've used Amplify's guide for scaffolding a GraphQL project and the application itself doesn't have any business logic (nor is needed for the purpose of this blog post). We'll only use it as an example of how to model some of Amplify's core features like GraphQL API, Cognito user pools, lambdas, lambda triggers, etc.
To do this, though, we'll need to make some assumptions about how the application will work. Since it will be a to-do application, we will definitely need a to-do list with to-do items. They can be modeled with the following types:
type List
@model(
  mutations: { create: "createList", update: "updateList" }
  queries: { get: "getList", list: "listLists" }
  subscriptions: null
)
@auth(
  rules: [
    {
      allow: owner
      identityField: "sub"
      ownerField: "owner"
      operations: [create, update, delete, read]
    }
  ]
){
  id: ID!
  cognitoUserId: ID!
  title: String!
  items: [Item] @connection(keyName: "byList", fields: ["id"])
}

type Item
@model(
  mutations: { create: "createItem", update: "updateItem" }
  queries: { get: "getItem", list: "listItems" }
  subscriptions: null
)
@key(name: "byList", fields: ["listId"])
@auth(
  rules: [
    {
      allow: owner
      identityField: "sub"
      ownerField: "owner"
      operations: [create, update, delete, read]
    }
  ]
){
  id: ID!
  cognitoUserId: ID!
  listId: ID!
  title: String!
  notes: String!
  completed: Boolean
  remindAt: AWSDateTime
}
There are several things to note here. To demonstrate the use of Cognito user pools, we're assuming that only Cognito-authenticated users will be able to use the app. Both List and Item types have a cognitoUserId field which prevents users from reading each other's data through Amplify's @auth directive. We're also assuming that users will want to use reminders for their tasks, hence the remindAt field in the Item type. Reminders will be sent only to those users that want them, though. We'll create another type called UserPreference where we will store reminder preferences for our users:
type UserPreference
@model(mutations: { update: "updateUserPreference" }, queries: { get: "getUserPreference" }, subscriptions: null)
@auth(
  rules: [
    {
      allow: owner
      identityField: "sub"
      ownerField: "owner"
      operations: [create, update, delete, read]
    }
  ]
) {
  id: ID!
  cognitoUserId: ID!
  notificationConfig: NotificationConfig
}

type NotificationConfig {
  email: Boolean,
  inApp: Boolean
}
A Cognito trigger will create an instance of user preference on every new user registration.
As for the notifications, there are dozens of ways we could process these notifications, but to demonstrate the usage of DynamoDB triggers, we'll use a dedicated DynamoDB table for queuing notifications. Whenever Item is updated, a DynamoDB will read its remindAt field and insert a notification to the queue. Let's add a GraphQL type for that:
type NotificationQueue
@model(mutations: null, queries: { get: "getNotificationQueueItem" }, subscriptions: null)
{
  id: ID!
  itemId: ID!
  email: Boolean,
  inApp: Boolean,
  sent: Boolean,
  scheduledFor: AWSDateTime
}
Finally, to demonstrate invoking lambdas via GraphQL API, we'll have a dedicated mutation for triggering the processing of the notification queue. Let's add GraphQL types for that as well:
type Mutation {
  processQueue(input: ProcessQueueInput!): ID @function(name: "processQueue")
}

input ProcessQueueInput {
  since: AWSDateTime!
}
You can view the entire schema on GitHub. With the above assumptions in mind, we can now proceed in modeling the following Amplify features using Serverless Framework:
- Deploying Cognito user pools
- Invoking lambdas via Cognito user triggers (creation of
UserPreferenceitems) - Setting up GraphQL API
- Using Amplify-specific directives such as
@authand@model - Mapping GraphQL types to DynamoDB tables
- Invoking lambdas via GraphQL mutations (processing notification queues)
- Invoking lambdas via DynamoDB triggers (adding notifications to queues on every modification of
Itemrows) - Deploying S3 buckets
As part of this blog post, we'll cover the first two points. The remaining points will come in future blog posts.
Building Our Serverless Framework Config
The first time you try to model anything close to an Amplify-powered GraphQL API, you come to appreciate just how much of the work Amplify does for you! Not only does it provide you specialized directives for easily modeling your data types (such as @connection for parent-child connections), but it takes care of the resolving part as well - you don't need to write any code for mapping your GraphQL invocations to a DynamoDB table, for example. Needless to say, Amplify is a powerful beast.
Hence, copying an Amplify-based GraphQL API to Serverless Framework is not an easy task. Fortunately, the Amplify CLI which does the bulk of the work is open-source, so we can use parts of it to replicate Amplify's behavior. Also, Serverless Framework itself has some nice plugins for working with AppSync, the powerhorse behind Amplify's GraphQL API. When joined together, they can help us accomplish what we need.
Initializing Serverless Config
Install the Serverless CLI using the official guide, and initialize your Serverless configuration file by calling serverless in the terminal:
➜  Amplified-ToDo git:(main) serverless

Creating a new serverless project

? What do you want to make? AWS - Node.js - Starter
? What do you want to call this project? amplified-todo-api

✔ Project successfully created in amplified-todo folder

? Do you want to login/register to Serverless Dashboard? No
This will create the following directory structure under your project directory:
AmplifiedToDo/
├─ amplified-todo-api/
│  ├─ .gitignore
│  ├─ handler.js
│  ├─ README.md
│  ├─ serverless.yml
handler.js is just a sample Lambda function, while serverless.yml is the core of the Serverless Framework config, and we'll be spending most of our time there.
Now, go to the amplified-todo-api and install the serverless-appsync-plugin plugin as well as dependencies that we need for transforming the GraphQL schema. We'll need this later on when we will be configuring AppSync.
➜ amplified-todo-api git:(main) npm install --save-dev serverless-appsync-plugin graphql-auth-transformer graphql-function-transformer graphql-key-transformer graphql-connection-transformer graphql-dynamodb-transformer graphql-transformer-core graphql-elasticsearch-transformer
Now, add .env to your .gitignore file and create a .env file that will hold your environment variables. Here, you can store various parameters that may differ from developer to developer, such as the name of the AWS profile that holds your AWS access key ID and the secret access key that you can use for deployment. Let's create that environment variable in the .env file:
PROFILE=todo
todo is the profile that I use locally, but yours can be named differently.
Now, we can start editing the Serverless config file. Let's do some modifications to the config that Serverless CLI initialized and try our first deploy:
service: amplified-todo-api

frameworkVersion: '3'
useDotenv: true

provider:
  name: aws
  runtime: nodejs14.x
  profile: ${env:PROFILE}
  stage: dev

functions:
  hello:
    handler: handler.hello
In the modified config, we've added support for dotenv files as well as defined the profile that we will be using for deployment. We're reading the PROFILE environment variable by using the environment variable syntax for reading variables in Serverless Framework. If you run sls deploy now, you will have your first service deployed:
➜  amplified-todo-api git:(main) ✗ sls deploy

Deploying amplified-todo-api to stage dev (us-east-1)

✔ Service deployed to stack amplified-todo-api-dev (76s)

functions:
  hello: amplified-todo-api-dev-hello (17 MB)
Deploying Cognito User Pools
Now that we have the basic config set up, let's replace the hello lambda with a lambda that will be invoked after a new app user is registered. The content of the lambda doesn't matter - it may be used to insert a new UserPreference item to the table, for example. What we will show you, though, is how you can create and deploy such lambda, and have it triggered by Cognito.
Cognito user pools allow you to hook into various events of a user lifecycle, such as user authentication, or user registration. When the user is registered and confirmed, Cognito will trigger a PostConfirmation event. To create a lambda that will listen to such an event, you can create something like handlers/insert-user-preference/index.js in the amplified-todo-api directory, with the following content:
'use strict';

module.exports.handler = async (event) => {
  return {
    statusCode: 200,
    body: JSON.stringify(
      {
        message: 'Go Serverless v3.0! Your function executed successfully!',
        input: event,
      },
      null,
      2
    ),
  };
};
Now, replace the hello function lambda definition in the Serverless config file with the following:
functions:
  insertUserPreference:
    handler: handlers/insert-user-preference/index.handler
    events:
      - cognitoUserPool:
          pool: AmplifiedToDo
          trigger: PostConfirmation
And run sls deploy. Now here comes the tricky part. By defining that we are listening on PostConfirmation events, Serverless Framework will also implicitly create a Cognito user pool on AWS once you deploy! This is unlike many other resources that have to be defined explicitly in the Serverless config.
The user pool will have default properties, however. If you want to customize those properties, then you need to override the generated user pool by creating its resource in the Resources section of the Serverless config file:
resources:
Resources:
CognitoUserPoolAmplifiedToDo:
Type: AWS::Cognito::UserPool
Properties:
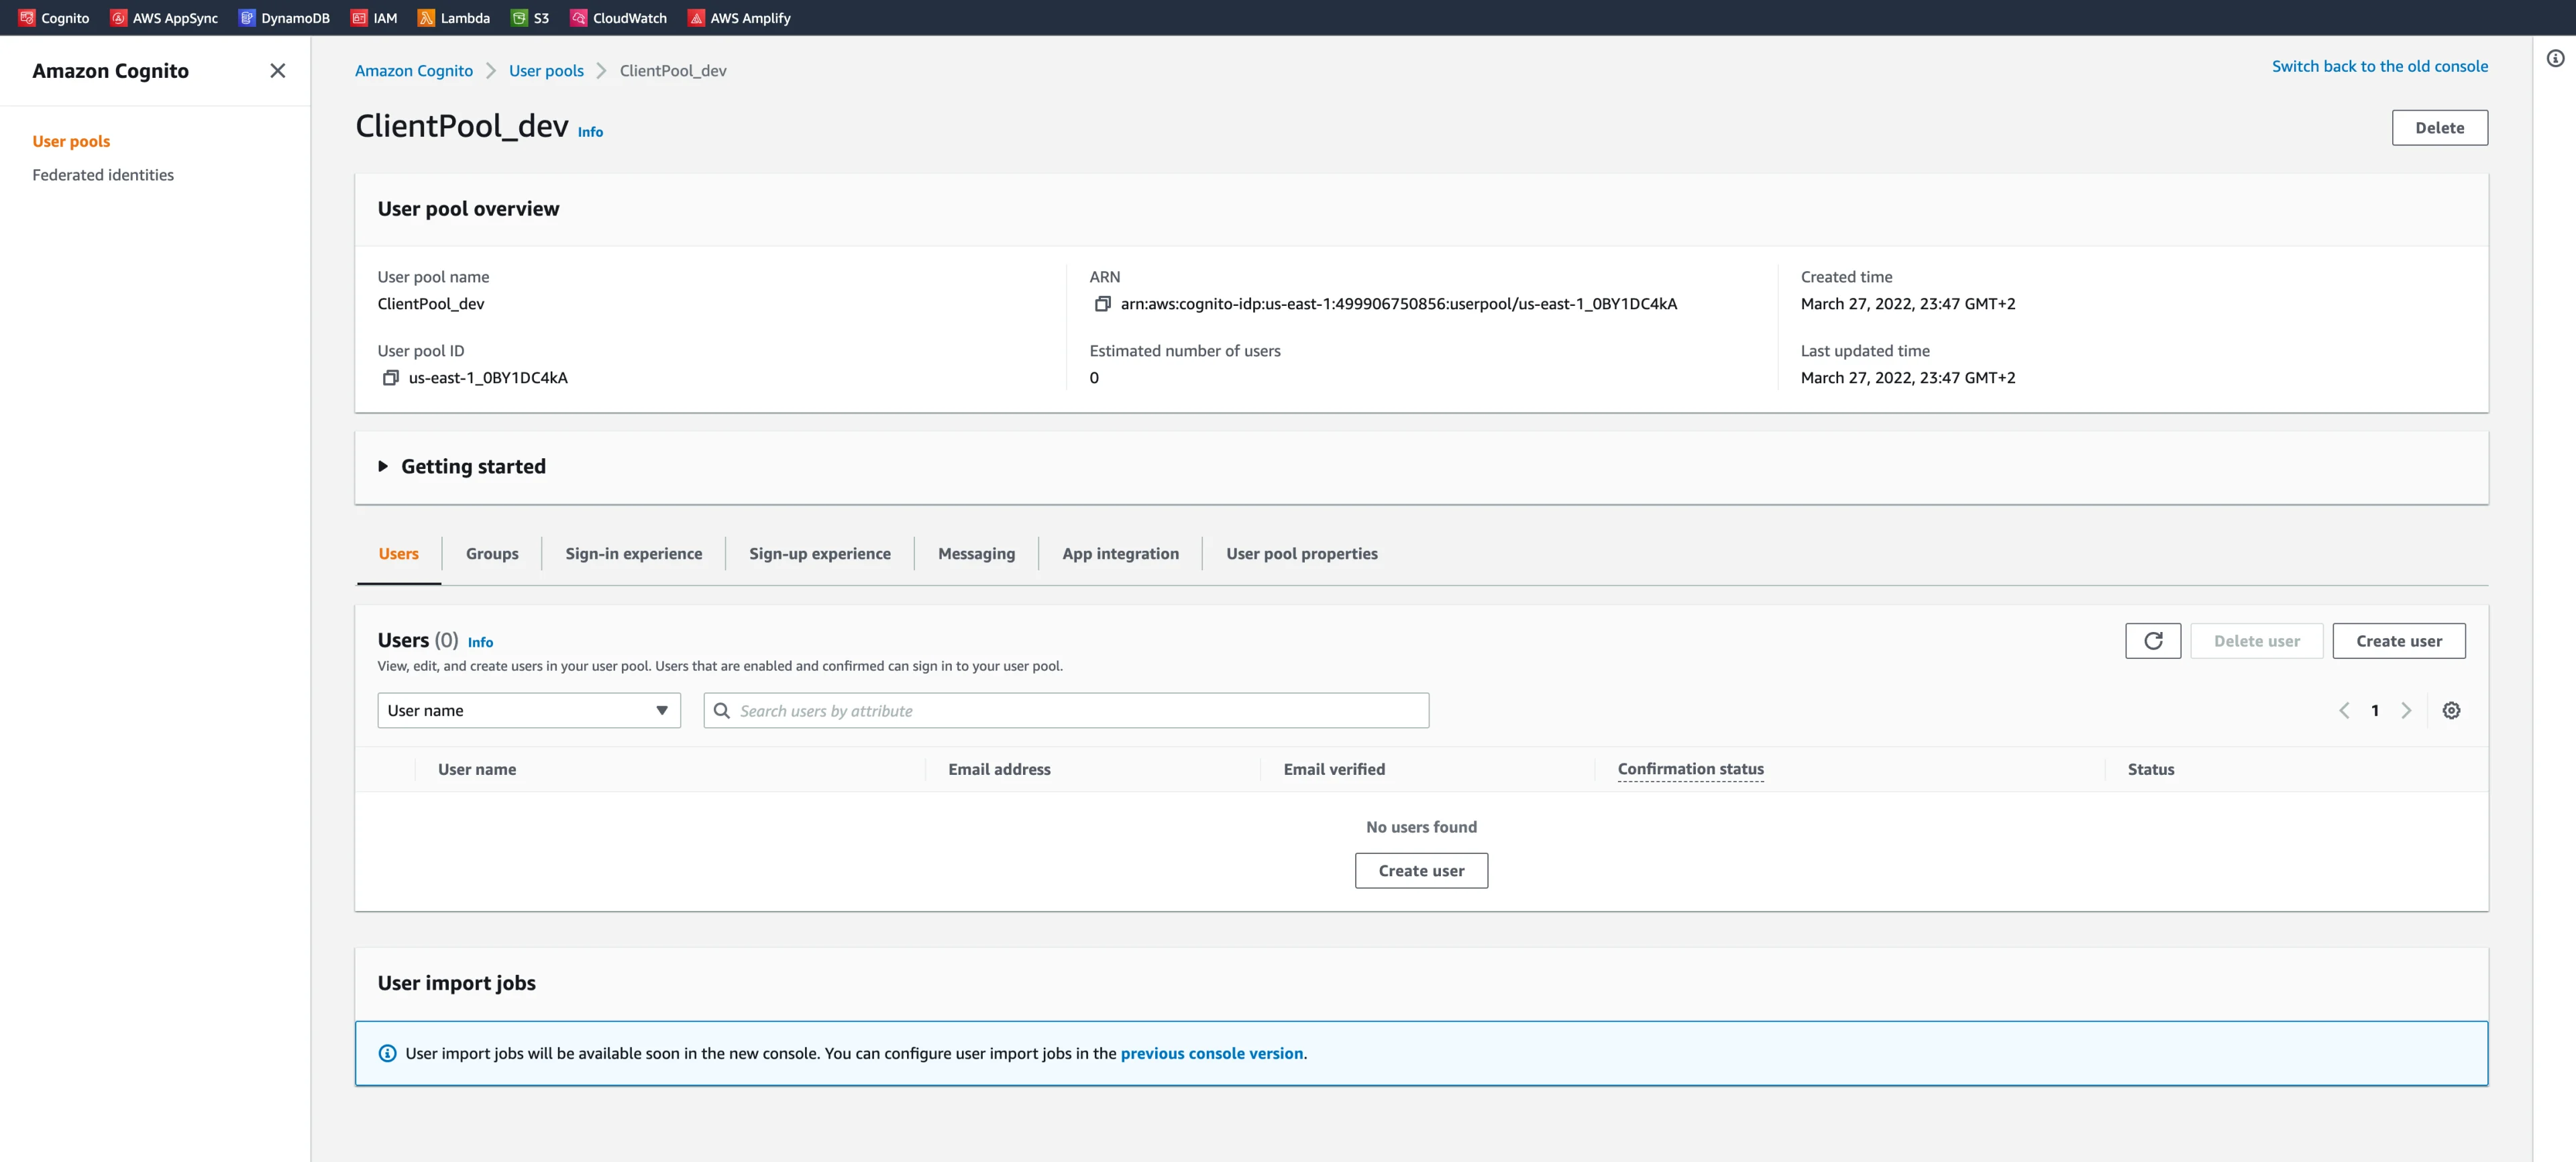
UserPoolName: ClientPool_${self:provider.stage}
UsernameAttributes:
- email
Schema:
- Name: email
AttributeDataType: String
Required: true
Mutable: true
AutoVerifiedAttributes:
- email
Policies:
PasswordPolicy:
MinimumLength: 8
RequireLowercase: false
RequireNumbers: false
RequireSymbols: false
RequireUppercase: false
UserPoolClient:
Type: AWS::Cognito::UserPoolClient
Properties:
ClientName: AmplifiedToDo_UI_${self:provider.stage}
UserPoolId:
Ref: CognitoUserPoolAmplifiedToDo
The name of the Cognito user pool resource is important. It needs to be the same as the resource that was created implicitly by Serverless Framework. Serverless Framework uses a special naming convention when creating resources, and you can look into their documentation to see how they form the name of the Cognito user pool resource when it's created implicitly by a lambda trigger. For Cognito user pools, it will normalize the name of the pool and then prefix it with CognitoUserPool, so that in our case, it becomes CognitoUserPoolAmplifiedToDo.
Tip: if you are ever unsure what name Serverless Framework will use for an implicitly generated resource, you may want to dig into the generated Cloud Formation template located in amplified-todo-api/.serverless/cloudformation-template-update-stack.json. In the case of Cognito user pool, look by the name of the Cognito user pool. In our case, it was AmplifiedToDo, so you should be able to find CognitoUserPoolAmplifiedToDo resource in the Cloud Formation template. The Cloud Formation template is big and maybe scary to look at, but it's useful for troubleshooting deployment issues.
Once you figure out the name of the resource, modifying the remaining properties of the resource is relatively straightforward. For UserPoolName, we can use any name, but since this is the name that will be shown on the AWS Console, it makes sense to inject provider.stage into the name so that we can differentiate user pools by stage.
To use the user pool from an external application such as our UI application, we also need to create a user pool client. This is the second resource shown in the previous snippet. The user pool client needs to reference the user pool it is created under, and for this we use the Ref intrinsic function to reference the user pool by resource name (CognitoUserPoolAmplifiedToDo). (AWS intrinsic functions are used in Cloud Formation templates for objects to reference each other.)
Now, when you try to deploy, your AWS may not allow you to deploy the changes. You might get an error like:
Updates are not allowed for property - UserPoolName
This is because once you create a Cognito pool, you cannot modify its name, even through the AWS console. If this happens, it would be best to remove the service using sls remove and re-deploy using sls deploy. For that reason, it's always a good idea to configure Cognito before doing anything else.
Going Forward
This is it for this blog post. In the following weeks, we will be continuing this project to create our first AppSync configuration, and deploy our GraphQL schema.