Skip to content

Build Typescript Project with Bazel Chapter 1: Bazel introduction

This article was written over 18 months ago and may contain information that is out of date. Some content may be relevant but please refer to the relevant official documentation or available resources for the latest information.

Bazel is a fast, scalable, incremental, and universal (for any languages/frameworks) build tool, and is especially useful for big mono repo projects.

I would like to write a series of blogs to introduce the concept of how to build a typescript project with Bazel.

  • Chapter 1: Bazel Introduction
  • Chapter 2: Bazel file structure and Bazel Query
  • Chapter 3: Build/Develop/Test a typescript project

In chapter 1, I would like introduce basic Bazel concepts, and define some of the benefits we can expect from using Bazel.

  • What is Bazel?
  • Bazel: Correctness
  • Bazel: Fast
  • Bazel: Universal
  • Bazel: Industrial grade

What is Bazel?

As you may know, we already have a lot of build tools. They include:

  • CI tools: Jenkins/CircleCI
  • Compile tools: tsc/sass
  • Bundle tools: webpack/rollup
  • Coordinate tools: make/grunt/gulp

So what is Bazel? Does it simply replace Jenkins or Webpack? @AlexEagle helped us answer this question at ngconf 2019, but here is a great picture that will explain a little as well. Build tools

So Bazel is a build tool, used to coordinate other tools (compile/bundle tools), and will use all the existing tools (such as tsc/webpack/rollup) to do the underlying work.

Another graph, also from @AlexEagle, will show this relationship more clearly. Bazel is a Hub

Ok, so Bazel is at the same position as Gulp, why not continue to use Gulp?

To answer this question, let's think about what the goal of the build tool is.

  • Essential:
    • Correct - don't need to worry about environmental pollution.
    • Fast
      • Incremental
      • Parallelism
    • Predictable - Same input will guarantee the same output.
    • Reusable - Build logic can be easily composed and reused.
  • Nice to have:
    • Universal - support multiple languages and frameworks.

Correctness

This is the most important requirement. We all want our build systems to be stable, and we don't want them to generate unexpected results. Therefore, we want every build to be executed in an isolated environment. Otherwise, we will run into problems if, for example, we forget to delete some temp files, forget to reset environment variables, or if the build only works under certain conditions.

  • Sandboxing: Bazel supports sandboxing to isolate the environment. When we do a Bazel build, it will create an isolated working folder, and Bazel will run the build process under this folder. This is what we would call "sandboxing". Bazel will then restrict the access to the files outside of this folder. Also, Bazel makes sure that elements of the build tool, such as the compiler, only know their own input files, so the output will only depend on input. xy087mf2gsrbfdbe3t4r

  • The rule can only access an input file. Unlike a Gulp task, a Bazel rule can only access the files declared as input (we will talk about the target/rule in detail later).

Here is an example of a Gulp task:

gulp.task('compile', ['depTask'], () => {
  // do compile
  gulp.src(["a.ts"])
      .pipe(tsc(...));
});

So inside of a Gulp task, there is just a normal function. There is no concept of Input, and dependencies only tells gulp to run tasks in a specified order, so the task can access any files, and use any environmental variables with no restrictions. Gulp will have no idea which files are used in this task, so if some logic depends on the unintended file access/environment reference, it is impossible for Gulp to guarantee that the task will always generate the same results.

Let's see a Bazel target.

ts_library(
    name = "compile",
    srcs = ["a.ts"],
)

We will talk about the Bazel target/rule in more detail in the next chapter. Here, we will declare a Bazel target with a ts_library rule. Unlike with a Gulp task, here we have a strict input which is srcs = ["a.ts"], so when Bazel decides to execute this target, the typescript compiler can only access the file a.ts inside of the sandbox, and nowhere else. Therefore, there is no way that the Bazel target will produce wrong results because of the unpredictable environment or input.

Fast

Bazel is incremental because Bazel is declarative and predictable.

Bazel is Declarative

Let's use Gulp to compile those two files, in order to demonstrate that Gulp is imperative and Bazel is declarative. Let's see an example with Gulp.

// gulpfile.js
gulp.task('compile', () => {
  gulp.src(['user.ts', 'print.ts'])
      .pipe(tsc(...))
      .pipe(gulp.desc('./out'));
});

gulp.task('test', ['compile'], () => {
   // run test depends on compile task
});

When we run gulp test for the first time, both the compile, and the test tasks will be executed. And then, even if we don't change any files, those two tasks will still be executed if we run gulp test again. Gulp is imperative, so we just have to tell it to do those two commands, and Gulp will do what we asked. Specifically, it checks the dependency, and guarantees the execution order. That's all.

Let's see how Bazel works. Here, we have two typescript files: user.ts, and print.ts. print.ts uses user.ts.

// user.ts
export class User {
  constructor(public name: string) {}

  toString() {
    return `user: ${this.name}`;
  }
}
// print.ts
import {User} from './user';

function printUser(user: User) {
  console.log(`the user is ${user.name}`);
}

printUser(new User('testUser'));

To demonstrate that Bazel is declarative, let's use two Bazel build targets.

# src/BUILD.bazel
ts_library(
    name = "user",
    srcs = ["user.ts"],
)

ts_library(
    name = "print",
    srcs = ["print.ts"],
    deps = [":user"]
)

So we declare two Bazel targets, user, and print. The print target depends on the user target. All those targets are using the ts_library rule. It contains the metadata to tell Bazel how to compile the typescript files. And again, all this information is just a definition. It's not about commands, so when you use Bazel to build those targets, it is up to Bazel to decide whether to execute those rules or not.

Let's see the result first.

When we run bazel build //src:print, both the user and print targets will be compiled, which makes sense. When we run bazel build //src:print again, you will find Bazel will not run any targets because nothing changed, and Bazel knows it. As a result, Bazel decides not to run any targets.

Let's change something in user.ts, and see what happens.

// updated user.ts
export class User {
  constructor(public name: string) {}

  toString() {
    return `updated toString of user: ${this.name}`;
  }
}

After we run bazel build //src:print again, we may expect that both user and print will be compiled once more because user.ts has been changed, and print.ts references user.ts, and the print target depends on the user target. But the result is that only the user target has been compiled, and the print target has not. Why?

This is because changes in user.ts don't impact print.ts, and Bazel understands this.

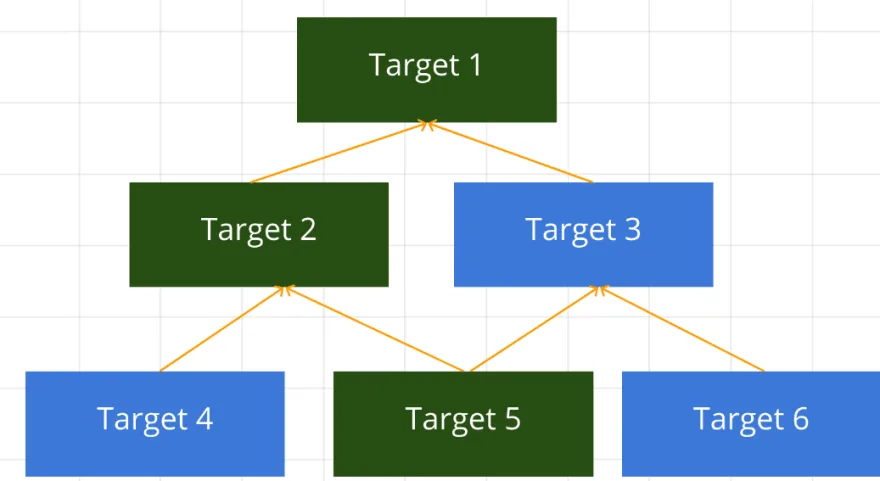
Let's check out the following graph, which describes the input/output of the target. Target input/output

So for user target, the input is user.ts, and we have two outputs. One is user.js, and the other is user.d.ts. The latter of the two is the typescript declaration file. So let's see the relationship between the user, and print target.

Target dependency

Here, we can see that the print target depends on the user target, and that it uses one of the user target's outputs, user.d.ts, as it's own input. So, because we only updated toString of user.ts, and the user.d.ts was not changed at all, Bazel analyses the dependency graph. As a result, it knows that only user target needs to be built. Further, it also knows that the print target doesn't need to be built because the inputs of the print target, which are user.d.ts and print.ts, have not changed. Because of this, Bazel decides not to build print target.

It is very important to remember that Bazel is declarative and not imperative.

Dependency Graph

Bazel analyses the input/output of all build targets to determine which targets need to be executed.

(We can generate the dependency graph with bazel query, and we will talk about it in the next chapter.)

So Bazel can do incremental builds based on the analysis of the dependency graph, and only build the really impacted targets.

Bazel is Predictable (Bazel's Rules are Pure Functions)

Also, all Bazel rules are pure functions, so the same input will always result in the same output, hence Bazel is predictable. We can use the input as a key to cache the result of each target, and save the cache locally or remotely.

Remote cache

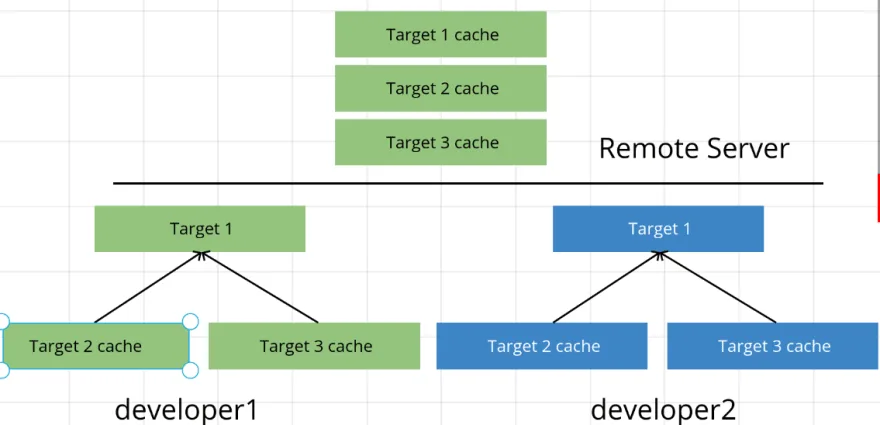
For example, developer 1 builds some targets, and pushes the result to remote cache. The other developer can then directly use this cache without building those targets in their own environment.

So these amazing features make Bazel super fast.

Universal

Bazel is a coordinate tool. It doesn't rely on any specified languages/frameworks, and it can build within almost all languages/frameworks from server to client, and from desktop to mobile.

It is difficult and costly to employ a specialist team to handle builds with several build tools/frameworks when working on a full-stack project. In one of my previous projects, we used Maven to build a Java backend, used Webpack to build its frontend, and used XCode and Gradle to build iOS and Android clients. Consequently, we needed a special build team consisting of people that knew all of those build tools, which makes it very difficult to do an incremental build, cache the results, or share the build script with other projects.

Bazel is also a perfect tool for mono repo, and full-stack projects that include multiple languages/frameworks.

Industrial Grade

Bazel is not an experimental project. It is used in almost all projects inside Google. When I started contributing to Angular, I did not use Bazel. Because of this, the time that Angular CI was taking was about 1 hour. Once Bazel was introduced to Angular CI, the time reduced to about 15 minutes, and the build process became much more stable, and less flaky than before, even with double the amount of test cases. It is amazing! I believe that Bazel will be the "must have" tool for many big projects.

I really like Bazel, and in the next blog post, I would like to introduce Bazel's file structure with bazel query.

Thanks for reading, and any feedback is appreciated.

This Dot is a consultancy dedicated to guiding companies through their modernization and digital transformation journeys. Specializing in replatforming, modernizing, and launching new initiatives, we stand out by taking true ownership of your engineering projects.

We love helping teams with projects that have missed their deadlines or helping keep your strategic digital initiatives on course. Check out our case studies and our clients that trust us with their engineering.

You might also like

Build Typescript Project with Bazel Chapter 2: File Structure cover image

Build Typescript Project with Bazel Chapter 2: File Structure

Build Typescript Project with Bazel Chapter 2: File Structure In the last chapter, we introduced the basic concept of Bazel. In this blog, I would like to talk about the file structure of Bazel. Concept and Terminology Before we introduce the file structure, we need to understand several key concepts and terminology in Bazel. - Workspace - Package - Target - Rule These concepts, and terminology, are composed to Build File, which Bazel will analyze, and execute. The basic relationship among these concepts looks like this , we will discuss the details one by one. Workspace A "workspace" refers to the directories, which contain 1. The source files of the project. 2. Symbolic links contain the build output. And the Bazel definition is in a file named WORKSPACE, or WORKSPACE.bazel at the root of the project directory. NOTE, one project can only have one WORKSPACE definition file. Here is an example of the WORKSPACE file. ` In a WORKSPACE file, we should 1. Define the name of the workspace. The name should be unique globally, or at least unique in your organization. You could use the reverse dns name, such as com_thisdot_bazel_demo, or the name of the project on GitHub. 2. Install environment related packages, such as yarn/npm/bazel. 3. Setup toolchains needed to build/test the project, such as typescript/karma. Once WORKSPACE is ready, application developers don't really need to touch this file. Package - The primary unit of code organization (something like module) in a repository - Collection of related files and a specification of the dependencies among them - Directory containing a file named BUILD or BUILD.bazel, residing beneath the top-level directory in the workspace - A package includes all files in its directory, plus all subdirectories beneath it, except those which, themselves, contain a BUILD file It is important to know how to split a project into package. It should be easy for the users to develop/test/share the unit of a package. If the unit is too big, the package has to be rebuilt on every package file change. If the unit is too small, it will be very hard to maintain and share. So, this is not an issue of Bazel. It is a general problem of project management. In Bazel, every package will have a BUILD.bazel file, containing all of the build/test/bundle target definitions. For example, here is a of the Angular structure. Every directory under packages directory is a package of code organization, and also the build organization of Bazel. Let's take a look at the file structure of gulpjs in Angular, so we can have a better understanding about the difference between Bazel and gulpjs. ` In most cases, - a gulpjs file doesn't have 1:1 relationship to the package directory. - a gulpjs file can reference any files inside the project. But for Bazel, - Each package should have their own BUILD.bazel file. - The BUILD.bazel can only reference the file inside the current package, and if the current package depends on other packages, we need to reference the Bazel build target from the other packages instead of the files directly. Here is a Bazel Package directory structure in Angular repo. Build File Before we talk about target, let's take a look at the content of a BUILD.bazel file. ` The language of the BUILD.bazel file is Starlark. - Starlark is a subset of Python. - It is a very feature-limited language. A ton of Python features, such as class, import, while, yield, lambda, is, raise, are not supported. - Recursion is not allowed. - Most of Python's builtin methods are not supported. So Starlark is a very very simple language, and only supports very limited Python syntax. Target The BUILD.bazel file contains build targets. Those targets are the definitions of the build, test, and bundle work we want to achieve. The build target can represent: - Files - Rules The target can also depend on other targets - Circular dependencies are not allowed - Two targets, generating the same output, will cause a problem - Target dependency must be declared explicitly. Let's see the previous sample, ` Here, ts_library is a rule imported from @npm_bazel_typescript workspace, and ts_library(name = "lib") is a target. The name is lib, and this target defines the metadata for compiling the lib.ts with ts_library rule. Label Every target has a unique name called label. For example, if the BUILD.bazel file above is under /lib directory, then the label of the target is ` The label is composed of several parts. 1. the name of the workspace: @com_thisdot_bazel_demo. 2. the name of the package: lib. 3. the name of the target: lib. So, the composition is //:. Most of the times, the name of the workspace can be omitted, so the label above can also be expressed as //lib:lib. Additionally, if the name of the target is the same as the package's name, the name of the target can also be omitted. Therefore, the label above can also be expressed as //lib. NOTE: The label for the target needs to be unique in the workspace. Visibility We can also define the visibility to define whether the rule inside this package can be used by other packages. ` The visibility can be: - private: the rules can be only used inside the current package. - public: the rules can be used everywhere. - //some_package:package_scope: the rules can only be used in the specified scope under //some_package. The package_scope can be: pkg/subpackages/package group. And if the rules in one package can be accessed from the other package, we can use load to import them. For example: ` Here, we import the ts_library rule from the Bazel typescript package. Target - Target can be Files or Rule. - Target has input and output. The input and output are known at build time. - Target will only be rebuilt when input changes. Let's take a look at Rule first. Rule The rule is just like a function or macro. It can accept named parameters as options. Just like in the previous post, calling a rule will not execute an action. It is just metadata. Bazel will decide what to do. ` So here, we use the ts_library rule to define a target, and the name is lib. The srcs is lib.ts in the same directory. The visibility is public, so this target can be accessed from the other packages. Rule Naming It is very important to follow the naming convention when you want to create your own rule. - *_binary: executable programs in a given language (nodejs_binary) - *_test: special _binary rule for testing - *_library: compiled module for a given language (ts_library) Rule common attributes Several common attributes exist in almost all rules. For example: ` - name: unique name within this package - srcs: inputs of the target, typically files - deps: compile-time dependencies - data: runtime dependencies - testonly: target which should be executed only when running Bazel test - visibility: specifies who can make a dependency on the given target Let's see another example: ` Here, we use the data attribute. The data will only be used at runtime. It will not be analyzed by Bazel at build time. So, in this blog, we introduced the basic Bazel structure concepts. In the next blog, we will introduce how to query Bazel targets....

Zone.js deep diving - Execution Context cover image

Zone.js deep diving - Execution Context

Zone.js deep diving Chapter 1: Execution Context As an Angular developer, you may know NgZone, which is a service for executing work inside, or outside of the angular Zone. You may also know that this NgZone service is based on a library called zone.js, but most developers may not directly use the APIs of zone.js, or know what zone.js is, so I would like to use several articles to explain zone.js to you. My name is Jia Li. I am a senior software engineer at This Dot Labs, and I have contributed to zone.js for more than 3 years. Now, I am the code owner of angular/zone.js package (zone.js had been merged into angular monorepo), and I am also an Angular collaborator. What is Zone.js Zone.js is a library created by Brian Ford in 2010 and is inspired by Dart. It provides a concept called Zone, which is an execution context that persists across async tasks. A Zone can: 1. Provide execution context that persist across async tasks. 2. Intercept async task, and provide life cycle hooks. 3. Provide centralized error handler for async tasks. We will discuss those topics one by one. Execution Context So what is Execution Context? This is a fundamental term in Javascript. Execution Context is an abstract concept that holds information about the environment within the current code being executed. The previous sentence may be a little difficult to understand without context, so let's use some code samples to explain it. For better understanding of Execution Context/Scope, please refer to this great book from getify 1. Global Context ` So in this first example, we have a global execution context, which will be created before any code is created. It needs to know it's scope, which means the execution context needs to know which variables and functions it can access. In this example, the global execution context can access variable a. Then, after the scope is determined, the Javascript engine will also determine the value of this. If we run this code in Browser, the globalThis will be window, and it will be global in NodeJS. Then, we execute testFunc. When we are going to run a new function, a new execution context will be created, and again, it will try to decide the scope and the value of this. In this example, the this in the function testFunc will be the same with globalThis, because we are running the testFunc without assigning any context object by using apply/call. And the scope in testFunc will be able to access both a and b. This is very simple. Let's just see another example to recall the Javascript 101. ` Here, testFunc is a property of testObj. We call testFunc in several ways. We will not go very deeper about how it works. We just list the results here. Again, please check getify for more details. 1. call testObj.testFunc, this will be testObj. 2. create a reference newTestFunc, this will be globalThis. 3. call with apply, this will be newObj. 4. call bounded version, this will always be bindObj. So we can see that this will change depending on how we call this function. This is a very fundamental mechanism in Javascript. So, back to Execution Context in Zone. What is the difference? Let's see the code sample here: ` So, in this example, we created a zone (we will talk about how to create a zone in the next chapter). As suggested by the term zone, when we run a function inside the zone, suddenly we have a new execution context provided by zone. Let's call it zoneThis for now. Unlike this, the value of zoneThis will always equal the zone, where the functions is being executed in no matter if it is a sync or an async operation. You can also see, in the callback of setTimeout, that the zoneThis will be the same value when setTimeout is scheduled. So this is another principle of Zone. The zone execution context will be kept as the same value as it is scheduled. So you may also wonder how to get zoneThis. Of course, we are not inventing a new Javascript keyword zoneThis, so to get this zone context, we need to use a static method, introduced by Zone.js, which is Zone.current. ` Because there is a Zone execution context we can share inside a zone, we can also share some data. ` Execution Context is the fundamental feature of Zone.js. Based on this feature, we can monitor/track/intercept the lifecycle of async operations. We will talk about those hooks in the next chapter....

Understanding Sourcemaps: From Development to Production cover image

Understanding Sourcemaps: From Development to Production

What Are Sourcemaps? Modern web development involves transforming your source code before deploying it. We minify JavaScript to reduce file sizes, bundle multiple files together, transpile TypeScript to JavaScript, and convert modern syntax into browser-compatible code. These optimizations are essential for performance, but they create a significant problem: the code running in production does not look like the original code you wrote. Here's a simple example. Your original code might look like this: ` After minification, it becomes something like this: ` Now imagine trying to debug an error in that minified code. Which line threw the exception? What was the value of variable d? This is where sourcemaps come in. A sourcemap is a JSON file that contains a mapping between your transformed code and your original source files. When you open browser DevTools, the browser reads these mappings and reconstructs your original code, allowing you to debug with variable names, comments, and proper formatting intact. How Sourcemaps Work When you build your application with tools like Webpack, Vite, or Rollup, they can generate sourcemap files alongside your production bundles. A minified file references its sourcemap using a special comment at the end: ` The sourcemap file itself contains a JSON structure with several key fields: ` The mappings field uses an encoding format called VLQ (Variable Length Quantity) to map each position in the minified code back to its original location. The browser's DevTools use this information to show you the original code while you're debugging. Types of Sourcemaps Build tools support several variations of sourcemaps, each with different trade-offs: Inline sourcemaps: The entire mapping is embedded directly in your JavaScript file as a base64 encoded data URL. This increases file size significantly but simplifies deployment during development. ` External sourcemaps: A separate .map file that's referenced by the JavaScript bundle. This is the most common approach, as it keeps your production bundles lean since sourcemaps are only downloaded when DevTools is open. Hidden sourcemaps: External sourcemap files without any reference in the JavaScript bundle. These are useful when you want sourcemaps available for error tracking services like Sentry, but don't want to expose them to end users. Why Sourcemaps During development, sourcemaps are absolutely critical. They will help avoid having to guess where errors occur, making debugging much easier. Most modern build tools enable sourcemaps by default in development mode. Sourcemaps in Production Should you ship sourcemaps to production? It depends. While security by making your code more difficult to read is not real security, there's a legitimate argument that exposing your source code makes it easier for attackers to understand your application's internals. Sourcemaps can reveal internal API endpoints and routing logic, business logic, and algorithmic implementations, code comments that might contain developer notes or TODO items. Anyone with basic developer tools can reconstruct your entire codebase when sourcemaps are publicly accessible. While the Apple leak contained no credentials or secrets, it did expose their component architecture and implementation patterns. Additionally, code comments can inadvertently contain internal URLs, developer names, or company-specific information that could potentially be exploited by attackers. But that’s not all of it. On the other hand, services like Sentry can provide much more actionable error reports when they have access to sourcemaps. So you can understand exactly where errors happened. If a customer reports an issue, being able to see the actual error with proper context makes diagnosis significantly faster. If your security depends on keeping your frontend code secret, you have bigger problems. Any determined attacker can reverse engineer minified JavaScript. It just takes more time. Sourcemaps are only downloaded when DevTools is open, so shipping them to production doesn't affect load times or performance for end users. How to manage sourcemaps in production You don't have to choose between no sourcemaps and publicly accessible ones. For example, you can restrict access to sourcemaps with server configuration. You can make .map accessible from specific IP addresses. Additionally, tools like Sentry allow you to upload sourcemaps during your build process without making them publicly accessible. Then configure your build to generate sourcemaps without the reference comment, or use hidden sourcemaps. Sentry gets the mapping information it needs, but end users can't access the files. Learning from Apple's Incident Apple's sourcemap incident is a valuable reminder that even the largest tech companies can make deployment oversights. But it also highlights something important: the presence of sourcemaps wasn't actually a security vulnerability. This can be achieved by following good security practices. Never include sensitive data in client code. Developers got an interesting look at how Apple structures its Svelte codebase. The lesson is that you must be intentional about your deployment configuration. If you're going to include sourcemaps in production, make that decision deliberately after considering the trade-offs. And if you decide against using public sourcemaps, verify that your build process actually removes them. In this case, the public repo was quickly removed after Apple filed a DMCA takedown. (https://github.com/github/dmca/blob/master/2025/11/2025-11-05-apple.md) Making the Right Choice So what should you do with sourcemaps in your projects? For development: Always enable them. Use fast options, such as eval-source-map in Webpack or the default configuration in Vite. The debugging benefits far outweigh any downsides. For production: Consider your specific situation. But most importantly, make sure your sourcemaps don't accidentally expose secrets. Review your build output, check for hardcoded credentials, and ensure sensitive configurations stay on the backend where they belong. Conclusion Sourcemaps are powerful development tools that bridge the gap between the optimized code your users download and the readable code you write. They're essential for debugging and make error tracking more effective. The question of whether to include them in production doesn't have a unique answer. Whatever you decide, make it a deliberate choice. Review your build configuration. Verify that sourcemaps are handled the way you expect. And remember that proper frontend security doesn't come from hiding your code. Useful Resources * Source map specification - https://tc39.es/ecma426/ * What are sourcemaps - https://web.dev/articles/source-maps * VLQ implementation - https://github.com/Rich-Harris/vlq * Sentry sourcemaps - https://docs.sentry.io/platforms/javascript/sourcemaps/ * Apple DMCA takedown - https://github.com/github/dmca/blob/master/2025/11/2025-11-05-apple.md...

Let's innovate together!

We're ready to be your trusted technical partners in your digital innovation journey.

Whether it's modernization or custom software solutions, our team of experts can guide you through best practices and how to build scalable, performant software that lasts.

Prefer email? hi@thisdot.co