Skip to content

Choosing Remix: The JavaScript Fullstack Framework and Building Your First Application

This article was written over 18 months ago and may contain information that is out of date. Some content may be relevant but please refer to the relevant official documentation or available resources for the latest information.

Remix is a React framework for building server-side rendering full-stack applications. It focuses on using web standards to build modern user interfaces. Remix was created by the team behind React Router, and was recently open-sourced for the community.

Remix extends most of the core functionality of React and React Router with server-side rendering, server requests, and backend optimization.

But why start using Remix? Remix comes with a number of advantages:

  • Nested routes - nested routes help eliminate nearly every loading state by using React Router’s outlet to render nested routes from directories and subdirectories.

  • Setup is easy! Spinning up a remix project takes just a few minutes and gets you productive immediately.

  • Remix uses server side progressive enhancement which means only necessary JavaScript, JSON, and CSS content is sent to the browser.

  • Remix focuses on server-side rendering.

  • File-system-based routing automatically generates the router configuration based on your file directory.

  • Remix is built on React which makes it easy to use if you know React.

Key Features

Let’s highlight a few key features of Remix you should be aware of.

Nested Route

Routes in Remix are file-system-based. Any component in the route directory is handled as a route and rendered to its parent outlet components.

If you define a parent component inside the routes directory, and then different routes inside a directory with the same name as the parent component, the latter will be nested within the first one.

Error boundaries

Error handling with applications is critical. In many cases, a single error can cause the entire application to be affected.

With Remix, when you get an error in a Remix component or a nested route, the errors are limited to the component and the component will fail to render or it will display the error without disrupting the entire application’s functionality.

Loading State

Remix handles loading states in parallel on the server and sends the fully formed HTML document to the browser; this eliminates the need to use a loading skeleton or spinner when fetching data or submitting form data.

Loaders and Actions

Among the most exciting features of Remix are Loaders and Actions.

These are special functions:

Loaders are functions (Hooks) that retrieve dynamic data from the database or API using the native fetch API. You can add loaders to a component by calling the useLoaderData() hook.

Actions are functions used to mutate data. Actions are mostly used to send form data to the API or database, to make changes to an API, or perform a delete action.

Building Your First Remix App

The next portion of this blog post will show you how to build your first Remix app!

We will be building a small blog app with primsa’s SQLite to store the posts.

To start a Remix project the prerequisites are:

  • A familiarity with JavaScript and React
  • Node.js installed
  • A code editor i.e VSCode

Open your system terminal and run:

npx create-remix@latest

You can accept the default prompts or use your own preferences.

Screenshot 2022-09-16 1.14.53 PM

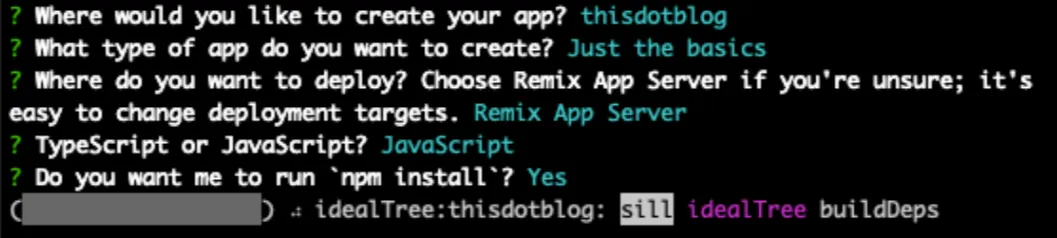
Remix will install all the dependencies it requires and scaffold the application with directories and files.

In the project’s directory let install the other dependencies we will be using, run:

npm install bootstrap

You should use something like the directory in the image.

Screenshot 2022-09-16 1.17.44 PM

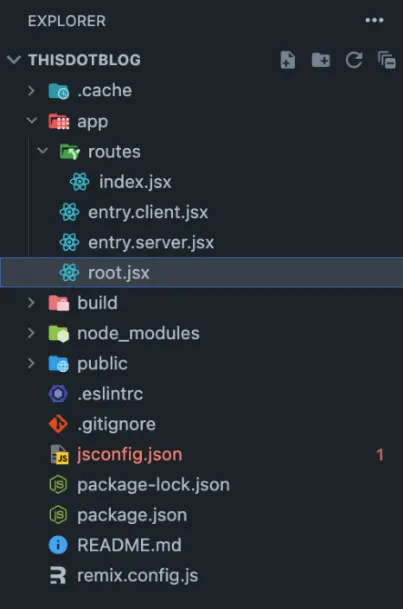
File structure walk through

The app directory contains the main building files for our Remix application.

The route directory holds all the routes that expose the exported default function as the route handler from the file.

entry.client.jsx and entry.server.jsx are core Remix’s files. Remix uses entry.client.jsx as the entry point for the browser bundle, and uses entry.server.jsx to generate the HTTP response when rendering on the server.

root.jsx is the root component of Remix application, the default export is the layout component that renders the rest of the app in an <Outlet />

These are the files we really want to touch on in our project. To learn more about the file directory, check out Remix’s API conventions.

Project set up

Open the root.jsx file and replace the code with:

import { Links, LiveReload, Meta, Outlet } from "@remix-run/react";
import bootstrapCSS from "bootstrap/dist/css/bootstrap.min.css";

export const links = () => [{ rel: "stylesheet", href: bootstrapCSS }];

export const meta = () => ({
  charset: "utf-8",
  viewport: "width=device-width,initial-scale=1",
});

export default function App() {
  return (
    <Document>
      <Layout>
        <Outlet />
      </Layout>
    </Document>
  );
}

function Layout({ children }) {
  return (
    <>
      <nav className="navbar navbar-expand-lg navbar-light bg-light px-5 py-3">
        <a href="/" className="navbar-brand">
          Remix
        </a>
        <ul className="navbar-nav mr-auto">
          <li className="nav-item">
            <a className="nav-link" href="/posts">Posts </a>
          </li>
        </ul>
      </nav>

      <div className="container">{children}</div>
    </>
  );
}

function Document({ children }) {
  return (
    <html>
      <head>
        <Links />
        <Meta />
        <title>ThisDot Labs Code Blog</title>
      </head>
      <body>
        {children}
        {process.env.NODE_ENV === "development" ? <LiveReload /> : null}
      </body>
    </html>
  );
}

Since we are using bootstrap for styling we imported the minified library, Remix uses the <link rel="stylesheet"> to add stylesheet at component level using the Route Module links export.

The links function defines which elements to add to the page when the user visits the route. Visit Remix Styles to learn more about stylesheets in Remix.

Similar to the stylesheet, Remix can add the Meta tags to the route header by calling Meta Module. The meta function defines which meta elements you can add to the routes. This is a huge plus for your application’s SEO.

The app file has three components with a default export of the App component. Here, we declared a Document Component for the HTML document template, a Layout Component to further improve the template layout for rendering components, and added the {process.env.NODE_ENV === "development" ? <LiveReload /> : null} for Hot reload when changing things in the file during development.

One important note is to not confuse Links with Link. The latter, Link, is a router component for matching routes in Remix’s apps. We will handle the components to match our routes below.

To test out the application:

npm run dev

You should have a similar app as shown below:

Screenshot 2022-09-16 1.20.17 PM

Let’s configure the db we will use for the app. We will use primsa SQLite to store the posts.

Install the Prisma packages in your project:

npm install prisma @prisma-client

Now let’s initialize the prisma SQlite in project:

npx prisma init --datasource-provider sqlite

This will add a Prisma directory to the project.

Open prisma/schema.prisma and add the following code at the end of the file:

model Post {
  slug     String @id
  title    String
  body String

  createdAt DateTime @default(now())
  updatedAt DateTime @updatedAt
}

This is the schema for the blog database.

Simply, the schema is identifying that we will need a slug which will be a unique string and used for our blog’s unique route. The title property is also a string type for the title of our blog. The body type of string will hold the body, and finally we want to have the dates created and updated.

Now, let’s push the schema to Prisma:

npx prisma db push

Prisma will create a dev.db in the Prisma directory.

Now let's seed our database with a couple posts. Create prisma/seed.js and add this to the file.

const {PrismaClient} = require('@prisma/client')

const prisma = new PrismaClient()

async function seed() {

  await Promise.all(
    getPosts().map(post => {

      return prisma.post.create({data: post})
    })
  )
}

seed()

function getPosts() {
  return [
    {
      title: 'JavaScript Performance Tips',
      slug: "javaScript-performance-tips",
      body: `We will look at 10 simple tips and tricks to increase the speed of your code when writing JS`,
    },
    {
      title: 'Tailwind vs. Bootstrap',
      slug: `tailwind-vs-bootstrap`,
      body: `Both Tailwind and Bootstrap are very popular CSS frameworks. In this article, we will compare them`,
    },
    {
      title: 'Writing Great Unit Tests',
      slug: `writing-great-unit-tests`,
      body: `We will look at 10 simple tips and tricks on writing unit tests in JavaScript`,
    },
    {
      title: 'What Is New In PHP 8?',
      slug: `what-is-new-in-PHP-8`,
      body: `In this article we will look at some of the new features offered in version 8 of PHP`,
    },
  ]
}

Now edit the package.json file just before the script property and add this:

  "prisma": {
    "seed": "node prisma/seed"
  },
  "scripts": {
… 

Now, to seed the db with Prisma, run:

npx prisma db seed

Our database setup is now done.

There is just one more thing for database connection, We need to create a typescript file app/utils/db.server.ts.

We specify a server file by appending .server at the end of the file name, Remix will compile and deploy this file on the server..

Add the code below to the file:

import { PrismaClient } from "@prisma/client";

let db: PrismaClient

declare global {
  var __db: PrismaClient | undefined
}

if (process.env.NODE_ENV === 'production') {
  db = new PrismaClient()
  db.$connect()
} else {
  if (!global.__db) {
    global.__db = new PrismaClient()
    global.__db.$connect()
  }

  db = global.__db
}

export { db }

Now, go back to the code editor and create post.jsx in the route directory, and add the following code:

import { Outlet } from "@remix-run/react"

function Posts() {
  return (
    <>
      <Outlet />
    </>
  )
}

export default Posts

All we are doing is rendering our nested routes of posts here, nothing crazy.

Now create routes/posts/index.jsx

import { Link, useLoaderData } from "@remix-run/react";
import {db} from '../../utils/db.server';

export const loader = async () => {
  const data = {
    posts: await db.post.findMany({
      take: 20,
      select: {slug: true, title: true, createdAt: true},
      orderBy: {createdAt: 'desc'}
    })
  }
  return data
}

function PostItems() {
  const {posts} = useLoaderData()
  return (
    <>
      <div>
        <h1>Posts</h1>
        <Link to='/posts/new' className="btn btn-primary">New Post</Link>
      </div>
      <div className="row mt-3">
      {posts.map(post => (
        <div className="card mb-3 p-3" key={post.id}>
          <Link to={`./${post.slug}`}>
            <h3 className="card-header">{post.title}</h3>
            {new Date(post.createdAt).toLocaleString()}
          </Link>
        </div>
      ))}

      </div>
    </>
  )
}

export default PostItems

Here, we are declaring the loader and fetching all the posts from the database with a limit of 20 and destructuring the posts from the useLoaderData hook, then finally looping through the returned posts.

Dynamic Routes

Remix dynamic routes are defined with a $ sign and the id key. We will want to use the slugs properties as our dynamic routes for the blogs.

To do this, create app/routes/posts/$postSlug.jsx

import {Link, useLoaderData} from "@remix-run/react";
import {db} from '../../utils/db.server';

export const loader = async ({params}) => {
  const post = await db.post.findUnique({
    where: {slug: params.postSlug}
  })

  if (!post) throw new Error('Post not found')

  const data = {post}

  return data
}

function Post() {
  const {post} = useLoaderData() 
  return (
    <div className="card w-100">
      <div className="card-header">
        <h1>{post.title}</h1>
      </div>
      <div className="card-body">{post.body}</div>
      <div className="card-footer">
        <Link to='/posts' className="btn btn-danger">Back</Link>
      </div>
    </div>
  )
}

export default Post

Here, the loader is fetching from the database using the unique slug we provided and rendering the article.

To add where to post new blogs, create app/routes/posts/new.jsx, and the following code:

import { redirect } from "@remix-run/node";
import { Link } from "@remix-run/react";
import { db } from "../../utils/db.server";

export const action = async ({ request }) => {
  const form = await request.formData();

  const title = form.get("title");
  const body = form.get("body");
  const fields = { title, body, slug: title.split(‘ ‘).join(‘-’) };

  const post = await db.post.create({ data: fields });

  return redirect(`/posts/${post.slug}`);
};

function NewPost() {
  return (
    <div className="card w-100">
<form method="POST">
      <div className="card-header">
        <h1>New Post</h1>
        <Link to="/posts" className="btn btn-danger">
          Back
        </Link>
      </div>

      <div className="card-body">

          <div className="form-control my-2">
            <label htmlFor="title">Title</label>
            <input type="text" name="title" id="title" />
          </div>
          <div className="form-control my-2">
            <label htmlFor="body">Post Body</label>
            <textarea name="body" id="body" />
          </div>

      </div>
      <div className="card-footer">
        <button type="submit" className="btn btn-success">
          Add Post
        </button>
      </div>
        </form>
    </div>
  );
}

export default NewPost;

We created an action function to handle the form post request, and Remix will catch all the formData by passing the request.

And there you have it! You’ve created a functional blog application.

Conclusion

In this article, we learned why Remix is a great choice for building your next application, and why it’s becoming a more popular framework to use amongst developers.

We also explored the core features of Remix and learned how to build a sample blog application using a database.

This Dot is a consultancy dedicated to guiding companies through their modernization and digital transformation journeys. Specializing in replatforming, modernizing, and launching new initiatives, we stand out by taking true ownership of your engineering projects.

We love helping teams with projects that have missed their deadlines or helping keep your strategic digital initiatives on course. Check out our case studies and our clients that trust us with their engineering.

You might also like

D1 SQLite: Writing queries with the D1 Client API cover image

D1 SQLite: Writing queries with the D1 Client API

Writing queries with the D1 Client API In the previous post we defined our database schema, got up and running with migrations, and loaded some seed data into our database. In this post we will be working with our new database and seed data. If you want to participate, make sure to follow the steps in the first post. We’ve been taking a minimal approach so far by using only wrangler and sql scripts for our workflow. The D1 Client API has a small surface area. Thanks to the power of SQL, we will have everything we need to construct all types of queries. Before we start writing our queries, let's touch on some important concepts. Prepared statements and parameter binding This is the first section of the docs and it highlights two different ways to write our SQL statements using the client API: prepared and static statements. Best practice is to use prepared statements because they are more performant and prevent SQL injection attacks. So we will write our queries using prepared statements. We need to use parameter binding to build our queries with prepared statements. This is pretty straightforward and there are two variations. By default we add ? ’s to our statement to represent a value to be filled in. The bind method will bind the parameters to each question mark by their index. The first ? is tied to the first parameter in bind, 2nd, etc. I would stick with this most of the time to avoid any confusion. ` I like this second method less as it feels like something I can imagine messing up very innocently. You can add a number directly after a question mark to indicate which number parameter it should be bound to. In this exampl, we reverse the previous binding. ` Reusing prepared statements If we take the first example above and not bind any values we have a statement that can be reused: ` Querying For the purposes of this post we will just build example queries by writing them out directly in our Worker fetch handler. If you are building an app I would recommend building functions or some other abstraction around your queries. select queries Let's write our first query against our data set to get our feet wet. Here’s the initial worker code and a query for all authors: ` We pass our SQL statement into prepare and use the all method to get all the rows. Notice that we are able to pass our types to a generic parameter in all. This allows us to get a fully typed response from our query. We can run our worker with npm run dev and access it at http://localhost:8787 by default. We’ll keep this simple workflow of writing queries and passing them as a json response for inspection in the browser. Opening the page we get our author results. joins Not using an ORM means we have full control over our own destiny. Like anything else though, this has tradeoffs. Let’s look at a query to fetch the list of posts that includes author and tags information. ` Let’s walk through each part of the query and highlight some pros and cons. ` * The query selects all columns from the posts table. * It also selects the name column from the authors table and renames it to author_name. * It aggregates the name column from the tags table into a JSON array. If there are no tags, it returns an empty JSON array. This aggregated result is renamed to tags. ` * The query starts by selecting data from the posts table. * It then joins the authors table to include author information for each post, matching posts to authors using the author_id column in posts and the id column in authors. * Next, it left joins the posts_tags table to include tag associations for each post, ensuring that all posts are included even if they have no tags. * Next, it left joins the tags table to include tag names, matching tags to posts using the tag_id column in posts_tags and the id column in tags. * Finally, group the results by the post id so that all rows with the same post id are combined in a single row SQL provides a lot of power to query our data in interesting ways. JOIN ’s will typically be more performant than performing additional queries.You could just as easily write a simpler version of this query that uses subqueries to fetch post tags and join all the data by hand with JavaScript. This is the nice thing about writing SQL, you’re free to fetch and handle your data how you please. Our results should look similar to this: ` This brings us to our next topic. Marshaling / coercing result data A couple of things we notice about the format of the result data our query provides: Rows are flat. We join the author directly onto the post and prefix its column names with author. ` Using an ORM we might get the data back as a child object: ` Another thing is that our tags data is a JSON string and not a JavaScript array. This means that we will need to parse it ourselves. ` This isn’t the end of the world but it is some more work on our end to coerce the result data into the format that we actually want. This problem is handled in most ORM’s and is their main selling point in my opinion. insert / update / delete Next, let’s write a function that will add a new post to our database. ` There’s a few queries involved in our create post function: * first we create the new post * next we run through the tags and either create or return an existing tag * finally, we add entries to our post_tags join table to associate our new post with the tags assigned We can test our new function by providing post content in query params on our index page and formatting them for our function. ` I gave it a run like this: http://localhost:8787authorId=1&tags=Food%2CReview&title=A+review+of+my+favorite+Italian+restaurant&content=I+got+the+sausage+orchette+and+it+was+amazing.+I+wish+that+instead+of+baby+broccoli+they+used+rapini.+Otherwise+it+was+a+perfect+dish+and+the+vibes+were+great And got a new post with the id 11. UPDATE and DELETE operations are pretty similar to what we’ve seen so far. Most complexity in your queries will be similar to what we’ve seen in the posts query where we want to JOIN or GROUP BY data in various ways. To update the post we can write a query that looks like this: ` COALESCE acts similarly to if we had written a ?? b in JavaScript. If the binded value that we provide is null it will fall back to the default. We can delete our new post with a simple DELETE query: ` Transactions / Batching One thing to note with D1 is that I don’t think the traditional style of SQLite transactions are supported. You can use the db.batch API to achieve similar functionality though. According to the docs: Batched statements are SQL transactions ↗. If a statement in the sequence fails, then an error is returned for that specific statement, and it aborts or rolls back the entire sequence. ` Summary In this post, we've taken a hands-on approach to exploring the D1 Client API, starting with defining our database schema and loading seed data. We then dove into writing queries, covering the basics of prepared statements and parameter binding, before moving on to more complex topics like joins and transactions. We saw how to construct and execute queries to fetch data from our database, including how to handle relationships between tables and marshal result data into a usable format. We also touched on inserting, updating, and deleting data, and how to use transactions to ensure data consistency. By working through these examples, we've gained a solid understanding of how to use the D1 Client API to interact with our database and build robust, data-driven applications....

Introduction to Zod for Data Validation cover image

Introduction to Zod for Data Validation

As web developers, we're often working with data from external sources like APIs we don't control or user inputs submitted to our backends. We can't always rely on this data to take the form we expect, and we can encounter unexpected errors when it deviates from expectations. But with the Zod library, we can define what our data ought to look like and parse the incoming data against those defined schemas. This lets us work with that data confidently, or to quickly throw an error when it isn't correct. Why use Zod? TypeScript is great for letting us define the shape of our data in our code. It helps us write more correct code the first time around by warning us if we are doing something we shouldn't. But TypeScript can't do everything for us. For example, we can define a variable as a string or a number, but we can't say "a string that starts with user_id_ and is 20 characters long" or "an integer between 1 and 5". There are limits to how much TypeScript can narrow down our data for us. Also, TypeScript is a tool for us developers. When we compile our code, our types are not available to the vanilla JavaScript. JavaScript can't validate that the data we actually use in our code matches what we thought we'd get when we wrote our TypeScript types unless you're willing to manually write code to perform those checks. This is where we can reach for a tool like Zod. With Zod, we can write data schemas. These schemas, in the simplest scenarios, look very much like TypeScript types. But we can do more with Zod than we can with TypeScript alone. Zod schemas let us create additional rules for data parsing and validation. A 20-character string that starts with user_id_? It's z.string().startsWith('user_id_').length(20). An integer between 1 and 5 inclusive? It's z.number().int().gte(1).lte(5). Zod's primitives give us many extra functions to be more specific about *exactly* what data we expect. Unlike TypeScript, Zod schemas aren't removed on compilation to JavaScript—we still have access to them! If our app receives some data, we can verify that it matches the expected shape by passing it to your Zod schema's parse function. You'll either get back your data in exactly the shape you defined in your schema, or Zod will give you an error to tell you what was wrong. Zod schemas aren't a replacement for TypeScript; rather, they are an excellent complement. Once we've defined our Zod schema, it's simple to derive a TypeScript type from it and to use that type as we normally would. But when we really need to be sure our data conforms to the schema, we can always parse the data with our schema for that extra confidence. Defining Data Schemas Zod schemas are the variables that define our expectations for the shape of our data, validate those expectations, and transform the data if necessary to match our desired shape. It's easy to start with simple schemas, and to add complexity as required. Zod provides different functions that represent data structures and related validation options, which can be combined to create larger schemas. In many cases, you'll probably be building a schema for a data object with properties of some primitive type. For example, here's a schema that would validate a JavaScript object representing an order for a pizza: ` Zod provides a number of primitives for defining schemas that line up with JavaScript primitives: string, number, bigint, boolean, date, symbol, undefined, and null. It also includes primitives void, any, unknown, and never for additional typing information. In addition to basic primitives, Zod can define object, array, and other native data structure schemas, as well as schemas for data structures not natively part of JavaScript like tuple and enum. The documentation contains considerable detail on the available data structures and how to use them. Parsing and Validating Data with Schemas With Zod schemas, you're not only telling your program what data should look like; you're also creating the tools to easily verify that the incoming data matches the schema definitions. This is where Zod really shines, as it greatly simplifies the process of validating data like user inputs or third party API responses. Let's say you're writing a website form to register new users. At a minimum, you'll need to make sure the new user's email address is a valid email address. For a password, we'll ask for something at least 8 characters long and including one letter, one number, and one special character. (Yes, this is not really the best way to write strong passwords; but for the sake of showing off how Zod works, we're going with it.) We'll also ask the user to confirm their password by typing it twice. First, let's create a Zod schema to model these inputs: ` So far, this schema is pretty basic. It's only making sure that whatever the user types as an email is an email, and it's checking that the password is at least 8 characters long. But it is *not* checking if password and confirmPassword match, nor checking for the complexity requirements. Let's enhance our schema to fix that! ` By adding refine with a custom validation function, we have been able to verify that the passwords match. If they don't, parsing will give us an error to let us know that the data was invalid. We can also chain refine functions to add checks for our password complexity rules: ` Here we've chained multiple refine functions. You could alternatively use superRefine, which gives you even more fine grained control. Now that we've built out our schema and added refinements for extra validation, we can parse some user inputs. Let's see two test cases: one that's bound to fail, and one that will succeed. ` There are two main ways we can use our schema to validate our data: parse and safeParse. The main difference is that parse will throw an error if validation fails, while safeParse will return an object with a success property of either true or false, and either a data property with your parsed data or an error property with the details of a ZodError explaining why the parsing failed. In the case of our example data, userInput2 will parse just fine and return the data for you to use. But userInput1 will create a ZodError listing all of the ways it has failed validation. ` ` We can use these error messages to communicate to the user how they need to fix their form inputs if validation fails. Each error in the list describes the validation failure and gives us a human readable message to go with it. You'll notice that the validation errors for checking for a valid email and for checking password length have a lot of details, but we've got three items at the end of the error list that don't really tell us anything useful: just a custom error of Invalid input. The first is from our refine checking if the passwords match, and the second two are from our refine functions checking for password complexity (numbers and special characters). Let's modify our refine functions so that these errors are useful! We'll add our own error parameters to customize the message we get back and the path to the data that failed validation. ` Now, our error messages from failures in refine are informative! You can figure out which form fields aren't validating from the path, and then display the messages next to form fields to let the user know how to remedy the error. ` By giving our refine checks a custom path and message, we can make better use of the returned errors. In this case, we can highlight specific problem form fields for the user and give them the message about what is wrong. Integrating with TypeScript Integrating Zod with TypeScript is very easy. Using z.infer&lt;typeof YourSchema> will allow you to avoid writing extra TypeScript types that merely reflect the intent of your Zod schemas. You can create a type from any Zod schema like so: ` Using a TypeScript type derived from a Zod schema does *not* give you any extra level of data validation at the type level beyond what TypeScript is capable of. If you create a type from z.string.min(3).max(20), the TypeScript type will still just be string. And when compiled to JavaScript, even that will be gone! That's why you still need to use parse/safeParse on incoming data to validate it before proceeding as if it really does match your requirements. A common pattern with inferring types from Zod schemas is to use the same name for both. Because the schema is a variable, there's no name conflict if the type uses the same name. However, I find that this can lead to confusing situations when trying to import one or the other—my personal preference is to name the Zod schema with Schema at the end to make it clear which is which. Conclusion Zod is an excellent tool for easily and confidently asserting that the data you're working with is exactly the sort of data you were expecting. It gives us the ability to assert at runtime that we've got what we wanted, and allows us to then craft strategies to handle what happens if that data is wrong. Combined with the ability to infer TypeScript types from Zod schemas, it lets us write and run more reliable code with greater confidence....

How to Build Apps with Great Startup Performance Using Qwik cover image

How to Build Apps with Great Startup Performance Using Qwik

In this article, we will recap the JS Drops Qwik workshop with Misko Hevery. This workshop provided an overview on Qwik, its unique features and a look at some example components. We will also address some of the questions raised at the end of the workshop. If you want to learn more about Qwik with Misko Hevery, then please check out this presentation on This Dot Media’s YouTube Channel. Also don’t forget to subscribe to get the latest on all things web development. Table of Contents - What is Qwik? - How to create a Counter Component in Qwik - Unique features of Qwik - Directory Based Routing - Slots in Qwik - Very little JavaScript in production - Resumability with Qwik - Lazy load components by default - Questions asked during the workshop - Are all these functions generated at build time or are they generated at runtime? What's the server consideration here (if any) or are we able to put everything behind a CDN? - How do you access elements in Qwik? - Can you force a download of something out of view? - What is the choice to use $ on Qwik declarations? - Can you explain the interop story with web components and Qwik? Any parts of the Qwik magic that aren’t available to us if, say, our web components are too complex? - Is there an ideal use case for Qwik? - When to use useWatch$ instead of useClientEffect$? - Conclusion What is Qwik? Qwik is a web framework that builds fast web applications with consistent performance at scale regardless of size or complexity. To get started with Qwik, run the following command: ` The Qwik CLI will prompt options to scaffold a starter project on your local machine. To start the demo application, run npm start and navigate to http://127.0.0.1:5173/ in the browser. How to create a Counter Component in Qwik Create a sub-directory in the routes directory named counter and add an index.tsx file with the component definition below. ` Now navigate to http://127.0.0.1:5173/counter and you should see the counter component rendered on the page. Unique features of Qwik Directory Based Routing Qwik is a directory-based routing framework. When we initiated Qwik, it created a routes sub-directory in the src directory and added index and layout files for route matching. The index.tsx is the base route component and the layout.tsx is the component for handling the base page layout. The sub-directories in the route directory serve as the application’s structure for route matching with its index.tsx files as the route components. Every index.tsx file does a look up for the layout component. If it doesn’t exist in the same directory, then it moves up to the parent directory. ` Slots in Qwik Qwik uses slots as a way of connecting content from the parent component to the child projection. The parent component uses the q:slot attribute to identify the source of the projection and the element to identify the destination of the projection. To learn more about slots, please check out the Qwik documentation. Very little JavaScript in production In production, Qwik starts the application with no JavaScript at startup, which makes the startup performance really fast. To see this in action, open the browser’s dev tools, click on the Network tab, and on the Filter tab select JS. You will notice the Vite files for hot module reloading are currently the only JavaScript files served which will not be shipped to production. Go to the filter tab and check the invert checkbox then in the filter input type select Vite. Resumability with Qwik Qwik applications do not require hydration to resume an application on the client. To see this in action, click on the increment button and observe the browser’s dev tools network tab. You will notice Qwik is downloading only the required amount of JavaScript needed. The way Qwik attaches the event to the DOM and handles the state of components is that it serializes the attribute, which tells the browser where to download the event handler and its state. To learn more about serialization with Qwik, read through the Qwik documentation. By default, the code associated with the click event will not download until the user triggers that event. On this interaction, Qwik will only download the minimum code for the event handler to work. To learn more about Qwik events, please read through the [documentation] (https://qwik.builder.io/docs/components/events/#events)....

Docusign Momentum 2025 From A Developer’s Perspective cover image

Docusign Momentum 2025 From A Developer’s Perspective

*What if your contract details stuck in PDFs could ultimately become the secret sauce of your business automation workflows?* In a world drowning in PDFs and paperwork, I never thought I’d get goosebumps about agreements – until I attended Docusign Momentum 2025. I went in expecting talks about e-signatures; I left realizing the big push and emphasis with many enterprise-level organizations will be around Intelligent Agreement Management (IAM). It is positioned to transform how we build business software, so let’s talk about it. As Director of Technology at This Dot Labs, I had a front-row seat to all the exciting announcements at Docusign Momentum. Our team also had a booth there showing off the 6 Docusign extension apps This Dot Labs has released this year. We met 1-on-1 with a lot of companies and leaders to discuss the exciting promise of IAM. What can your company accomplish with IAM? Is it really worth it for you to start adopting IAM?? Let’s dive in and find out. After his keynote, I met up with Robert Chatwani, President of Docusign and he said this > “At Docusign, we truly believe that the power of a great platform is that you won’t be able to exactly predict what can be built on top of it,and builders and developers are at the heart of driving this type of innovation. Now with AI, we have entered what I believe is a renaissance era for new ideas and business models, all powered by developers.” Docusign’s annual conference in NYC was an eye-opener: agreements are no longer just documents to sign and shelve, but dynamic data hubs driving key processes. Here’s my take on what I learned, why it matters, and why developers should pay attention. From E-Signatures to Intelligent Agreements – A New Era Walking into Momentum 2025, you could feel the excitement. Docusign’s CEO and product team set the tone in the keynote: “Agreements make the world go round, but for too long they’ve been stuck in inboxes and PDFs, creating drag on your business.” Their message was clear – Docusign is moving from a product to a platform​. In other words, the company that pioneered e-signatures now aims to turn static contracts into live, integrated assets that propel your business forward. I saw this vision click when I chatted with an attendee from a major financial services firm. His team manages millions of forms a year – loan applications, account forms, you name it. He admitted they were still “just scanning and storing PDFs” and struggled to imagine how IAM could help. We discussed how much value was trapped in those documents (what Docusign calls the “Agreement Trap” of disconnected processes​). By the end of our coffee, the lightbulb was on: with the right platform, those forms could be automatically routed, data-extracted, and trigger workflows in other systems – no more black hole of PDFs. His problem wasn’t unique; many organizations have critical data buried in agreements, and they’re waking up to the idea that it doesn’t have to be this way. What Exactly is Intelligent Agreement Management (IAM)? So what is Docusign’s Intelligent Agreement Management? In essence, IAM is an AI-powered platform that connects every part of the agreement lifecycle. It’s not a single product, but a collection of services and tools working in concert​. Docusign IAM helps transform agreement data into insights and actions, accelerate contract cycles, and boost productivity across departments. The goal is to address the inefficiencies in how agreements are created, signed, and managed – those inefficiencies that cost businesses time and money. At Momentum, Docusign showcased the core components of IAM: - Docusign Navigator link: A smart repository to centrally store, search, and analyze agreements. It uses AI to convert your signed documents (which are basically large chunks of text) into structured, queryable data​. Instead of manually digging through contracts for a specific clause, you can search across all agreements in seconds. Navigator gives you a clear picture of your organization’s contractual relationships and obligations (think of it as Google for your contracts). Bonus: it comes with out-of-the-box dashboards for things like renewal dates, so you can spot risks and opportunities at a glance. - Docusign Maestro link: A no-code workflow engine to automate agreement workflows from start to finish. Maestro lets you design customizable workflows that orchestrate Docusign tasks and integrate with third-party apps – all without writing code​. For example, you could have a workflow for new vendor onboarding: once a vendor contract is signed, Maestro could automatically notify your procurement team, create a task in your project tracker, and update a record in your ERP system. At the conference, they demoed how Maestro can streamline processes like employee onboarding and compliance checks through simple drag-and-drop steps or archiving PDFs of signed agreements into Google Drive or Dropbox. - Docusign Iris (AI Engine) link: The brains of the operation. Iris is the new AI engine powering all of IAM’s “smarts” – from reading documents to extracting data and making recommendations​. It’s behind features like automatic field extraction, AI-assisted contract review, intelligent search, and even document summarization. In the keynote, we saw examples of Iris in action: identify key terms (e.g. payment terms or renewal clauses) across a stack of contracts, or instantly generate a summary of a lengthy agreement. These capabilities aren’t just gimmicks; as one Docusign executive put it, they’re “signals of a new way of working with agreements”. Iris essentially gives your agreement workflow a brain – it can understand the content of agreements and help you act on it. - Docusign App Center link: A hub to connect the tools of your trade into Docusign. App Center is like an app store for integrations – it lets you plug in other software (project management, CRM, HR systems, etc.) directly into your Maestro workflows. This is huge for developers (and frankly, anyone tired of building one-off integrations). Instead of treating Docusign as an isolated e-signature tool, App Center makes it a platform you can extend. I’ll dive more into this in the next section, since it’s close to my heart – my team helped build some of these integrations! In short, IAM ties together the stages of an agreement (create → sign → store → manage) and supercharges each with automation and AI. It’s modular, too – you can adopt the pieces you need. Docusign essentially unbundled the agreement process into building blocks that developers and admins can mix-and-match. The future of agreements, as Docusign envisions it, is a world where organizations *“seamlessly add, subtract, and rearrange modular solutions to meet ever-changing needs”* on a single trusted platform. The App Center and Real-World Integrations (Yes, We Built Those!) One of the most exciting parts of Momentum 2025 for me was seeing the Docusign App Center come alive. As someone who works on integrations, I was practically grinning during the App Center demos. Docusign highlighted several partner-built apps that snap into IAM, and I’m proud to say This Dot Labs built six of them – including integrations for Monday.com, Slack, Jira, Asana, Airtable, and Mailchimp. Why are these integrations a big deal? Because developers often spend countless hours wiring up systems that need to talk to each other. With App Center, a lot of that heavy lifting is already done. You can install an app with a few clicks and configure data flows in minutes instead of coding for months​. In fact, a study found it takes the average org 12 months to develop a custom workflow via APIs, whereas with Docusign’s platform you can do it via configuration almost immediately​. That’s a game-changer for time-to-value. At our This Dot Labs booth, I spoke with many developers who were intrigued by these possibilities. For example, we showed how our Docusign Slack Extension lets teams send Slack messages and notifications when agreements are sent and signed.. If a sales contract gets signed, the Slack app can automatically post a notification in your channel and even attach the signed PDF – no more emailing attachments around. People loved seeing how easily Docusign and Slack now talk to each other using this extension​. Another popular one was our Monday.com app. With it, as soon as an agreement is signed, you can trigger actions in Monday – like assigning onboarding tasks for a new client or employee. Essentially, signing the document kicks off the next steps automatically. These integrations showcase why IAM is not just about Docusign’s own features, but about an ecosystem. App Center already includes connectors for popular platforms like Salesforce, HubSpot, Workday, ServiceNow, and more. The apps we built for Monday, Slack, Jira, etc., extend that ecosystem. Each app means one less custom integration a developer has to build from scratch. And if an app you need doesn’t exist yet – well, that’s an opportunity. (Shameless plug: we’re happy to help build it!) The key takeaway here is that Docusign is positioning itself as a foundational layer in the enterprise software stack. Your agreement workflow can now natively include things like project management updates, CRM entries, notifications, and data syncs. As a developer, I find that pretty powerful. It’s a shift from thinking of Docusign as a single SaaS tool to thinking of it as a platform that glues processes together. Not Just Another Contract Tool – Why IAM Matters for Business After absorbing all the Momentum keynotes and sessions, one thing is clear: IAM is not “just another contract management tool.” It’s aiming to be the platform that automates critical business processes which happen to revolve around agreements. The use cases discussed were not theoretical – they were tangible scenarios every developer or IT lead will recognize: - Procurement Automation: We heard how companies are using IAM to streamline procurement. Imagine a purchase order process where a procurement request triggers an agreement that goes out for e-signature, and once signed, all relevant systems update instantly. One speaker described connecting Docusign with their ERP so that vendor contracts and purchase orders are generated and tracked automatically. This reduces the back-and-forth with legal and ensures nothing falls through the cracks. It’s easy to see the developer opportunity: instead of coding a complex procurement approval system from scratch, you can leverage Docusign’s workflow + integration hooks to handle it. Docusign IAM is designed to connect to systems like CRM, HR, and ERP so that agreements flow into the same stream of data. For developers, that means using pre-built connectors and APIs rather than reinventing them. - Faster Employee Onboarding: Onboarding a new hire or client typically involves a flurry of forms and tasks – offer letters or contracts to sign, NDAs, setup of accounts, etc. We saw how IAM can accelerate onboarding by combining e-signature with automated task generation. For instance, the moment a new hire signs their offer letter, Maestro could trigger an onboarding workflow: provisioning the employee in systems, scheduling orientation, and creating tasks in tools like Asana or Monday. All those steps get kicked off by the signed agreement. Docusign Maestro’s integration capabilities shine here – it can tie into HR systems or project management apps to carry the baton forward​. The result is a smoother day-one experience for the new hire and less manual coordination for IT and HR. As developers, we can appreciate how this modular approach saves us from writing yet another “onboarding script”; we configure the workflow, and IAM handles the rest. - Reducing Contract Auto-Renewal Risk: If your company manages a lot of recurring contracts (think vendor services, subscriptions, leases), missing a renewal deadline can be costly. One real-world story shared at Momentum was about using IAM to prevent unwanted auto-renewals. With traditional tracking (spreadsheets or calendar reminders), it’s easy to forget a termination notice and end up locked into a contract for another year. Docusign’s solution: let the AI engine (Iris) handle it. It can scan your repository, surface any renewal or termination dates, and proactively remind stakeholders – or even kick off a non-renewal workflow if desired. As the Bringing Intelligence to Obligation Management session highlighted, “Missed renewal windows lead to unwanted auto-renewals or lost revenue… A forgotten termination deadline locks a company into an unneeded service for another costly term.”​ With IAM, those pitfalls are avoidable. The system can automatically flag and assign tasks well before a deadline hits​. For developers, this means we can deliver risk-reduction features without building a custom date-tracking system – the platform’s AI and notification framework has us covered. These examples all connect to a bigger point: agreements are often the linchpin of larger business processes (buying something, hiring someone, renewing a service). By making agreements “intelligent,” Docusign IAM is essentially automating chunks of those processes. This translates to real outcomes – faster cycle times, fewer errors, and less risk. From a technical perspective, it means we developers have a powerful ally: we can offload a lot of workflow logic to the IAM platform. Why code it from scratch if a combination of Docusign + a few integration apps can do it? Why Developers Should Care about IAM (Big Time) If you’re a software developer or architect building solutions for business teams, you might be thinking: This sounds cool, but is it relevant to me? Let me put it this way – after Momentum 2025, I’m convinced that ignoring IAM would be a mistake for anyone in enterprise software. Here’s why: - Faster time-to-value for your clients or stakeholders: Business teams are always pressuring IT to deliver solutions faster. With IAM, you have ready-made components to accelerate projects. Need to implement a contract approval workflow? Use Maestro, not months of coding. Need to integrate Docusign with an internal system? Check App Center for an app or use their APIs with far less glue code. Docusign’s own research shows that connecting systems via App Center and Maestro can cut development time dramatically (from ~12 months of custom dev to mere weeks or less). For us developers, that means we can deliver results sooner, which definitely wins points with the business. - Fewer custom builds (and less maintenance): Let’s face it – maintaining custom scripts or one-off integrations is not fun. Every time a SaaS API changes or a new requirement comes in, you’re back in the code. IAM’s approach offers more reuse and configuration instead of raw code. The platform is doing the hard work of staying updated (for example, when Slack or Salesforce change something in their API, Docusign’s connector app will handle it). By leveraging these pre-built connectors and templates, you write less custom code, which means fewer bugs and lower maintenance overhead. You can focus your coding effort on the unique parts of your product, not the boilerplate integration logic. - Reusable and modular workflows: I love designing systems as Lego blocks – and IAM encourages that. You can build a workflow once and reuse it across multiple projects or clients with slight tweaks. For instance, an approval workflow for sales contracts might be 90% similar to one for procurement contracts – with IAM, you can reuse that blueprint. The fact that everything is on one platform also means these workflows can talk to each other or be combined. This modularity is a developer’s dream because it leads to cleaner architecture. Docusign explicitly touts this modular approach, noting that organizations can easily rearrange solutions on the fly to meet new needs​. It’s like having a library of proven patterns to draw from. - AI enhancements with minimal effort: Adding AI into your apps can be daunting if you have to build or train models yourself. IAM essentially gives you AI-as-a-service for agreements. Need to extract key data from 1,000 contracts? Iris can do that out-of-the-box​. Want to implement a risk scoring for contracts? The AI can flag unusual terms or deviations. As a developer, being able to call an API or trigger a function that returns “these are the 5 clauses to look at” is incredibly powerful – you’re injecting intelligence without needing a data science team. It means you can offer more value in your applications (and impress those end-users!) by simply tapping into IAM’s AI features. Ultimately, Docusign IAM empowers developers to build more with less code. It’s about higher-level building blocks. This doesn’t replace our jobs – it makes our jobs more focused on the interesting problems. I’d rather spend time designing a great user experience or tackling a complex business rule than coding yet another Docusign-to-Slack integration. IAM is taking care of the plumbing and adding a layer of smarts on top. Don’t Underestimate Agreement Intelligence – Your Call to Action Momentum 2025 left me with a clear call to action: embrace agreement intelligence. If you’re a developer or tech leader, it’s time to explore what Docusign IAM can do for your projects. This isn’t just hype from a conference – it’s a real shift in how we can deliver solutions. Here are a few ways to get started: - Browse the IAM App Center – Take a look at the growing list of apps in the Docusign App Center. You might find that integration you’ve been meaning to build is already available (or one very close to it). Installing an app is trivial, and you can configure it to fit your workflow. This is the low-hanging fruit to immediately add value to your existing Docusign processes. If you have Docusign eSignature or CLM in your stack, App Center is where you extend it. - Think about integrations that could unlock value – Consider the systems in your organization that aren’t talking to each other. Is there a manual step where someone re-enters data from a contract into another system? Maybe an approval that’s done via email and could be automated? Those are prime candidates for an IAM solution. For example, if Legal and Sales use different tools, an integration through IAM can bridge them, ensuring no agreement data falls through the cracks. Map out your agreement process end-to-end and identify gaps – chances are, IAM has a feature to fill them. - Experiment with Maestro and the API – If you’re technical, spin up a trial of Docusign IAM. Try creating a Maestro workflow for a simple use case, or use the Docusign API/SDKs to trigger some AI analysis on a document. Seeing it in action will spark ideas. I was amazed how quickly I could set up a workflow with conditions and parallel steps – things that would take significant coding time if I did them manually. The barrier to entry for adding complex logic has gotten a lot lower. - Stay informed and involved – Docusign’s developer community and IAM documentation are growing. Momentum may be over, but the “agreement intelligence” movement is just getting started. Keep an eye on upcoming features (they hinted at even more AI-assisted tools coming soon). Engage with the community forums or join Docusign’s IAM webinars. And if you’re building something cool with IAM, consider sharing your story – the community benefits from hearing real use cases. My final thought: don’t underestimate the impact that agreement intelligence can have in modern workflows. We spend so much effort optimizing various parts of our business, yet often overlook the humble agreement – the contracts, forms, and documents that initiate or seal every deal. Docusign IAM is shining a spotlight on these and saying, “Here is untapped gold. Let’s mine it.” As developers, we have an opportunity (and now the tools) to lead that charge. I’m incredibly excited about this new chapter. After seeing what Docusign has built, I’m convinced that intelligent agreements can be a foundational layer for digital transformation. It’s not just about getting documents signed faster; it’s about connecting dots and automating workflows in ways we couldn’t before. As I reflect on Momentum 2025, I’m inspired and already coding with new ideas in mind. I encourage you to do the same – check out IAM, play with the App Center, and imagine what you could build when your agreements start working intelligently for you. The future of agreements is here, and it’s time for us developers to take full advantage of it. Ready to explore? Head to the Docusign App Center and IAM documentation and see how you can turn your agreements into engines of growth. Trust me – the next time you attend Momentum, you might just have your own success story to share. Happy building!...

Let's innovate together!

We're ready to be your trusted technical partners in your digital innovation journey.

Whether it's modernization or custom software solutions, our team of experts can guide you through best practices and how to build scalable, performant software that lasts.

Prefer email? hi@thisdot.co