Copilot has become a household name for developers, all thanks to GitHub’s popular AI tooling. Before GitHub released Copilot, AWS already had a developer tool in the wild, also named Copilot. I stumbled across AWS Copilot a year or two ago and found it to be a really great tool for easily deploying Serverless applications and services to AWS infrastructure. Since deploying to AWS has been such a huge pain point for so many developers, Copilot CLI is one of many tools that is designed to make this process a lot easier.
AWS Copilot is a command-line interface (CLI) that simplifies the process of deploying and managing containerized applications on AWS. It abstracts away the complexity of managing infrastructure, allowing us to focus on writing code. This blog post will provide an overview of AWS Copilot CLI and explore its practical use cases.
AWS Copilot CLI is designed to simplify the building, releasing, and operating of production-ready containerized applications on Amazon ECS and AWS Fargate. It offers an intuitive interface for developers to launch and manage environments, jobs, pipelines, and services in the cloud. Although ECS and Fargate are considered ‘Serverless’; you are actually deploying to more traditional, stateful, web servers on EC2 (these are cool again).
Installation
You can install the Copilot CLI using Homebrew.
brew install aws/tap/copilot-cli
Otherwise use one of the scripts from the installation page.
Credentials
You need to add AWS credentials with proper permissions to your ~/aws/.credentials file to use Copilot. See the credentials docs for more details on this.
[default]

aws_access_key_id=AKIAIOSFODNN7EXAMPLE
aws_secret_access_key=wJalrXUtnFEMI/K7MDENG/bPxRfiCYEXAMPLEKEY
Overview
All you need is a Dockerfile that knows how to build and run your application and Copilot will handle the rest. Copilot provides a simple declarative set of commands, including examples and guided experiences built-in. These commands make it easy to start from scratch and get a containerized application running in the cloud in just a few steps. The configuration files that Copilot generates (called manifests) allow us to easily configure and adjust the amount of compute resources available to our web service (cpu, memory, instances, etc).
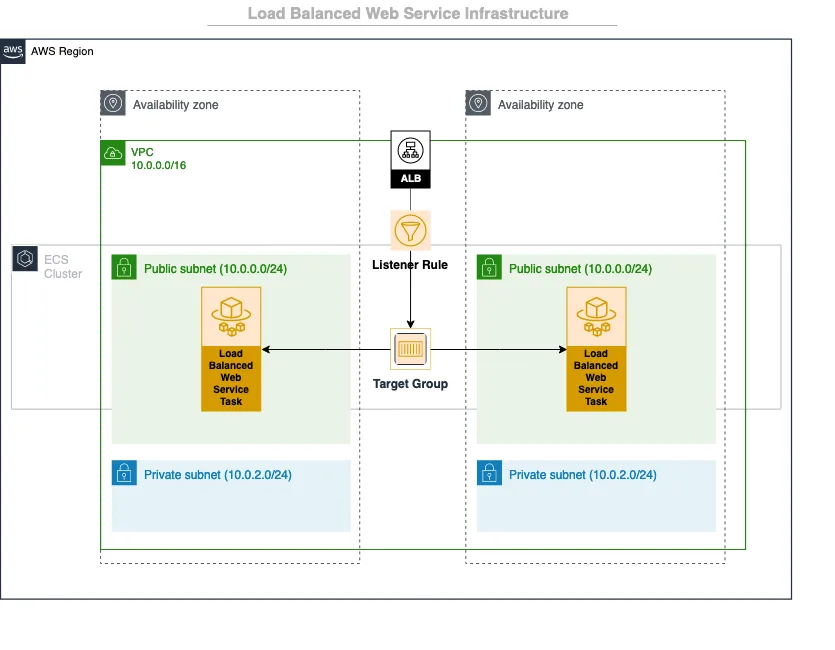
Here’s an architecture diagram for a load-balanced web service running on AWS and deployed with Copilot. The outermost layer is the region your application is deployed to on AWS ie: us-east-1, us-west-1, etc. Copilot handles all the networking for your application which includes a VPC, and public subnets that your server instances can be reached from. The load balancer (ALB) sits at the top, listens for requests, and directs traffic to the ECS Cluster (instances of your application server). Typically, the work involved with setting all of these pieces up and getting them working together is cumbersome to put it lightly.
Concepts
Before we dive into some of the commands, a quick look at the concepts that Copilot is built on so we have a clear understanding of what we can achieve with it.
Applications
Applications in Copilot is the top-level parent of all the AWS infrastructure managed by your Copilot setup. In this article I will generally refer to an application as any kind of software that you are deploying (api server, etc). In Copilot your ‘Application’ is the entire collection of all the environments and services that you have configured.
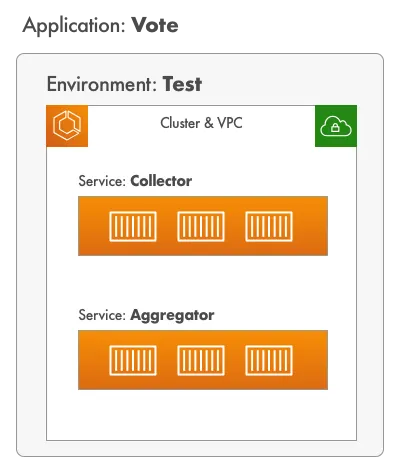
Here’s the diagram from the documentation. The Vote application can consist of a number of different services, jobs, pipelines, etc.
Services
In AWS Copilot, “Services” refer to the type of application (not to be confused with the definition of Application in the previous section) that you’re deploying and the underlying AWS service infrastructure that supports it.
Using the Load Balanced Web Service service from the diagram above, the service consists of the ECS (Elastic Container Service) service, the application load balancer, and the network load balancer. These are some of the AWS infrastructure that Copilot orchestrates for you when deploying this type of “Service”.
There are a few main types of services that you can deploy with Copilot
- Internet-facing web services (Static Site, Load Balanced Web Service, etc)
- Backend services (services that can only be accessed internally)
- Worker services (pub/sub queues, etc)
Environments
When setting up your project and your first service you will supply Copilot with the name of the environment you want to deploy to. For example, you can create a production environment initially to deploy your application and services to and then later on add additional environments like a staging environment.
Jobs
You might also know these as ‘crons’ but these are just tasks or some code that runs on a schedule.
Pipelines
Pipelines are for automating tests and releases. This is AWS’s CI/CD service somewhat similar to something like GitHub actions. Copilot can initialize and create new pipelines for you. We can configure this as a manifest in our codebase that declares instructions on how we build and deploy our application(s).
Configuration
Copilot is configured through various configuration files called ‘Manifests’. The documentation contains examples on how to configure your application, services, environments, jobs, and pipelines. You can also refer to it to learn what options are available. Since Copilot is a CLI tool they make a lot of the configuration process pretty painless by providing walkthrough prompts and generating configuration files for you.
The CLI
Now that we have a pretty good idea of what AWS Copilot is and the types of things we can accomplish with it, let's walk through using the CLI.
copilot init
This is where you will most likely want to start to get your application ready for deployment to AWS. The init command will prompt you with questions like what kind of service you want to generate and once you’re done, it will generate all the initial configuration files for you.
Example setup:
> copilot init
Welcome to the Copilot CLI! We're going to walk you through some questions
to help you get set up with a containerized application on AWS. An application is a collection of
containerized services that operate together.

> Use existing application: No
> Application name: twitter

Which workload type best represents your architecture?  [Use arrows to move, type to filter, ? for more help]

Request-Driven Web Service  (App Runner)
Load Balanced Web Service   (Internet to ECS on Fargate)
Backend Service             (ECS on Fargate)
Worker Service              (Events to SQS to ECS on Fargate)
Static Site                 (Internet to CDN to S3 bucket)
Scheduled Job               (Scheduled event to State Machine to Fargate)
You’ll pick your service type, tell Copilot where your Dockerfile lives, name your environment, and let it do its magic from there. Copilot will generate your Manifest/config files which in turn become CloudFormation stacks that set up all your infrastructure on AWS.
Other Commands
There are commands for each concept that we covered above. There are Create, Delete, and Deploy operation commands for Environments, Services, Jobs, and Pipelines.
If you wanted to add a staging environment to your application you could just run copilot env init .
There are also commands to manage your Application or things like tasks. To see details about your Application you can run copilot app show -n [name]
Conclusion
AWS Copilot CLI is a powerful tool that simplifies the deployment and management of containerized applications on AWS. It abstracts away the complexities of the underlying infrastructure, allowing developers to focus on writing code and delivering value to their customers. Whether you're deploying a simple web service or managing multiple environments, AWS Copilot CLI can make your cloud development process more efficient and enjoyable.