Skip to content

How to Build Apps with Great Startup Performance Using Qwik

In this article, we will recap the JS Drops Qwik workshop with Misko Hevery. This workshop provided an overview on Qwik, its unique features and a look at some example components. We will also address some of the questions raised at the end of the workshop.

If you want to learn more about Qwik with Misko Hevery, then please check out this presentation on This Dot Media’s YouTube Channel. Also don’t forget to subscribe to get the latest on all things web development.

Table of Contents

What is Qwik?

Qwik is a web framework that builds fast web applications with consistent performance at scale regardless of size or complexity.

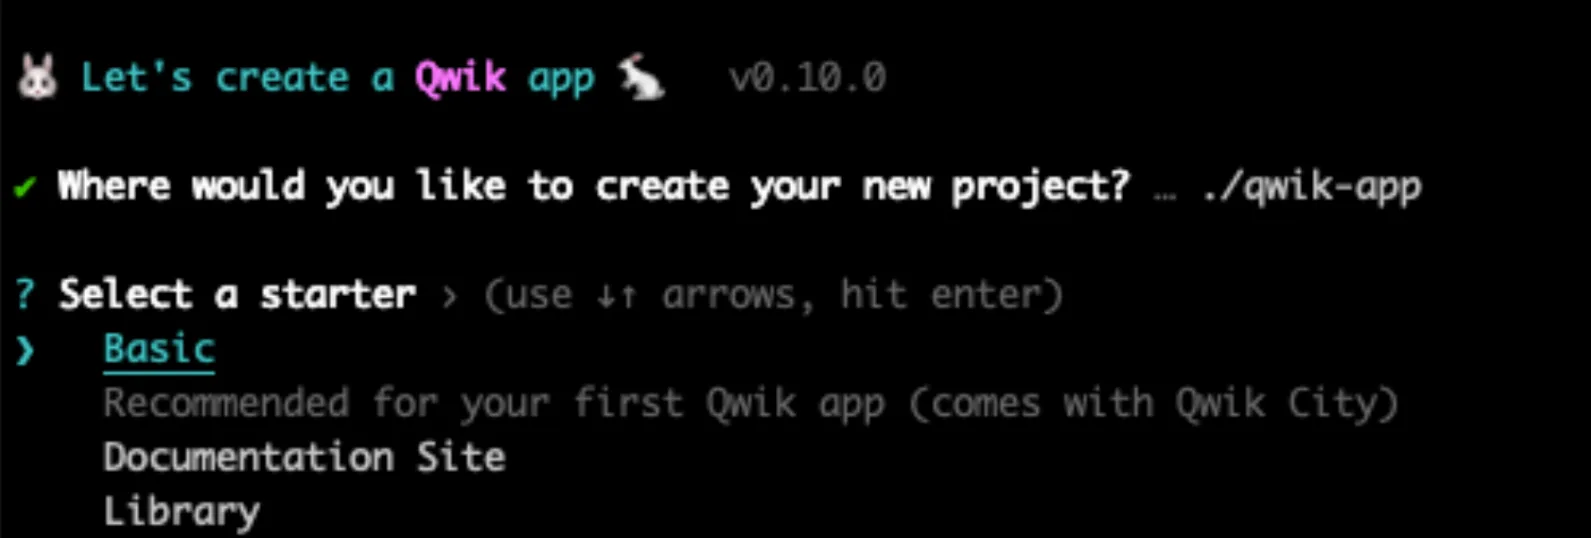
To get started with Qwik, run the following command:

npm create qwik@latest

The Qwik CLI will prompt options to scaffold a starter project on your local machine.

Screenshot 2022-12-07 160054

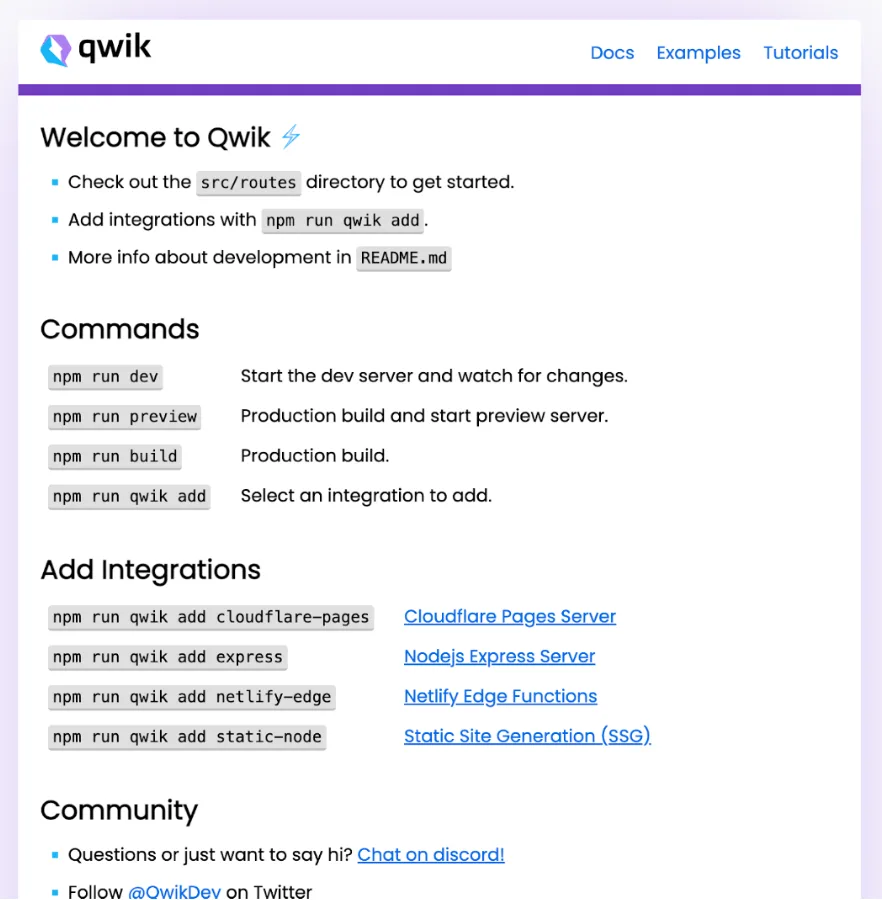
To start the demo application, run npm start and navigate to http://127.0.0.1:5173/ in the browser.

Screenshot 2022-12-07 160302

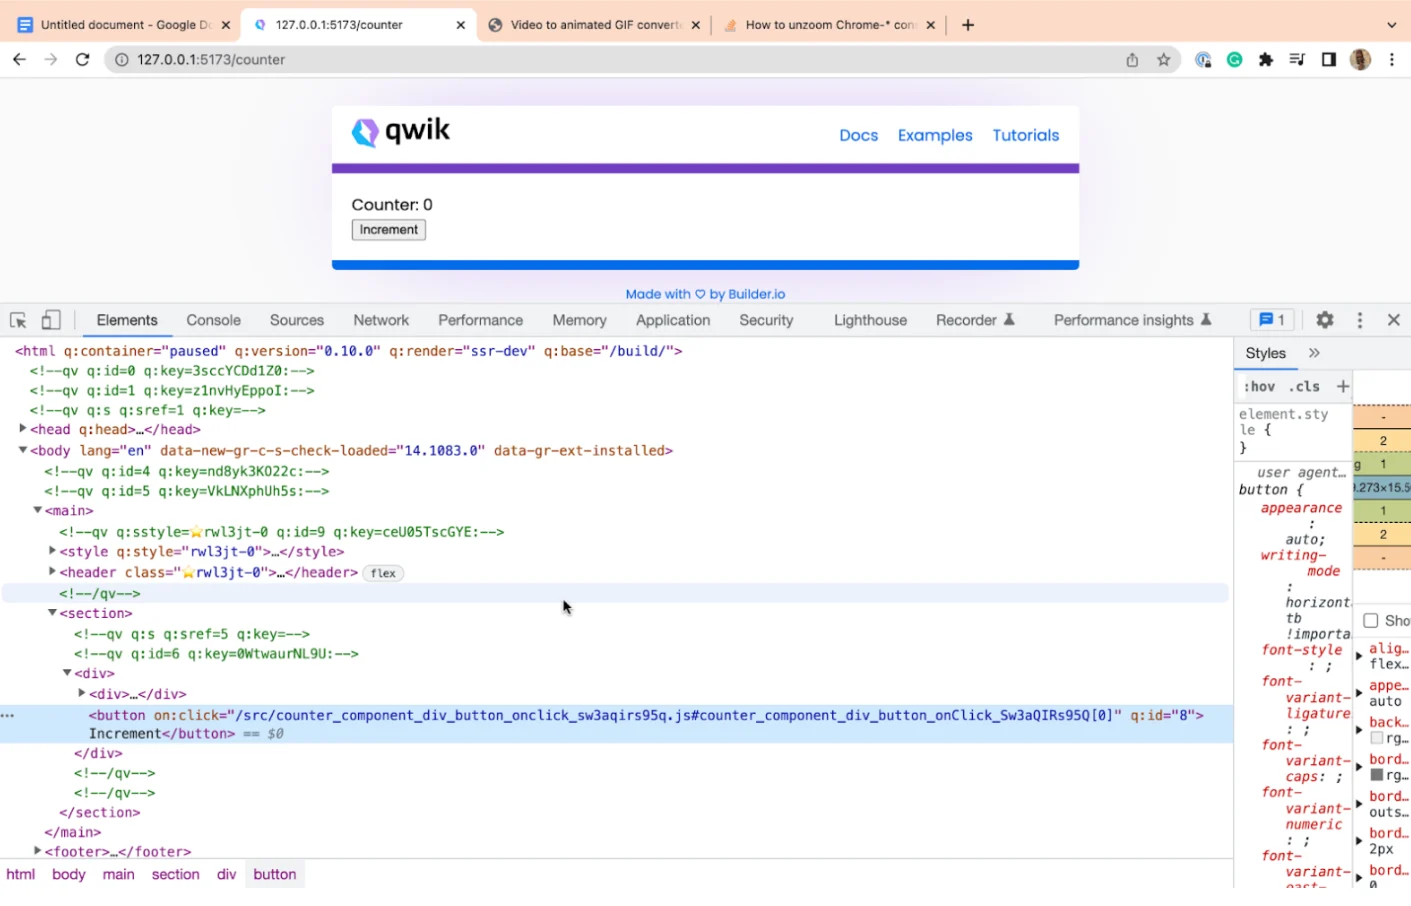
How to create a Counter Component in Qwik

Create a sub-directory in the routes directory named counter and add an index.tsx file with the component definition below.

import { component$, useStore } from "@builder.io/qwik";

export default component$(() => {
  const store = useStore({
    count: 0
  });

  return (
    <div>
      <div>Counter: {store.count}</div>
      <button onClick$={() => store.count++}>Increment</button>
    </div>
  )

})

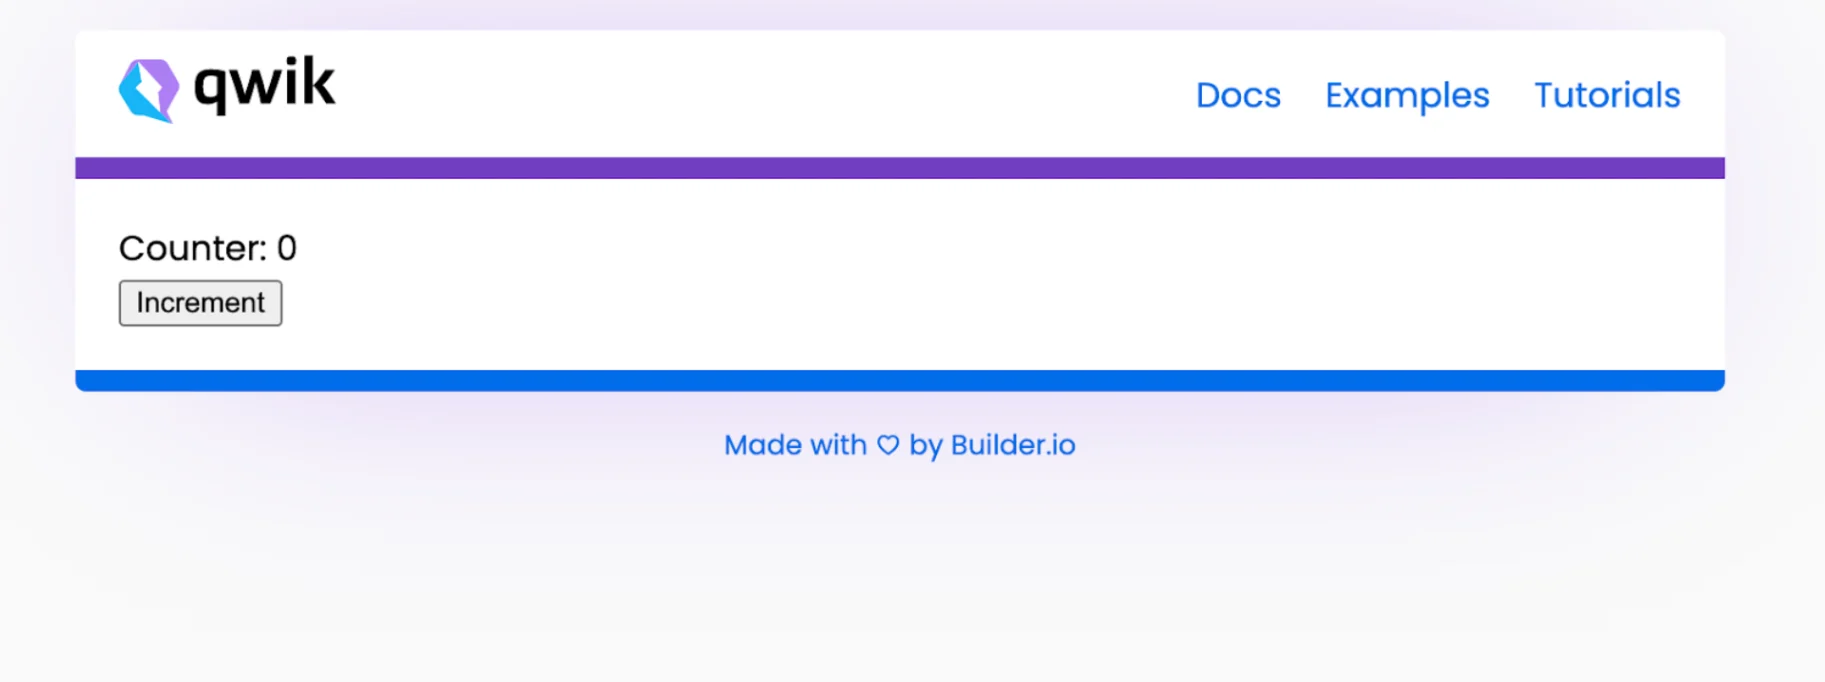
Now navigate to http://127.0.0.1:5173/counter and you should see the counter component rendered on the page.

Screenshot 2022-12-07 160508

Unique features of Qwik

Directory Based Routing

Qwik is a directory-based routing framework. When we initiated Qwik, it created a routes sub-directory in the src directory and added index and layout files for route matching.

The index.tsx is the base route component and the layout.tsx is the component for handling the base page layout.

The sub-directories in the route directory serve as the application’s structure for route matching with its index.tsx files as the route components. Every index.tsx file does a look up for the layout component. If it doesn’t exist in the same directory, then it moves up to the parent directory.

// layout.tsx

import { component$, Slot } from '@builder.io/qwik';
import Header from '../components/header/header';

export default component$(() => {
  return (
    <>
      <main>
        <Header />
        <section>
          <Slot />
        </section>
      </main>
      <footer>
        <a href="https://www.builder.io/" target="_blank">
          Made with ♡ by Builder.io
        </a>
      </footer>
    </>
  );
});

Slots in Qwik

Qwik uses slots as a way of connecting content from the parent component to the child projection.

The parent component uses the q:slot attribute to identify the source of the projection and the element to identify the destination of the projection.

To learn more about slots, please check out the Qwik documentation.

Very little JavaScript in production

In production, Qwik starts the application with no JavaScript at startup, which makes the startup performance really fast.

To see this in action, open the browser’s dev tools, click on the Network tab, and on the Filter tab select JS.

Screenshot 2022-12-07 160737

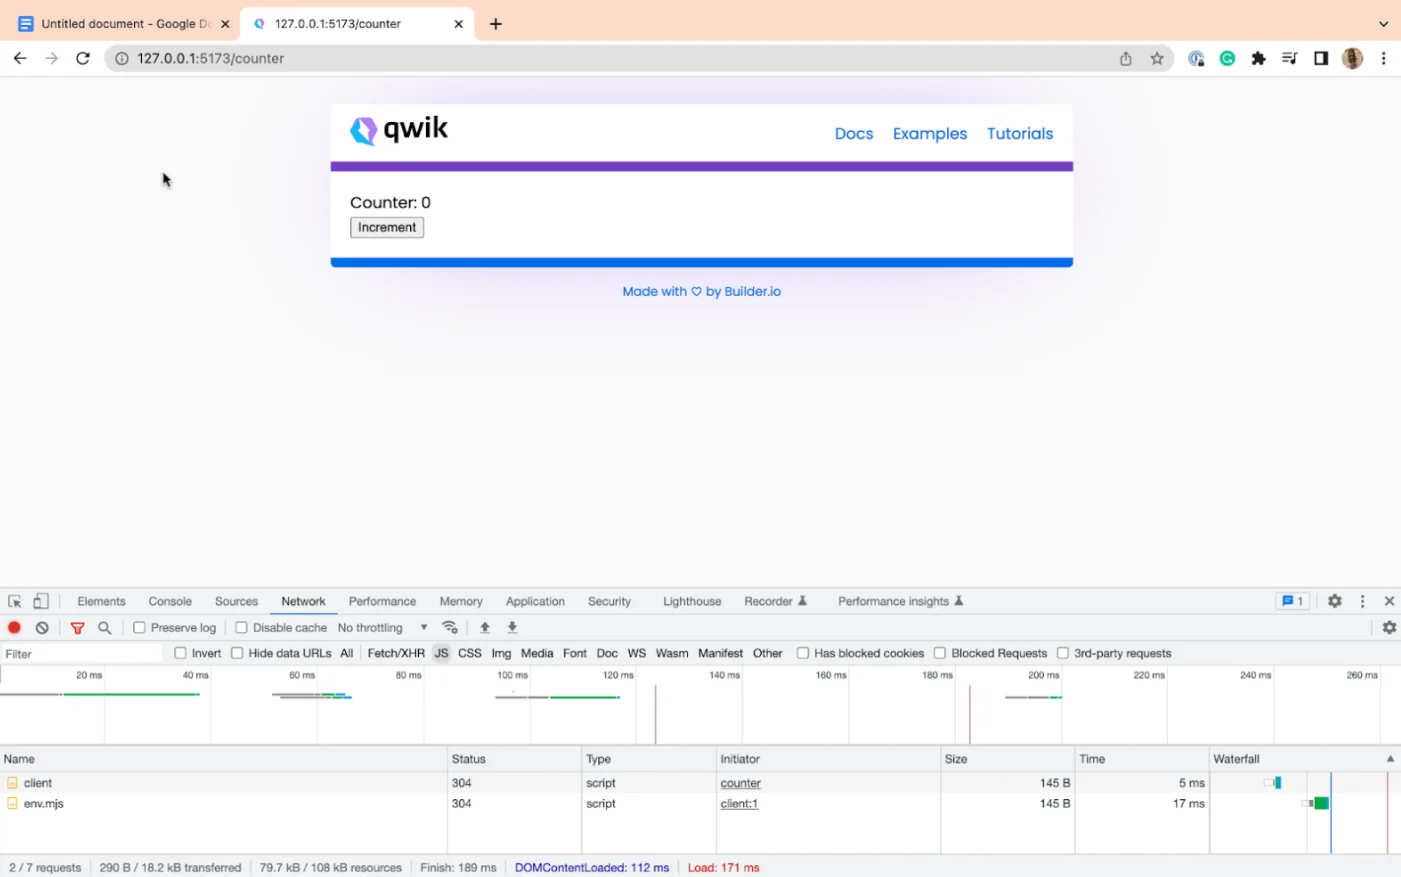
You will notice the Vite files for hot module reloading are currently the only JavaScript files served which will not be shipped to production.

Go to the filter tab and check the invert checkbox then in the filter input type select Vite.

Screenshot 2022-12-07 161025

Resumability with Qwik

Qwik applications do not require hydration to resume an application on the client. To see this in action, click on the increment button and observe the browser’s dev tools network tab. You will notice Qwik is downloading only the required amount of JavaScript needed.

The way Qwik attaches the event to the DOM and handles the state of components is that it serializes the attribute, which tells the browser where to download the event handler and its state. To learn more about serialization with Qwik, read through the Qwik documentation.

Screenshot 2022-12-07 161548

By default, the code associated with the click event will not download until the user triggers that event. On this interaction, Qwik will only download the minimum code for the event handler to work.

To learn more about Qwik events, please read through the [documentation] (https://qwik.builder.io/docs/components/events/#events).

This Dot Labs is a development consultancy that is trusted by top industry companies, including Stripe, Xero, Wikimedia, Docusign, and Twilio. This Dot takes a hands-on approach by providing tailored development strategies to help you approach your most pressing challenges with clarity and confidence. Whether it's bridging the gap between business and technology or modernizing legacy systems, you’ll find a breadth of experience and knowledge you need. Check out how This Dot Labs can empower your tech journey.

You might also like

How to automatically deploy your full-stack JavaScript app with AWS CodePipeline cover image

How to automatically deploy your full-stack JavaScript app with AWS CodePipeline

How to automatically deploy your full-stack JavaScript app from an NX monorepo with AWS CodePipeline In our previous blog post (How to host a full-stack JavaScript app with AWS CloudFront and Elastic Beanstalk) we set up a horizontally scalable deployment for our full-stack javascript app. In this article, we would like to show you how to set up AWS CodePipeline to automatically deploy changes to the application. APP Structure Our application is a simple front-end with an API back-end set up in an NX monorepo. The production built API code is hosted in Elastic Beanstalk, while the front-end is stored in S3 and hosted through CloudFront. Whenever we are ready to make a new release, we want to be able to deploy the new API and front-end versions to the existing distribution. In this article, we will set up a CodePipeline to deploy changes to the main branch of our connected repository. CodePipeline CodeBuild and the buildspec file First and foremost, we should set up the build job that will run the deploy logic. For this, we are going to need to use CodeBuild. Let's go into our repository and set up a build-and-deploy.buildspec.yml` file. We put this file under the `tools/aws/` folder. `yaml version: 0.2 phases: install: runtime-versions: nodejs: 18 on-failure: ABORT commands: - npm ci build: on-failure: ABORT commands: # Build the front-end and the back-end - npm run build:$ENVIRONMENTTARGET # TODO: Push FE to S3 # TODO: Push API to Elastic beanstalk ` This buildspec file does not do much so far, we are going to extend it. In the installation phase, it will run npm ci` to install the dependencies and in the build phase, we are going to run the build command using the `ENVIRONMENT_TARGET` variable. This is useful, because if you have more environments, like `development` and `staging` you can have different configurations and builds for those and still use the same buildspec file. Let's go to the Codebuild page in our AWS console and create a build project. Add a descriptive name, such as your-appp-build-and-deploy`. Please provide a meaningful description for your future self. For this example, we are going to restrict the number of concurrent builds to 1. The next step is to set up the source for this job, so we can keep the buildspec file in the repository and make sure this job uses the steps declared in the yaml file. We use an access token that allows us to connect to GitHub. Here you can read more on setting up a GitHub connection with an access token. You can also connect with Oauth, or use an entirely different Git provider. We set our provider to GitHub and provided the repository URL. We also set the Git clone depth to 1, because that makes checking out the repo faster. In the Environment` section, we recommend using an AWS CodeBuild managed image. We use the Ubuntu Standard runtime with the `aws/codebuild/standard:7.0` version. This version uses Node 18. We want to always use the latest image version for this runtime and as the `Environment type` we are good with `Linux EC2`. We don't need elevated privileges, because we won't build docker images, but we do want to create a new service role. In the Buildspec` section select `Use a buildspec file` and give the path from your repository root as the `Buildspec name`. For our example, it is `tools/aws/build-and-deploy.buildspec.yml`. We leave the `Batch configuration` and the `Artifacts` sections as they are and in the `Logs` section we select how we want the logs to work. For this example, to reduce cost, we are going to use S3 logs and save the build logs in the `aws-codebuild-build-logs` bucket that we created for this purpose. We are finished, so let's create the build project. CodePipeline setup To set up automated deployment, we need to create a CodePipeline. Click on Create pipeline` and give it a name. We also want a new service role to be created for this pipeline. Next, we should set up the source stage. As the source provider, we need to use GitHub (version2)` and set up a connection. You can read about how to do it here. After the connection is set up, select your repository and the branch you want to deploy from. We also want to start the pipeline if the source code changes. For the sake of simplicity, we want to have the Output artefact format as CodePipeline default. At the Build stage, we select AWS CodeBuild` as the build provider and let's select the build that we created above. Remember that we have the `ENVIRONMENT_TARGET` as a variable used in our build, so let's add it to this stage with the `Plaintext` value `prod`. This way the build will run the `build:prod` command from our `package.json`. As the `Build type` we want `Single build`. We can skip the deployment stage because we are going to set up deployment in our build job. Review our build pipeline and create it. After it is created, it will run for the first time. At this time it will not deploy anything but it should run successfully. Deployment prerequisites To be able to deploy to S3 and Elastic Beanstalk, we need our CodeBuild job to be able to interact with those services. When we created the build, we created a service role for it. In this example, the service role is codebuild-aws-test-build-and-deploy-service-role`. Let's go to the IAM page in the console and open the `Roles` page. Search for our codebuild role and let's add permissions to it. Click the `Add permissions` button and select `Attach policies`. We need two AWS-managed policies to be added to this service role. The `AdministratorAccess-AWSElasticBeanstalk` will allow us to deploy the API and the `AmazonS3FullAccess` will allow us to deploy the front-end. The `CloudFrontFullAccess` will allow us to invalidate the caches so CloudFront will send the new front-end files after the deployment is ready. Deployment Upload the front-end to S3 Uploading the front-end should be pretty straightforward. We use an AWS CodeBuild managed image in our pipeline, therefore, we have access to the aws` command. Let's update our buildspec file with the following changes: `yaml phases: ... build: on-failure: ABORT commands: # Build the front-end and the back-end - npm run build:$ENVIRONMENTTARGET # Delete the current front-end and deploy the new version front-end - aws s3 sync dist/apps/frontend/ s3://$FRONTEND_BUCKET --delete # Invalidate cloudfront caches to immediately serve the new front-end files - aws cloudfront create-invalidation --distribution-id $CLOUDFRONTDISTRIBUTION_ID --paths "/index.html" # TODO: Push API to Elastic beanstalk ` First, we upload the fresh front-end build to the S3 bucket, and then we invalidate the caches for the index.html` file, so CloudFront will immediately serve the changes. If you have more static files in your app, you might need to invalidate caches for those as well. Before we push the above changes up, we need to update the environment variables in our CodePipeline. To do this open the pipeline and click on the Edit` button. This will then enable us to edit the `Build` stage. Edit the build step by clicking on the edit button. On this screen, we add the new environment variables. For this example, it is aws-hosting-prod` as `Plaintext` for the `FRONT_END_BUCKET` and `E3FV1Q1P98H4EZ` as `Plaintext` for the `CLOUDFRONT_DISTRIBUTION_ID` Now if we add changes to our index.html file, for example, change the button to HELLO 2`, commit it and push it. It gets deployed. Deploying the API to Elastic Beanstalk We are going to need some environment variables passed down to the build pipeline to be able to deploy to different environments, like staging or prod. We gathered these below: - COMMIT_ID`: `#{SourceVariables.CommitId}` - This will have the commit id from the checkout step. We include this, so we can always check what commit is deployed. - ELASTIC_BEANSTALK_APPLICATION_NAME`: `Test AWS App` - This is the Elastic Beanstalk app which has your environment associated. - ELASTIC_BEANSTALK_ENVIRONMENT_NAME`: `TestAWSApp-prod` - This is the Elastic Beanstalk environment you want to deploy to - API_VERSION_BUCKET`: `elasticbeanstalk-us-east-1-474671518642` - This is the S3 bucket that was created by Elastic Beanstalk With the above variables, we can make some new variables during the build time, so we can make sure that every API version is unique and gets deployed. We set this up in the install phase. `yaml ... phases: install: runtime-versions: nodejs: 18 on-failure: ABORT commands: - APPVERSION=`jq '.version' -j package.json` - APIVERSION=$APP_VERSION-build$CODEBUILD_BUILD_NUMBER - APIZIP_KEY=$COMMIT_ID-api.zip - 'APPVERSION_DESCRIPTION="$AP_VERSION: $COMMIT_ID"' - npm ci ... ` The APP_VERSION` variable is the version property from the `package.json` file. In a release process, the application's version is stored here. The `API_VERSION` variable will contain the `APP_VERSION` and as a suffix, we include the build number. We want to upload this API version by indicating the commit ID, so the `API_ZIP_KEY` will have this information. The `APP_VERSION_DESCRIPTION` will be the description of the deployed version in Elastic Beanstalk. Finally, we are going to update the buildspec file with the actual Elastic Beanstalk deployment steps. `yaml phases: ... build: on-failure: ABORT commands: # ... # ZIP the API - zip -r -j dist/apps/api.zip dist/apps/api # Upload the API bundle to S3 - aws s3 cp dist/apps/api.zip s3://$APIVERSION_BUCKET/$ENVIRONMENT_TARGET/$API_ZIP_KEY # Create new API version in Elastic Beanstalk - aws elasticbeanstalk create-application-version --application-name "$ELASTICBEANSTALK_APPLICATION_NAME" --version-label "$API_VERSION" --description "$APP_VERSION_DESCRIPTION" --source-bundle "S3Bucket=$API_VERSION_BUCKET,S3Key=$ENVIRONMENT_TARGET/$API_ZIP_KEY" # Deploy new API version - aws elasticbeanstalk update-environment --application-name "$ELASTICBEANSTALK_APPLICATION_NAME" --version-label "$API_VERSION" --environment-name "$ELASTIC_BEANSTALK_ENVIRONMENT_NAME" # Wait until the Elastic Beanstalk environment is stable - aws elasticbeanstalk wait environment-updated --application-name "$ELASTICBEANSTALK_APPLICATION_NAME" --environment-name "$ELASTIC_BEANSTALK_ENVIRONMENT_NAME" ` Let's make a change in the API, for example, the message sent back by the /api/hello` endpoint and push up the changes. --- Now every time a change is merged to the main` branch, it gets pushed to our production deployment. Using these guides, you can set up multiple environments, and you can configure separate CodePipeline instances to deploy from different branches. I hope this guide proved to be helpful to you....

Nuxt DevTools v1.0: Redefining the Developer Experience Beyond Conventional Tools cover image

Nuxt DevTools v1.0: Redefining the Developer Experience Beyond Conventional Tools

In the ever-evolving world of web development, Nuxt.js has taken a monumental leap with the launch of Nuxt DevTools v1.0. More than just a set of tools, it's a game-changer—a faithful companion for developers. This groundbreaking release, available for all Nuxt projects and being defaulted from Nuxt v3.8 onwards, marks the beginning of a new era in developer tools. It's designed to simplify our development journey, offering unparalleled transparency, performance, and ease of use. Join me as we explore how Nuxt DevTools v1.0 is set to revolutionize our workflow, making development faster and more efficient than ever. What makes Nuxt DevTools so unique? Alright, let's start delving into the features that make this tool so amazing and unique. There are a lot, so buckle up! In-App DevTools The first thing that caught my attention is that breaking away from traditional browser extensions, Nuxt DevTools v1.0 is seamlessly integrated within your Nuxt app. This ensures universal compatibility across browsers and devices, offering a more stable and consistent development experience. This setup also means the tools are readily available in the app, making your work more efficient. It's a smart move from the usual browser extensions, making it a notable highlight. To use it you just need to press Shift + Option + D` (macOS) or `Shift + Alt + D` (Windows): With simple keystrokes, the Nuxt DevTools v1.0 springs to life directly within your app, ready for action. This integration eliminates the need to toggle between windows or panels, keeping your workflow streamlined and focused. The tools are not only easily accessible but also intelligently designed to enhance your productivity. Pages, Components, and Componsables View The Pages, Components, and Composables View in Nuxt DevTools v1.0 are a clear roadmap for your app. They help you understand how your app is built by simply showing its structure. It's like having a map that makes sense of your app's layout, making the complex parts of your code easier to understand. This is really helpful for new developers learning about the app and experienced developers working on big projects. Pages View lists all your app's pages, making it easier to move around and see how your site is structured. What's impressive is the live update capability. As you explore the DevTools, you can see the changes happening in real-time, giving you instant feedback on your app's behavior. Components View is like a detailed map of all the parts (components) your app uses, showing you how they connect and depend on each other. This helps you keep everything organized, especially in big projects. You can inspect components, change layouts, see their references, and filter them. By showcasing all the auto-imported composables, Nuxt DevTools provides a clear overview of the composables in use, including their source files. This feature brings much-needed clarity to managing composables within large projects. You can also see short descriptions and documentation links in some of them. Together, these features give you a clear picture of your app's layout and workings, simplifying navigation and management. Modules and Static Assets Management This aspect of the DevTools revolutionizes module management. It displays all registered modules, documentation, and repository links, making it easy to discover and install new modules from the community! This makes managing and expanding your app's capabilities more straightforward than ever. On the other hand, handling static assets like images and videos becomes a breeze. The tool allows you to preview and integrate these assets effortlessly within the DevTools environment. These features significantly enhance the ease and efficiency of managing your app's dynamic and static elements. The Runtime Config and Payload Editor The Runtime Config and Payload Editor in Nuxt DevTools make working with your app's settings and data straightforward. The Runtime Config lets you play with different configuration settings in real time, like adjusting settings on the fly and seeing the effects immediately. This is great for fine-tuning your app without guesswork. The Payload Editor is all about managing the data your app handles, especially data passed from server to client. It's like having a direct view and control over the data your app uses and displays. This tool is handy for seeing how changes in data impact your app, making it easier to understand and debug data-related issues. Open Graph Preview The Open Graph Preview in Nuxt DevTools is a feature I find incredibly handy and a real time-saver. It lets you see how your app will appear when shared on social media platforms. This tool is crucial for SEO and social media presence, as it previews the Open Graph tags (like images and descriptions) used when your app is shared. No more deploying first to check if everything looks right – you can now tweak and get instant feedback within the DevTools. This feature not only streamlines the process of optimizing for social media but also ensures your app makes the best possible first impression online. Timeline The Timeline feature in Nuxt DevTools is another standout tool. It lets you track when and how each part of your app (like composables) is called. This is different from typical performance tools because it focuses on the high-level aspects of your app, like navigation events and composable calls, giving you a more practical view of your app's operation. It's particularly useful for understanding the sequence and impact of events and actions in your app, making it easier to spot issues and optimize performance. This timeline view brings a new level of clarity to monitoring your app's behavior in real-time. Production Build Analyzer The Production Build Analyzer feature in Nuxt DevTools v1.0 is like a health check for your app. It looks at your app's final build and shows you how to make it better and faster. Think of it as a doctor for your app, pointing out areas that need improvement and helping you optimize performance. API Playground The API Playground in Nuxt DevTools v1.0 is like a sandbox where you can play and experiment with your app's APIs. It's a space where you can easily test and try out different things without affecting your main app. This makes it a great tool for trying out new ideas or checking how changes might work. Some other cool features Another amazing aspect of Nuxt DevTools is the embedded full-featured VS Code. It's like having your favorite code editor inside the DevTools, with all its powerful features and extensions. It's incredibly convenient for making quick edits or tweaks to your code. Then there's the Component Inspector. Think of it as your code's detective tool. It lets you easily pinpoint and understand which parts of your code are behind specific elements on your page. This makes identifying and editing components a breeze. And remember customization! Nuxt DevTools lets you tweak its UI to suit your style. This means you can set up the tools just how you like them, making your development environment more comfortable and tailored to your preferences. Conclusion In summary, Nuxt DevTools v1.0 marks a revolutionary step in web development, offering a comprehensive suite of features that elevate the entire development process. Features like live updates, easy navigation, and a user-friendly interface enrich the development experience. Each tool within Nuxt DevTools v1.0 is thoughtfully designed to simplify and enhance how developers build and manage their applications. In essence, Nuxt DevTools v1.0 is more than just a toolkit; it's a transformative companion for developers seeking to build high-quality web applications more efficiently and effectively. It represents the future of web development tools, setting new standards in developer experience and productivity....

State of Deno: A Look at the Deno CLI, Node.js Compatibility and the Fresh Framework cover image

State of Deno: A Look at the Deno CLI, Node.js Compatibility and the Fresh Framework

In this State of Deno event, our panelists discussed the Deno CLI, Node.js compatibility for the npm ecosystem, and the Fresh framework. In this wrap-up, we will take a deeper look into these latest developments and explore what is on the horizon for Deno. You can watch the full State of Deno event on the This Dot Media YouTube Channel. Here is a complete list of the host and panelists that participated in this online event. Hosts**: Tracy Lee, CEO, This Dot Labs, @ladyleet Panelists**: Colin Ihrig, Software Engineer at Deno, @cjihrig Luca Casonato, Software Engineer at Deno, @lcasdev Bartek Iwańczuk, Software Engineer at Deno, @biwanczuk David Sherret, Software Engineer at Deno, @DavidSherret Table of Contents - Exploring the Deno CLI and its features - What is Deno? - Built in support for TypeScript - Built in toolchain - Deno install and upgrade commands - Deno permissions - Upcoming features - Deno products - Deno Deploy - Deno and Node.js compatibility - Future support for npm packages - The Deno to Node Transform library tool - Fresh framework - Conclusion - We look forward to seeing you at our next State of Deno! Exploring the Deno CLI and Its Features What is Deno? Deno is server-side runtime for JavaScript that also behaves similarly to a browser because it supports all of the same browser APIs on the server. This support provides access to existing knowledge, resources, and documentation for these browser APIs. The team at Deno works closely with browser vendors to make sure that new web APIs work well for both server-side runtime and browsers. Built In Support for TypeScript One of the advantages of Deno is that it ships with TypeScript by default. This removes the setup and configuration time, and reduces the barrier of entry for getting started with TypeScript. Deno also type checks your TypeScript code so you no longer have to use tsc`. Built in Toolchain The Deno CLI comes with an entire toolchain which includes a formatter, Linter, package manager, vendor remote dependencies, editor integrations, and more. One of those tools is the Documentation Generator, which annotates library function comments, types, or interfaces with JSDocs comments to easily generate documentation. For a complete list of the Deno CLI tools, please visit their documentation page. Deno install and upgrade commands Deno install is another feature that allows you to take a script and install it using a global command. ` $ deno install -n awesomecli https://example.com/awesome/cli.ts ` If there is a new version of Deno, you can just run the upgrade command and it will upgrade itself, which makes it a version manager for itself. ` $ deno upgrade ` Deno permissions Deno by default will not have file, network or environment access unless you grant those permissions by running a script with command line flags. ` $ deno run --allow-read mod.ts ` Even with permissions granted, you can scope it to certain directories to allow it to only read and write in the directory of your choosing. If you run the program without permissions granted, the program will still prompt you for permission access before accessing a file. To learn more about Deno's permissions, please read through the documentation. Upcoming features Deno is currently working on improving performance in the areas of HTTP, FFI (Foreign Function Interface) and Node compatibility. There are also improvements being made on the Documentation Generator, to make sure that the docs provided are good and removing the need to maintain two separate docs. Deno Products Deno Deploy Deno deploy is a hosted offering that makes it easy to go from local development to production ready. This service integrates well with GitHub, and provides an option to pay only when users make requests to your services. Deno deploy has a dashboard that allows you to automate most of the processes and show you metrics, deployment statistics, CPU utilization, and network utilization. It also allows you to set up custom domains and provision certificates. Deno and Node.js compatibility Deno v1.15 will introduce a Node.js compatibility mode which will make it possible to run some of Node's programs in Deno. Node APIs like the http server will work in Deno as they would in Node.js. When it comes to the NPM ecosystem compatibility, the goal is to support the large number of packages built on Node.js. The Deno team is working on these compatibility issues, because it uses web APIs for most of their operations. All of these Web APIs were created after Node.js was conceived, meaning that Node implements a whole different set of APIs to do certain operations like performing network requests. This new Node.js API compatibility layer will be able to translate API calls to modern underlying APIs which is what the actual runtime implements. Future support for npm packages When it comes to supporting npm packages on Deno, the goal is to have a transpiler server that takes common.js` code and translates that into ESM (ECMAScript module) code. The reason for this is because, just like browsers, Deno only supports ESM code. Deno uses the concept of npm specifiers to provide access to the npm package. Deno downloads the npm package and runs it from a global cache. `common.js` is also supported ,and it runs the code as it is. ` import { x, y, z } from "npm:someModule@2.1.1"; ` For npm packages, Deno will create a single copy of the downloaded package instead of multiple directories or sub-directories of modules. It is one global hash file, with no node_modules` directory by default, and no need for a `package.json` by default. If a package requires a `node_modules` directory, then that directory can be created using a specifier flag. The following command will create a `node_modules` directory in the project directory, using symlink. ` deno run --unstable --node-modules-dir main.ts ` The Deno to Node Transform library tool The Deno team built a tool to allow library authors to transform Deno packages to Node.js packages. Deno to Node Transform (DNT) takes the Deno code then builds it for Node and distributes it as an npm package. This allows library authors to take advantage of the Deno tool chain. This package can also be shipped on npm for Node.js users. Fresh framework Fresh is a new web framework for Deno, that makes use of the Deno toolchain ecosystem. Fresh uses JSX for templating, and it is similar to Next.js or Remix. A key difference between Fresh and Next.js or Remix, is that Fresh is built to be server-side rendered on the edge rather than server-side in a few locations. Another difference is that with Fresh, no JavaScript is shipped to the client by default, which makes it faster. Fresh handles the Server-side rendering, generates the HTML, sends the file to the client, and hydrates only the part of the page that requires JavaScript on the client by default. Here are some products that already use the Fresh framework: - Deno - merch.deno.com - Deno Deploy To learn more about how to build apps with the Fresh framework, please read through this helpful blog post. Conclusion The team at Deno is making great progress to bring more exciting features to the community to make the runtime engine easy to use for building or migrating existing libraries. If you have any questions about the State of Deno, be sure to ask here. What is it you find exciting about Deno? We will be happy to hear about it on Twitter! We look forward to seeing you at our next State of Deno!...

Software Team Leadership: Risk Taking & Decision Making with David Cramer, Co-Founder & CTO at Sentry cover image

Software Team Leadership: Risk Taking & Decision Making with David Cramer, Co-Founder & CTO at Sentry

In this episode of the engineering leadership series, Rob Ocel interviews David Cramer, co-founder and CTO of Sentry, delving into the importance of decision-making, risk-taking, and the challenges faced in the software engineering industry. David emphasizes the significance of having conviction and being willing to make decisions, even if they turn out to be wrong. He shares his experience of attending a CEO event, where he discovered that decision-making and conflict resolution are struggles even for successful individuals. David highlights the importance of making decisions quickly and accepting the associated risks, rather than attempting to pursue multiple options simultaneously. He believes that being decisive is crucial in the fast-paced software engineering industry. This approach allows for faster progress and adaptation, even if it means occasionally making mistakes along the way. The success of Sentry is attributed to a combination of factors, including market opportunity and the team's principles and conviction. David acknowledges that bold ideas often carry a higher risk of failure, but if they do succeed, the outcome can be incredibly significant. This mindset has contributed to Sentry’s achievements in the industry. The interview also touches on the challenges of developing and defending opinions in the software engineering field. David acknowledges that it can be difficult to navigate differing viewpoints and conflicting ideas. However, he emphasizes the importance of standing by one's convictions and being open to constructive criticism and feedback. Throughout the conversation, David emphasizes the need for engineering leaders to be decisive and take calculated risks. He encourages leaders to trust their instincts and make decisions promptly, even if they are uncertain about the outcome. This approach fosters a culture of innovation and progress within engineering teams. The episode provides valuable insights into the decision-making process and the challenges faced by engineering leaders. It highlights the importance of conviction, risk-taking, and the ability to make decisions quickly in the software engineering industry. David's experiences and perspectives offer valuable lessons for aspiring engineering leaders looking to navigate the complexities of the field....