Skip to content

How to Use Custom Domain with Serverless: The Perfbuddy API Use Case

This article was written over 18 months ago and may contain information that is out of date. Some content may be relevant but please refer to the relevant official documentation or available resources for the latest information.

Recently, Perfbuddy has transitioned its backend stack to utilize Serverless when managing the AWS Amplify backend, in favor of using pure Amplify. I was brought on near the end of that process to lend a hand, after previously wrapping up migrating another project's backend over to the Serverless framework. Out of the tasks I helped with, one of the bigger challenges came from setting up custom domains for our API endpoints that the frontend would point to.

That is, instead of a difficult-to-keep-track-of URL generated by AWS, we can use a custom domain such as api.perfbuddy.com that points to an API Gateway domain where the API routes are set up. Much more developer friendly to remember, especially if you have multiple environments set up for various stages. Fortunately, Serverless has a plugin called Domain Manager that can handle all of that for us.

The potential problem? The site had already deployed in a production state inside of another AWS account, and its domain was registered to that account -- separately from where the Serverless backend was being set up. There is a process to migrate that, but having never done it before and the site needing to stay live, I decided to see if I could make it work as it was. Fortunately, I was able to.

Prerequisite

Before we take a deeper look, if you're following along looking to solve a similar problem and you haven't yet started your Serverless migration, we've discussed that process previously in detail, and you'll definitely want to have the basics already set up for your Serverless deployment instead of doing this all in one go.

If you're already deploying with Serverless, you probably also have an IAM role created and set up with the permissions you'll be needing. Just to be sure, you'll be needing these permissions:

acm:ListCertificates                *
apigateway:GET                      /domainnames/*
apigateway:GET                      /domainnames/*/basepathmappings
apigateway:DELETE                   /domainnames/*
apigateway:POST                     /domainnames
apigateway:POST                     /domainnames/*/basepathmappings
apigateway:PATCH                    /domainnames/*/basepathmapping
cloudformation:GET                  *
cloudfront:UpdateDistribution       *
route53:ListHostedZones             *
route53:ChangeResourceRecordSets    hostedzone/{HostedZoneId}
route53:GetHostedZone               *
route53:ListResourceRecordSets      *
iam:CreateServiceLinkedRole         arn:aws:iam::${AWS::AccountId}: role/aws-service-role/ops.apigateway.amazonaws.com/AWSServiceRoleForAPIGateway

The Problem

As I stated previously, the Perfbuddy domain was registered in a separate AWS account than the one our new Serverless deployment was in under our organization account. Fortunately, I had access to both accounts so either a) I could make this work or b) I would have to migrate the domain over and be a nervous wreck the whole time that I'd break something.

My first step was just to naively follow the excellent Serverless Domain Manager plugin guide, which got me most of the way there. I added the plugin to the project:

npm install serverless-domain-manager --save-dev

Then, added the plugin to the the serverless.yml:

plugins:
  - serverless-domain-manager

Note: You'll want to make sure you pay attention to the order of your plugins, since for some plugins, the order matters greatly. If you've been paying attention to the order of your plugins already, you probably know whether or not if it's safe to list it first, last, etc. For my purposes, I added it to the end of the list without issue.

Next, I needed to add the plugin configuration under the custom field:

custom:
  customDomain:
    domainName: api.perfbuddy.com
    certificateName: '*.perfbuddy.com'
    endpointType: 'regional'
    apiType: http

The documentation specifies multiple ways to set up multiple domains in one configuration setup, but for my first attempt, I decided to try to get just one domain setup to see if it worked (more on setting up multiple domains later). I left out a few of the parameters that were listed in the guide, and only added a few that I knew I needed to specify. Most parameters have a default value if not specified, which you can find on the plugin's Github.

After running the create command:

serverless create_domain

I hit my first real snag: there was no hosted zone set up for the custom domain.

The Solution

At this step, I feared I would actually potentially have to migrate the domain over. However, when reading the migration documentation, I noticed a specific line in the second optional step that would clue me in on exactly what I needed to know. It reads as follows:

If you're using Route 53 as the DNS service for the domain, Route 53 doesn't transfer the hosted zone when you transfer a domain to a different AWS account. If domain registration is associated with one account and the corresponding hosted zone is associated with another account, neither domain registration nor DNS functionality is affected. The only effect is that you'll need to sign into the Route 53 console using one account to see the domain, and sign in using the other account to see the hosted zone.

So, since I had access to both accounts under the same organization, it read to me that AWS would handle the DNS automatically without transferring anything. A hosted zone can live on one account while the main domain registration lived on the other. Perfect.

Navigating to the Route 53 console where the Serverless backend was being deployed, I created a hosted zone under the exact domain name I wanted to deploy to (I also created hosted zones for the other specific domains I would need):

AWS Hosted Zone Screenshot

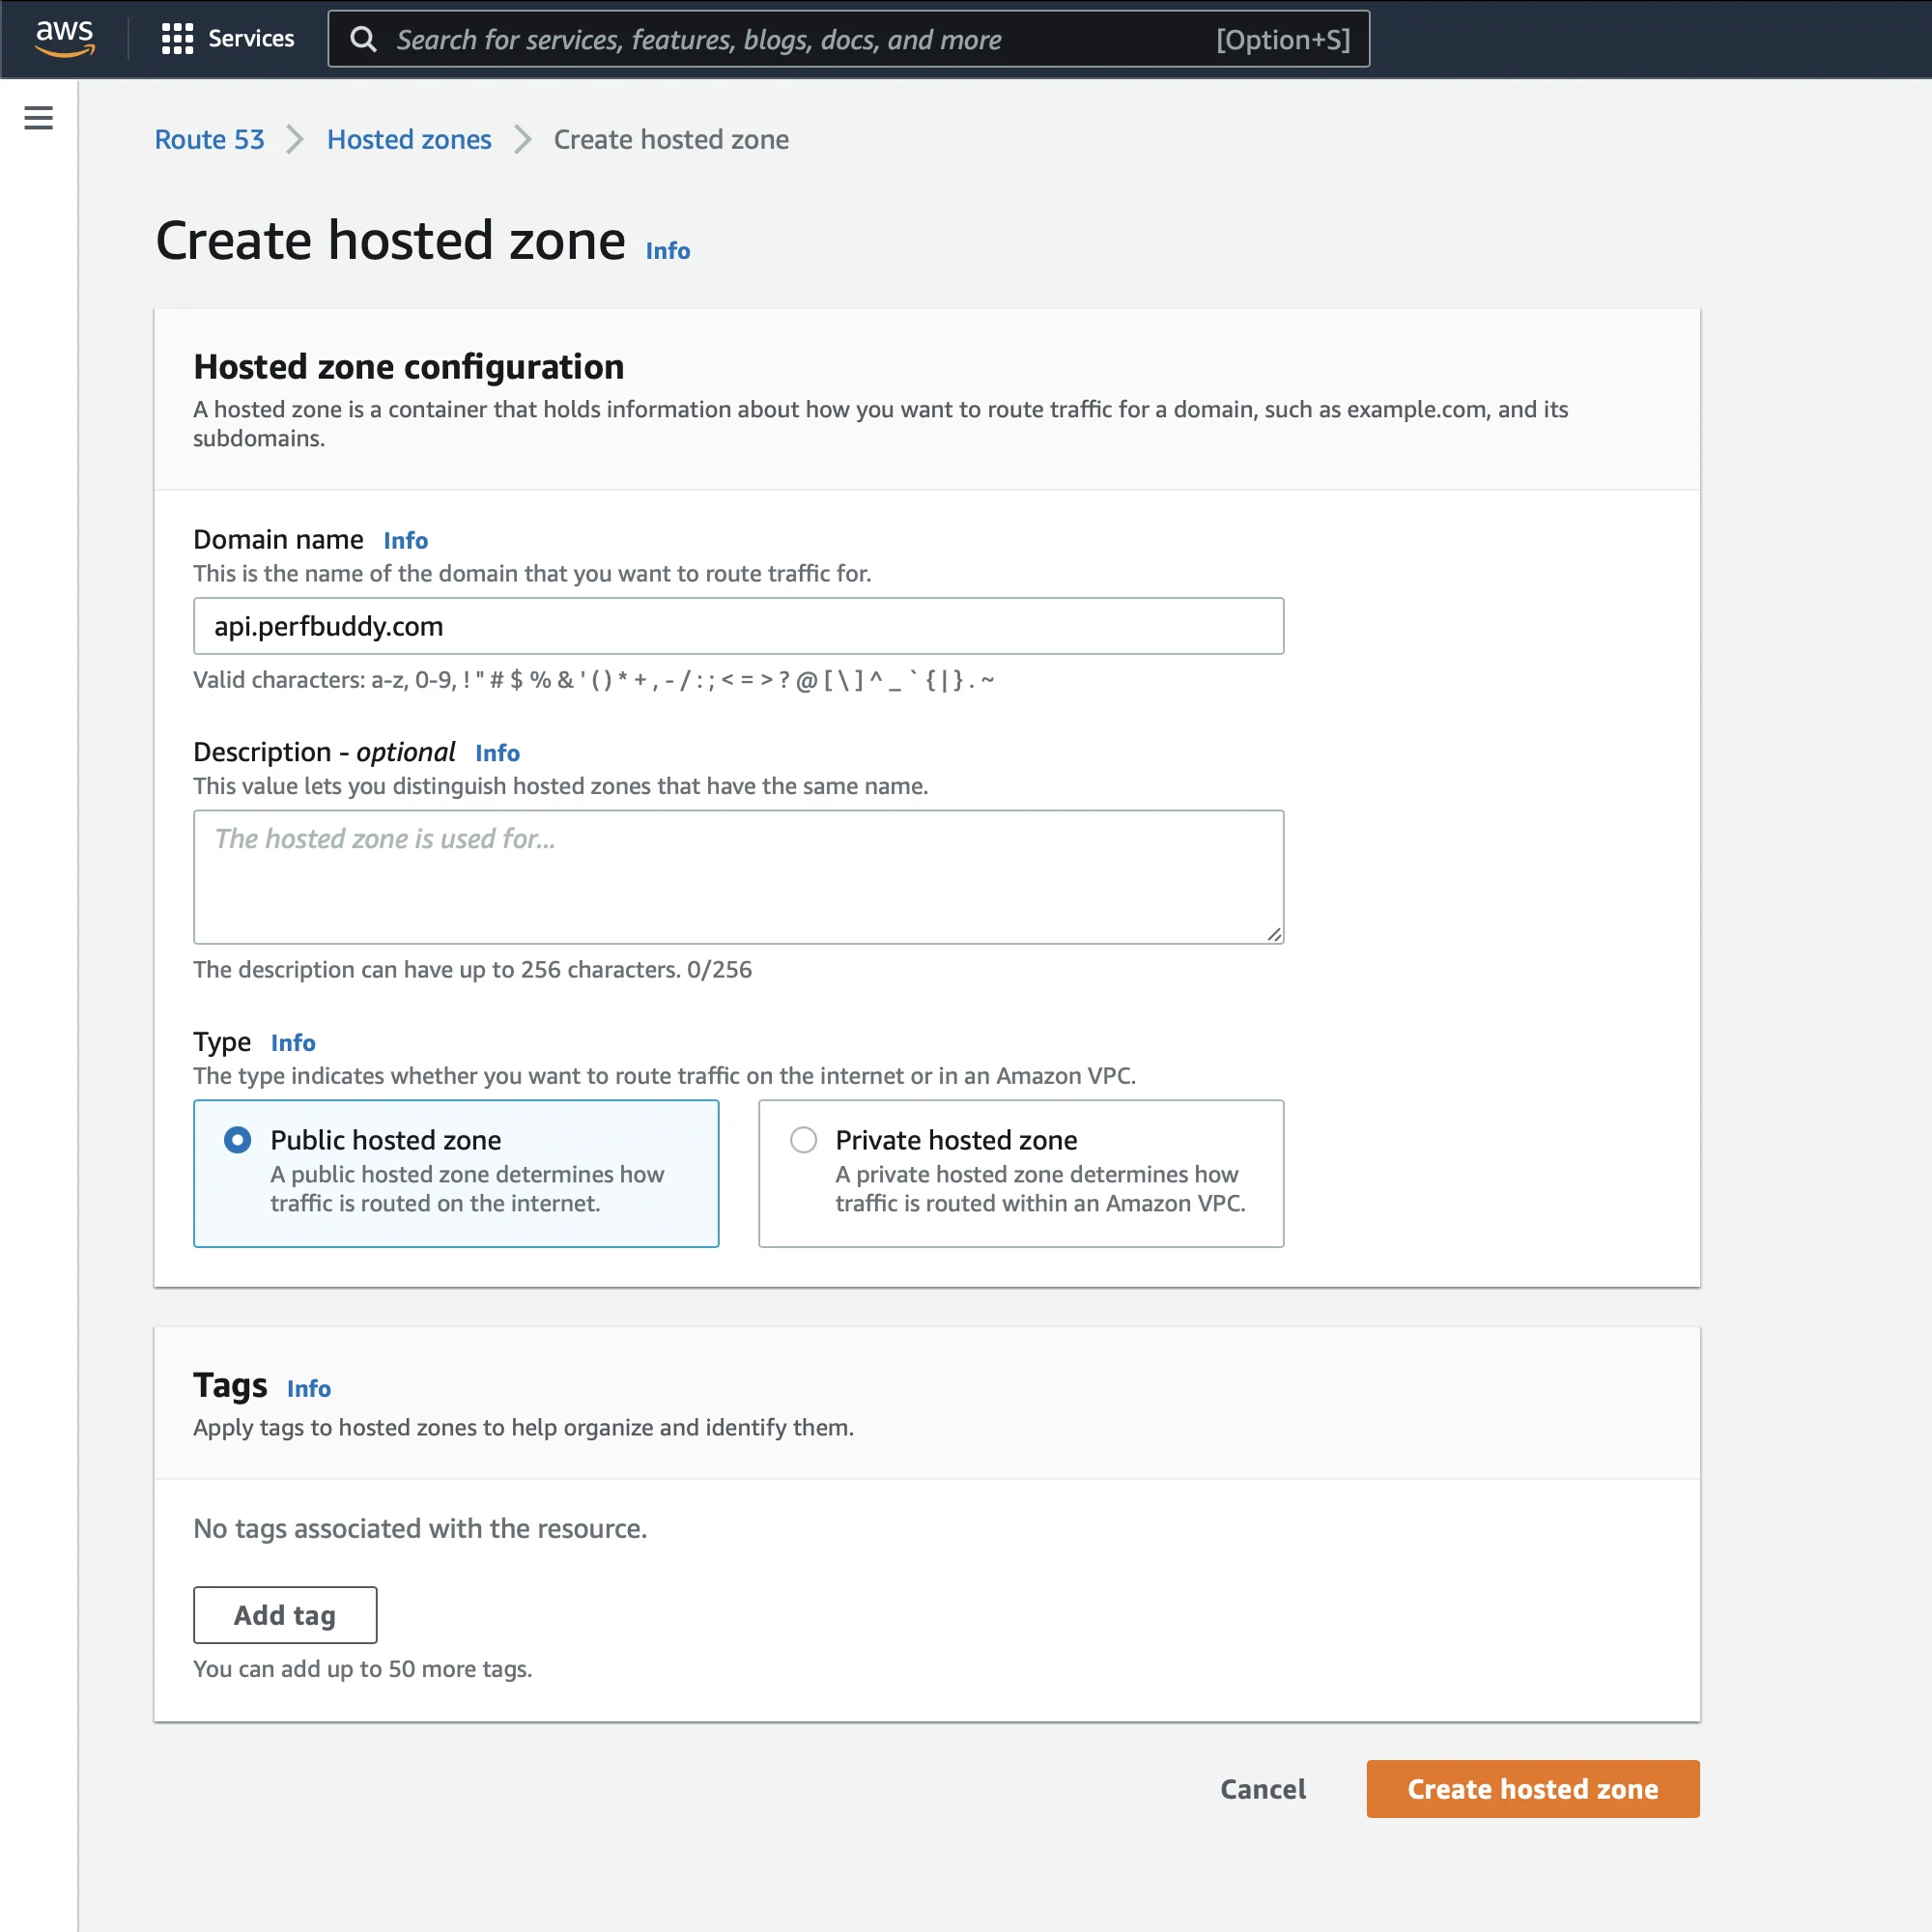
At this point, the Serverless CLI may have worked with the configuration we specified as is, but I decided to add an additional parameter using the hosted zone ID from the one I just created:

custom:
  customDomain:
    domainName: api.perfbuddy.com
    certificateName: '*.perfbuddy.com'
    endpointType: 'regional'
    apiType: http
    hostedZoneId: 'redacted-hosted-zone-id'

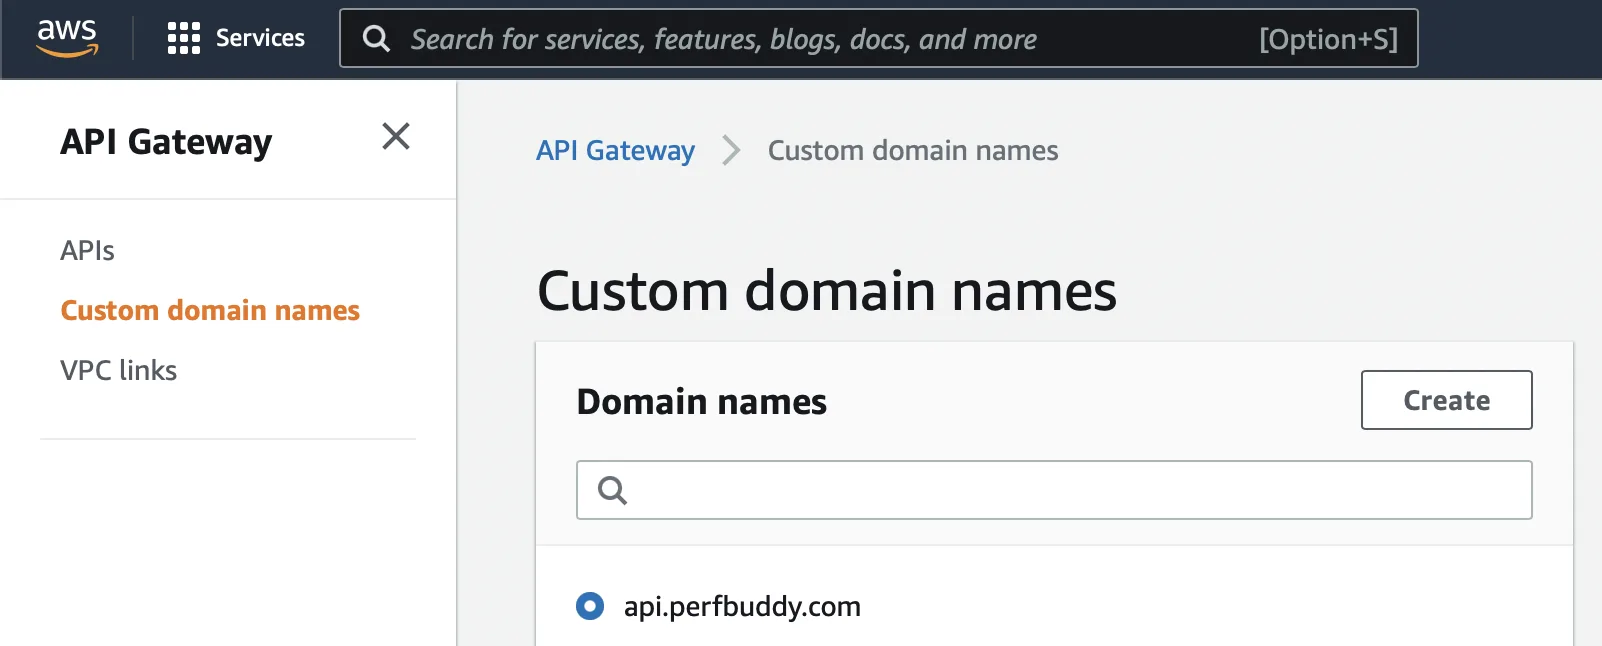
Now, running the create_domain worked and navigating to the API Gateway console showed the custom domain we just created:

AWS Custom Domain Names List Screenshot

Additionally, navigating back to our hosted zone in the Route 53 console, we created shows two additional records the plugin created for us. Finally, running a deploy command:

serverless deploy

Successfully deployed the backend, now with the domain manager plugin info appearing in the output:

Serverless Domain Manager:
  Domain Name: api.perfbuddy.com
  Target Domain: [AWS target domain that matches with API Gateway custom domain target]
  Hosted Zone Id: [Hosted zone ID that matches with API Gateway custom domain hosted zone ID]

Deploying Multiple Domains

Of course, it wasn't just a single API backend I needed to setup; I needed to setup multiple. The problem I saw with using the plugin's built-in capability for multiple domains was that it would try to deploy to all of them at the same time. We needed to deploy to different stages, at different points of development and release independently between them.

So, utilizing the Serverless stage parameters I was able to use the same single custom domain structure for the domain manager plugin configuration. You can even specify whole arrays as a parameter, so I did exactly that (with the other stages and parameters added as needed, of course):

params:
  prod:
    customDomain:
      domainName: api.perfbuddy.com
      stage: prod
      endpointType: 'regional'
      certificateName: '*.perfbuddy.com'
      hostedZoneId: 'your-hosted-zone-id'
      apiType: http

Note: Be sure to take note that you are using the correct YAML formatting and structure for you use case -- at one point, I was using the multiple domains YAML structure, but incorrectly so my deployments weren't actually going through as a result, I believe. I spent far more time resolving that specifically than I needed to.

Then, back under the actual plugin configuration, I changed it as follows:

custom:
  customDomain: ${param:customDomain}

Now, running any of the commands:

serverless deploy --stage prod
serverless deploy --stage stage
serverless deploy --stage dev

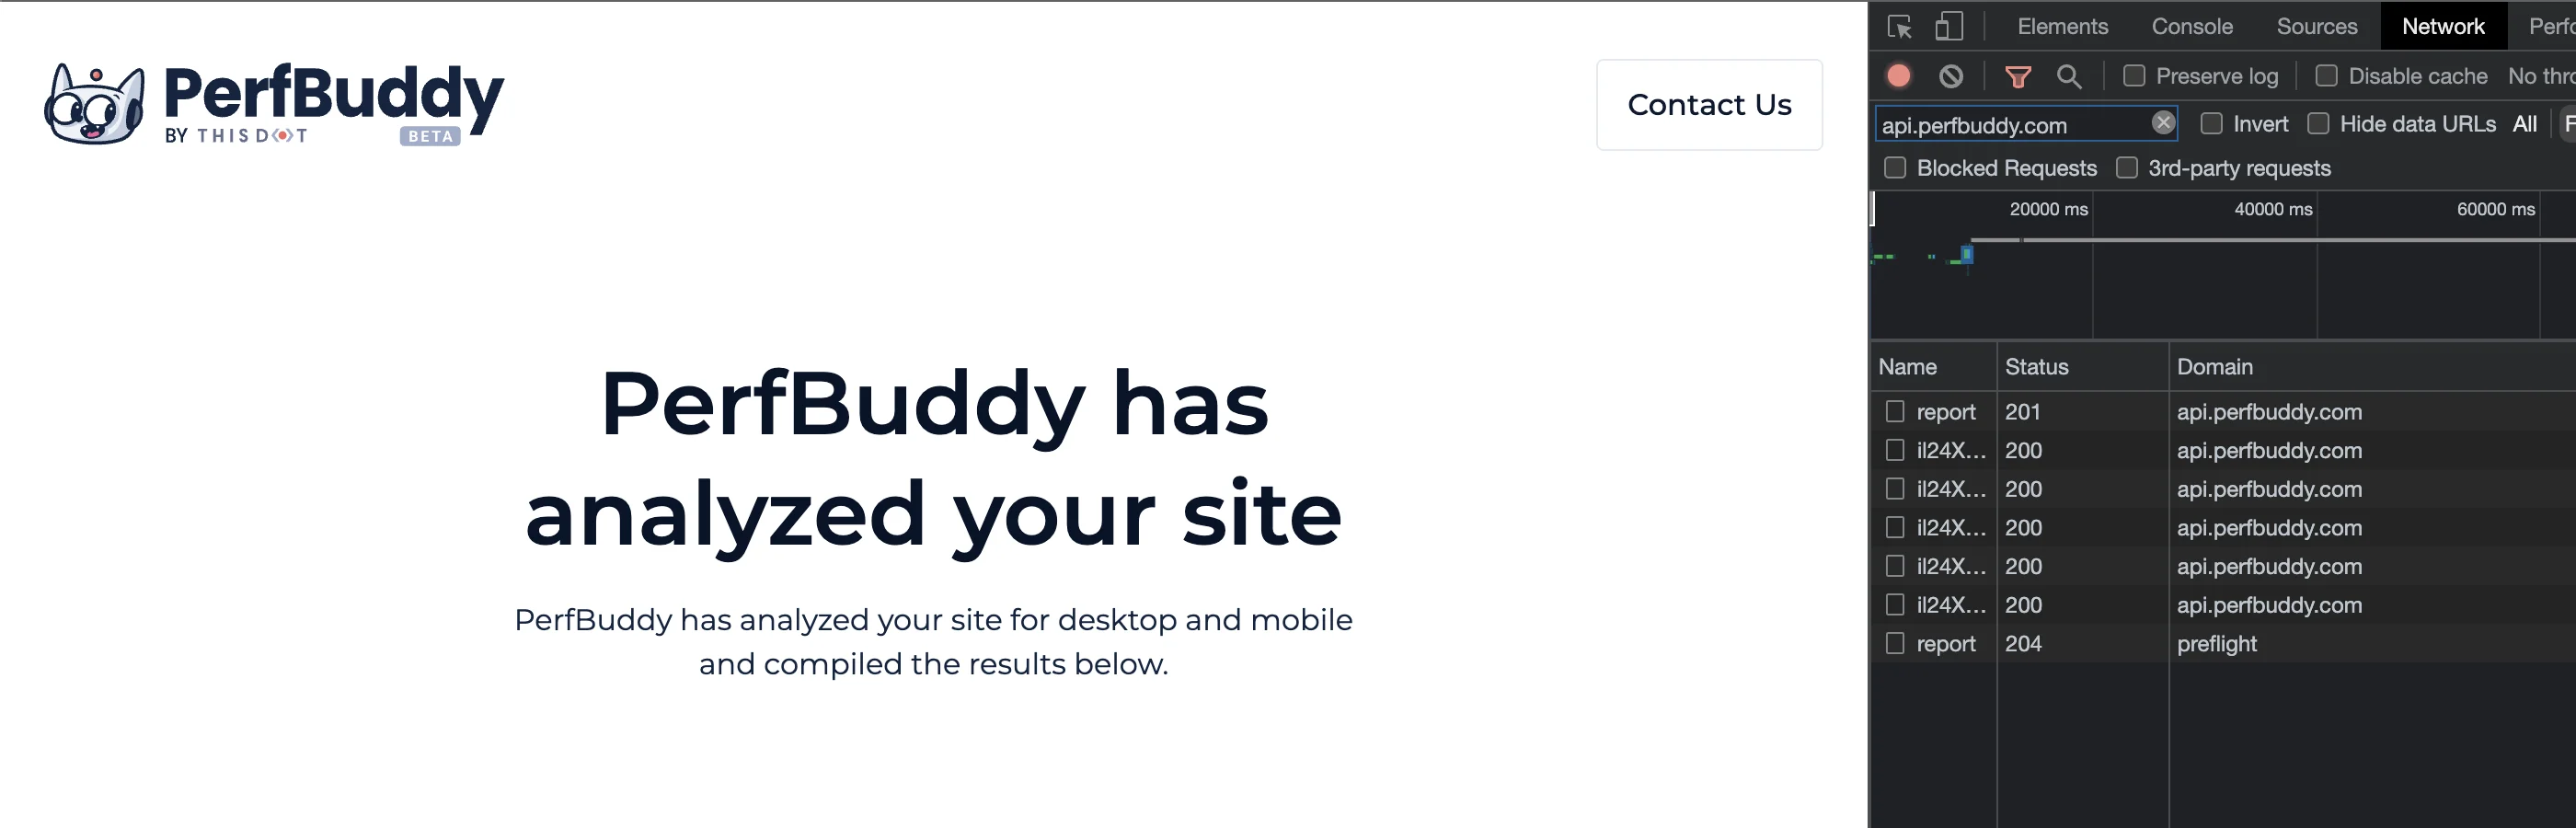
Deployed to all needed environments separately, and pointing my locally running frontend to api.perfbuddy.com worked like a charm:

Custom Domain Working on Perfbuddy Frontend Screenshot

Conclusion

Working in Serverless truly has been a smooth process, and we're constantly blown away with its power that can only succinctly be described as magic. And, of course, if you haven't yet checked out Perfbuddy, be sure to do so! It's completely free and was made to help all developers and their teams improve their products.

This Dot is a consultancy dedicated to guiding companies through their modernization and digital transformation journeys. Specializing in replatforming, modernizing, and launching new initiatives, we stand out by taking true ownership of your engineering projects.

We love helping teams with projects that have missed their deadlines or helping keep your strategic digital initiatives on course. Check out our case studies and our clients that trust us with their engineering.

You might also like

How to configure and optimize a new Serverless Framework project with TypeScript cover image

How to configure and optimize a new Serverless Framework project with TypeScript

How to configure and optimize a new Serverless Framework project with TypeScript If you’re trying to ship some serverless functions to the cloud quickly, Serverless Framework is a great way to deploy to AWS Lambda quickly. It allows you to deploy APIs, schedule tasks, build workflows, and process cloud events through a code configuration. Serverless Framework supports all the same language runtimes as Lambda, so you can use JavaScript, Ruby, Python, PHP, PowerShell, C#, and Go. When writing JavaScript though, TypeScript has emerged as a popular choice as it is a superset of the language and provides static typing, which many developers have found invaluable. In this post, we will set up a new Serverless Framework project that uses TypeScript and some of the optimizations I recommend for collaborating with teams. These will be my preferences, but I’ll mention other great alternatives that exist as well. Starting a New Project The first thing we’ll want to ensure is that we have the serverless framework installed locally so we can utilize its commands. You can install this using npm: ` From here, we can initialize the project our project by running the serverless command to run the CLI. You should see a prompt like the following: We’ll just use the Node.js - Starter for this demo since we’ll be doing a lot of our customization, but you should check out the other options. At this point, give your project a name. If you use the Serverless Dashboard, select the org you want to use or skip it. For this, we’ll skip this step as we won’t be using the dashboard. We’ll also skip deployment, but you can run this step using your default AWS profile. You’ll now have an initialized project with 4 files: .gitignore index.js - this holds our handler that is configured in the configuration README.md - this has some useful framework commands that you may find useful serverless.yml - this is the main configuration file for defining your serverless infrastructure We’ll cover these in more depth in a minute, but this setup lacks many things. First, I can’t write TypeScript files. I also don’t have a way to run and test things locally. Let’s solve these. Enabling TypeScript and Local Dev Serverless Framework’s most significant feature is its rich plugin library. There are 2 packages I install on any project I’m working on: - serverless-offline - serverless-esbuild Serverless Offline emulates AWS features so you can test your API functions locally. There aren’t any alternatives to this for Serverless Framework, and it doesn’t handle everything AWS can do. For instance, authorizer functions don’t work locally, so offline development may not be on the table for you if this is a must-have feature. There are some other limitations, and I’d consult their issues and READMEs for a thorough understanding, but I’ve found this to be excellent for 99% of projects I’ve done with the framework. Serverless Esbuild allows you to use TypeScript and gives you extremely fast bundler and minifier capabilities. There are a few alternatives for TypeScript, but I don’t like them for a few reasons. First is Serverless Bundle, which will give you a fully configured webpack-based project with other features like linters, loaders, and other features pre-configured. I’ve had to escape their default settings on several occasions and found the plugin not to be as flexible as I wanted. If you need that advanced configuration but want to stay on webpack, Serverless Webpack allows you to take all of what Bundle does and extend it with your customizations. If I’m getting to this level, though, I just want a zero-configuration option which esbuild can be, so I opt for it instead. Its performance is also incredible when it comes to bundle times. If you want just TypeScript, though, many people use serverless-plugin-typescript, but it doesn’t support all TypeScript features out of the box and can be hard to configure. To configure my preferred setup, do the following: 1. Install the plugins by setting up your package.json. I’m using yarn but you can use your preferred package manager. ` Note: I’m also installing serverless here, so I have a local copy that can be used in package.json scripts. I strongly recommend doing this. 2. In our serverless.yml, let’s install the plugins and configure them. When done, our configuration should look like this: ` 3. Now, in our newly created package.json, let’s add a script to run the local dev server. Our package.json should now look like this: ` We can now run yarn dev in our project root and get a running server 🎉 But our handler is still in JavaScript. We’ll want to pull in some types and set our tsconfig.json to fix this. For the types, I use aws-lambda and @types/serverless, which can be installed as dev dependencies. For reference, my tsconfig.json looks like this: ` And I’ve updated our index.js to index.ts and updated it to read as follows: ` With this, we now have TypeScript running and can do local development. Our function doesn’t expose an HTTP route making it harder to test so let’s expose it quickly with some configuration: ` So now we can point our browser to http://localhost:3000/healthcheck and see an output showing our endpoint working! Making the Configuration DX Better ion DX Better Many developers don’t love YAML because of its strict whitespace rules. Serverless Framework supports JavaScript or JSON configurations out of the box, but we want to know if our configuration is valid as we’re writing it. Luckily, we can now use TypeScript to generate a type-safe configuration file! We’ll need to add 2 more packages to make this work to our dev dependencies: ` Now, we can change our serverless.yml to serverless.ts and rewrite it with type safety! ` Note that we can’t use the export keyword for our configuration and need to use module.exports instead. Further Optimization There are a few more settings I like to enable in serverless projects that I want to share with you. AWS Profile In the provider section of our configuration, we can set a profile field. This will relate to the AWS configured profile we want to use for this project. I recommend this path if you’re working on multiple projects to avoid deploying to the wrong AWS target. You can run aws configure –profile to set this up. The profile name specified should match what you put in your Serverless Configuration. Individual Packaging Cold starts#:~:text=Cold%20start%20in%20computing%20refers,cache%20or%20starting%20up%20subsystems.) are a big problem in serverless computing. We need to optimize to make them as small as possible and one of the best ways is to make our lambda functions as small as possible. By default, serverless framework bundles all functions configured into a single executable that gets uploaded to lambda, but you can actually change that setting by specifying you want each function bundled individually. This is a top-level setting in your serverless configuration and will help reduce your function bundle sizes leading to better performance on cold starts. ` Memory & Timeout Lambda charges you based on an intersection of memory usage and function runtime. They have some limits to what you can set these values to but out of the box, the values are 128MB of memory and 3s for timeout. Depending on what you’re doing, you’ll want to adjust these settings. API Gateway has a timeout window of 30s so you won’t be able to exceed that timeout window for HTTP events, but other Lambdas have a 15-minute timeout window on AWS. For memory, you’ll be able to go all the way to 10GB for your functions as needed. I tend to default to 512MB of memory and a 10s timeout window but make sure you base your values on real-world runtime values from your monitoring. Monitoring Speaking of monitoring, by default, your logs will go to Cloudwatch but AWS X-Ray is off by default. You can enable this using the tracing configuration and setting the services you want to trace to true for quick debugging. You can see all these settings in my serverless configuration in the code published to our demo repo: https://github.com/thisdot/blog-demos/tree/main/serverless-setup-demo Other Notes Two other important serverless features I want to share aren’t as common in small apps, but if you’re trying to build larger applications, this is important. First is the useDotenv feature which I talk more about in this blog post. Many people still use the serverless-dotenv-plugin which is no longer needed for newer projects with basic needs. The second is if you’re using multiple cloud services. By default, your lambdas may not have permission to access the other resources it needs. You can read more about this in the official serverless documentation about IAM permissions. Conclusion If you’re interested in a new serverless project, these settings should help you get up and running quickly to make your project a great developer experience for you and those working with you. If you want to avoid doing these steps yourself, check out our starter.dev serverless kit to help you get started....

How to host a full-stack app with AWS CloudFront and Elastic Beanstalk cover image

How to host a full-stack app with AWS CloudFront and Elastic Beanstalk

How to host a full-stack JavaScript app with AWS CloudFront and Elastic Beanstalk Let's imagine that you have finished building your app. You have a Single Page Application (SPA) with a NestJS back-end. You are ready to launch, but what if your app is a hit, and you need to be prepared to serve thousands of users? You might need to scale your API horizontally, which means that to serve traffic, you need to have more instances running behind a load balancer. Serving your front-end using a CDN will also be helpful. In this article, I am going to give you steps on how to set up a scalable distribution in AWS, using S3, CloudFront and Elastic Beanstalk. The NestJS API and the simple front-end are both inside an NX monorepo The sample application For the sake of this tutorial, we have put together a very simple HTML page that tries to reach an API endpoint and a very basic API written in NestJS. The UI The UI code is very simple. There is a "HELLO" button on the UI which when clicked, tries to reach out to the /api/hello endpoint. If there is a response with status code 2xx, it puts an h1 tag with the response contents into the div with the id result. If it errors out, it puts an error message into the same div. ` The API We bootstrap the NestJS app to have the api prefix before every endpoint call. ` We bootstrap it with the AppModule which only has the AppController in it. ` And the AppController sets up two very basic endpoints. We set up a health check on the /api route and our hello endpoint on the /api/hello route. ` Hosting the front-end with S3 and CloudFront To serve the front-end through a CMS, we should first create an S3 bucket. Go to S3 in your AWS account and create a new bucket. Name your new bucket to something meaningful. For example, if this is going to be your production deployment I recommend having -prod in the name so you will be able to see at a glance, that this bucket contains your production front-end and nothing should get deleted accidentally. We go with the defaults for this bucket setting it to the us-east-1 region. Let's set up the bucket to block all public access, because we are going to allow get requests through CloudFront to these files. We don't need bucket versioning enabled, because these files will be deleted every time a new front-end version will be uploaded to this bucket. If we were to enable bucket versioning, old front-end files would be marked as deleted and kept, increasing the storage costs in the long run. Let's use server-side encryption with Amazon S3-managed keys and create the bucket. When the bucket is created, upload the front-end files to the bucket and let's go to the CloudFront service and create a distribution. As the origin domain, choose your S3 bucket. Feel free to change the name for the origin. For Origin access, choose the Origin access control settings (recommended). Create a new Control setting with the defaults. I recommend adding a description to describe this control setting. At the Web Application Firewall (WAF) settings we would recommend enabling security protections, although it has cost implications. For this tutorial, we chose not to enable WAF for this CloudFront distribution. In the Settings section, please choose the Price class that best fits you. If you have a domain and an SSL certificate you can set those up for this distribution, but you can do that later as well. As the Default root object, please provide index.html and create the distribution. When you have created the distribution, you should see a warning at the top of the page. Copy the policy and go to your S3 bucket's Permissions tab. Edit the Bucket policy and paste the policy you just copied, then save it. If you have set up a domain with your CloudFront distribution, you can open that domain and you should be able to see our front-end deployed. If you didn't set up a domain the Details section of your CloudFront distribution contains your distribution domain name. If you click on the "Hello" button on your deployed front-end, it should not be able to reach the /api/hello endpoint and should display an error message on the page. Hosting the API in Elastic Beanstalk Elastic beanstalk prerequisites For our NestJS API to run in Elastic Beanstalk, we need some additional setup. Inside the apps/api/src folder, let's create a Procfile with the contents: web: node main.js. Then open the apps/api/project.json and under the build configuration, extend the production build setup with the following (I only ) ` The above settings will make sure that when we build the API with a production configuration, it will generate a package.json and a package-lock.json near the output file main.js. To have a production-ready API, we set up a script in the package.json file of the repository. Running this will create a dist/apps/api and a dist/apps/frontend folder with the necessary files. ` After running the script, zip the production-ready api folder so we can upload it to Elastic Beanstalk later. ` Creating the Elastic Beanstalk Environment Let's open the Elastic Beanstalk service in the AWS console. And create an application. An application is a logical grouping of several environments. We usually put our development, staging and production environments under the same application name. The first time you are going to create an application you will need to create an environment as well. We are creating a Web server environment. Provide your application's name in the Application information section. You could also provide some unique tags for your convenience. In the Environment information section please provide information on your environment. Leave the Domain field blank for an autogenerated value. When setting up the platform, we are going to use the Managed Node.js platform with version 18 and with the latest platform version. Let's upload our application code, and name the version to indicate that it was built locally. This version label will be displayed on the running environment and when we set up automatic deployments we can validate if the build was successful. As a Preset, let's choose Single instance (free tier eligible) On the next screen configure your service access. For this tutorial, we only create a new service-role. You must select the aws-elasticbeanstalk-ec2-role for the EC2 instance profile. If can't select this role, you should create it in AWS IAM with the AWSElasticBeanstalkWebTier, AWSElasticBeanstalkMulticontainerDocker and the AWSElasticBeanstalkRoleWorkerTier managed permissions. The next step is to set up the VPC. For this tutorial, I chose the default VPC that is already present with my AWS account, but you can create your own VPC and customise it. In the Instance settings section, we want our API to have a public IP address, so it can be reached from the internet, and we can route to it from CloudFront. Select all the instance subnets and availability zones you want to have for your APIs. For now, we are not going to set up a database. We can set it up later in AWS RDS but in this tutorial, we would like to focus on setting up the distribution. Let's move forward Let's configure the instance traffic and scaling. This is where we are going to set up the load balancer. In this tutorial, we are keeping to the defaults, therefore, we add the EC2 instances to the default security group. In the Capacity section we set the Environment type to Load balanced. This will bring up a load balancer for this environment. Let's set it up so that if the traffic is large, AWS can spin up two other instances for us. Please select your preferred tier in the instance types section, We only set this to t3.micro For this tutorial, but you might need to use larger tiers. Configure the Scaling triggers to your needs, we are going to leave them as defaults. Set the load balancer's visibility to the public and use the same subnets that you have used before. At the Load Balancer Type section, choose Application load balancer and select Dedicated for exactly this environment. Let's set up the listeners, to support HTTPS. Add a new listener for the 443 port and connect your SSL certificate that you have set up in CloudFront as well. For the SSL policy choose something that is over TLS 1.2 and connect this port to the default process. Now let's update the default process and set up the health check endpoint. We set up our API to have the health check endpoint at the /api route. Let's modify the default process accordingly and set its port to 8080. For this tutorial, we decided not to enable log file access, but if you need it, please set it up with a separate S3 bucket. At the last step of configuring your Elastic Beanstalk environment, please set up Monitoring, CloudWatch logs and Managed platform updates to your needs. For the sake of this tutorial, we have turned most of these options off. Set up e-mail notifications to your dedicated alert e-mail and select how you would like to do your application deployments. At the end, let's configure the Environment properties. We have set the default process to occupy port 8080, therefore, we need to set up the PORT environment variable to 8080. Review your configuration and then create your environment. It might take a few minutes to set everything up. After the environment's health transitions to OK you can go to AWS EC2 / Load balancers in your web console. If you select the freshly created load balancer, you can copy the DNS name and test if it works by appending /api/hello at the end of it. Connect CloudFront to the API endpoint Let's go back to our CloudFront distribution and select the Origins tab, then create a new origin. Copy your load balancer's URL into the Origin domain field and select HTTPS only protocol if you have set up your SSL certificate previously. If you don't have an SSL certificate set up, you might use HTTP only, but please know that it is not secure and it is especially not recommended in production. We also renamed this origin to API. Leave everything else as default and create a new origin. Under the Behaviors tab, create a new behavior. Set up the path pattern as /api/* and select your newly created API origin. At the Viewer protocol policy select Redirect HTTP to HTTPS and allow all HTTP methods (GET, HEAD, OPTIONS, PUT, POST, PATCH, DELETE). For this tutorial, we have left everything else as default, but please select the Cache Policy and Origin request policy that suits you the best. Now if you visit your deployment, when you click on the HELLO button, it should no longer attach an error message to the DOM. --- Now we have a distribution that serves the front-end static files through CloudFront, leveraging caching and CDN, and we have our API behind a load balancer that can scale. But how do we deploy our front-end and back-end automatically when a release is merged to our main branch? For that we are going to leverage AWS CodeBuild and CodePipeline, but in the next blog post. Stay tuned....

Getting Started with Angular: A Mobile Developer’s Approach cover image

Getting Started with Angular: A Mobile Developer’s Approach

At many points in your career, you will find yourself picking up a new framework, platform, language, or (most likely) some combination of all three. In my case, I recently found myself looking for a change of pace, and ended up switching from working in native iOS as a Mobile Engineer to the world of JavaScript as a Front-End Engineer. Specifically, I started out with Angular. No matter how you slice it, learning something brand new can feel daunting — regardless of whether it is mid-career or otherwise. Luckily, Angular is extremely simple and quick to get set up . . . but getting an environment and project set up really is only a small part of the path to learning a platform, isn’t it? As I challenged myself to attempt to learn Angular as quickly as possible, I aimed to first break apart the approach by understanding: * What Angular is * What Angular's goal is * What the fundamental pieces of Angular are So, before we jump straight into some code, let's grasp these concepts first. What *is* Angular? First of all, Angular is not AngularJS. This was slightly confusing for me at first, and I made the mistake of mixing them up initially. Oops. At a macro level, Angular is a modern JavaScript framework that’s built on TypeScript, giving it access to static types, classes, and other elements provided by ES6. This allows code to organize and structure properly so it can be Object-Oriented, and allow for long-term maintenance at any scale, which will be important for the next fundamental concepts. What does Angular aim to achieve? Angular provides a platform to make single-page applications. I think it's important to point out the usage of the word platform, as Angular comes with quite a bit more to help us scale applications to any point we need. It ships with many integrated libraries (more on that in a bit), integration with numerous third-party libraries, and, maybe most importantly, the Angular CLI (command line interface), which gives us access to build, serve, test, and even ship our application. "Application" is also a very important distinction- that is, Angular (like many modern frameworks) aims to provide the tools to create responsive, smooth user experiences. What are the essential building blocks of Angular? To understand Angular, you have to understand what a Component is. But first, it may be easier to first visualize what makes an application: navbars, buttons, tables, table cells, and every other separately distinct building block you can visually see. In Angular, every single one of these is a Component, and everything else that exists is in service of these Components. For me, this is where it really started to click, since in iOS, the same fundamental principle exists: every single object on the screen *must* conform to UIView, including any View Controller. Angular, of course, is no different — the root view of the app itself is also a Component. Templates define the appearance of the Component via HTML. Angular extends the functionality of templates quite a bit through direct text interpolation, directives, and property/event binding. These, combined with CSS, can achieve essentially anything you need it to without having to entangle your Component's business logic with the presentation of said Component. The final core piece of the Angular paradigm is dependency injection. Essentially, dependency injection helps keep your Components extremely light, modular, and maintainable. So, say you have a table that needs data from a request sent to an API endpoint. You *could* just have the inner workings of a server fetch right there all in the component, but you likely have multiple places all over your application where you'll be making API requests, and have to duplicate that code. Instead, Angular lets you define a Service object that can handle that API request, and return the data directly to your component. You don't even need to instantiate the Service since Angular will just automatically do that for you once you inject the dependency to keep things even cleaner. Dependency injection, services, routing, etc. can feel daunting, but I think as long as you view everything else that isn't a Component solely existing to work *in favor* of Components, things become a lot clearer and you can start building apps the Angular way. Speaking of, let's do a bit of project setup, take a look at the structure, build it, and add a component. Prerequisties Now that we know what Angular is, we can finally start our first project. A couple things we will need first: * Visual Studio Code * NodeJS and NPM with at least a basic proficiency with a terminal * Some basic understanding of HTML and JavaScript/TypeScript Creating and running your first project With Node and NPM installed, we can install the Angular CLI with the following command: ` Then we create our first project with: ` Note: The above command will have a couple prompts for you. Answer yes to add Angular routing, and the style sheet format is up to you (I chose SCSS). You can just press enter on both prompts for the default setup as well. And finally, building and serving our new app locally: ` Open http://localhost:4200/ on your favorite browser to see what we just made. One note about ng serve is its ability to pick up code changes and update live — no waiting for build times just to see very small changes here. Nice. Project Structure Of course, it's helpful to know what the CLI just built out for us. Looking at our project structure in VS Code, we can see quite a bit of config files set up in the root directory. Of course, these are all important, but for now, let's focus on getting familiar with a few: * angular.json — This is the configuration file for CLI, so it knows how to build, serve, and test your app. Should be good to go right out of the box. * package.json — The file where the list of all your NPM dependencies live, the package-lock.json specifies the versions for these files (for my iOS friends, this is very similar to the podfile or build.gradle for my Android friends!). Whenever you install a Node package, the tool will automatically update these for you. * node_modules — With all the above dependencies installed, the .gitignore should be ignoring this directory by default, but it's good to know everything is there. Now that we're familiar with the housekeeping of the app, we can dig into the most important part: the code. In the src/app directory, we can see our first module, component, and the files that make it up. Let's ignore those files for now, and create our very first Component. Creating The First Component Within your terminal, we'll run the following command: ` With that, CLI should have made a directory in src/app/my-first-component and the following files: 1. my-first-component.component.ts — This is the file where the data and logic needed to update your Component's Template live. 2. my-first-component.component.html — The associated Template for the Component, where the HTML is defined to actually render our Component. 3. my-first-component.component.scss — The associated style sheet for the Template, where styles scoped only to this Component are defined. 4. my-first-component.component.spec.ts — The very first unit test for the Component, automatically generated by CLI. How nice! Within the component.ts file, let's take special note of the following: ` Here we can note the Template and style sheet URLs, but of particular note is the selector, in our case called app-my-first-component. This is the custom HTML tag we can now use anywhere our Component is imported in our project. The reason app is prepended to the front of the name is because we defined this Component within the app module, but you can absolutely change the name if you want. If we look back to the root app directory in src/app (taking special note of the exact same file structure we just created in my-first-component), let's open app.module.ts. The CLI has already created a declaration for our Component in the NgModule decorator, and imported MyFirstComponentComponent automatically for us. Let's actually get our newly created Component on the screen somewhere. Let's open app.component.html. There's quite a bit of HTML already in here, but we can leave it mostly alone for now. Really, we can throw our Component just about anywhere, but let's search for the following: ` And replace it with: ` Save your changes, and check your browser to see the following: Now that we've got it up on the screen, let's do some slight modification to get data from the logic to the Template. First, add the following inside the class definition of my-first-component.component.ts: ` Then, inside my-first-component.component.html, replace the Template definition with the following: ` The double bracket notation tells Angular to interpolate the value within, and dynamically pull the text defined in our class. Save both files, and you should see the following: Neat, right? Conclusion Whenever someone asks me how easy it is to get started doing native iOS app development, it's easy for me to boast that you can start a project, throw something in Interface Builder, and run it — all within a few minutes' time. Now, I (and hopefully you) can easily say the exact same about Angular. Of course, this is just a very small taste of what Angular has to offer, but hopefully instead of feeling initially lost in a sea of documentation, the relative simplicity of the platform will seem a lot more clear from the essence of what I described here from my journey of also having to learn Angular. From here, I think it's valuable to look through the incredible official Angular docs, and I'd recommend running through some of their tutorials as well....

The simplicity of deploying an MCP server on Vercel cover image

The simplicity of deploying an MCP server on Vercel

The current Model Context Protocol (MCP) spec is shifting developers toward lightweight, stateless servers that serve as tool providers for LLM agents. These MCP servers communicate over HTTP, with OAuth handled clientside. Vercel’s infrastructure makes it easy to iterate quickly and ship agentic AI tools without overhead. Example of Lightweight MCP Server Design At This Dot Labs, we built an MCP server that leverages the DocuSign Navigator API. The tools, like `get_agreements`, make a request to the DocuSign API to fetch data and then respond in an LLM-friendly way. ` Before the MCP can request anything, it needs to guide the client on how to kick off OAuth. This involves providing some MCP spec metadata API endpoints that include necessary information about where to obtain authorization tokens and what resources it can access. By understanding these details, the client can seamlessly initiate the OAuth process, ensuring secure and efficient data access. The Oauth flow begins when the user's LLM client makes a request without a valid auth token. In this case they’ll get a 401 response from our server with a WWW-Authenticate header, and then the client will leverage the metadata we exposed to discover the authorization server. Next, the OAuth flow kicks off directly with Docusign as directed by the metadata. Once the client has the token, it passes it in the Authorization header for tool requests to the API. ` This minimal set of API routes enables me to fetch Docusign Navigator data using natural language in my agent chat interface. Deployment Options I deployed this MCP server two different ways: as a Fastify backend and then by Vercel functions. Seeing how simple my Fastify MCP server was, and not really having a plan for deployment yet, I was eager to rewrite it for Vercel. The case for Vercel: * My own familiarity with Next.js API deployment * Fit for architecture * The extremely simple deployment process * Deploy previews (the eternal Vercel customer conversion feature, IMO) Previews of unfamiliar territory Did you know that the MCP spec doesn’t “just work” for use as ChatGPT tooling? Neither did I, and I had to experiment to prove out requirements that I was unfamiliar with. Part of moving fast for me was just deploying Vercel previews right out of the CLI so I could test my API as a Connector in ChatGPT. This was a great workflow for me, and invaluable for the team in code review. Stuff I’m Not Worried About Vercel’s mcp-handler package made setup effortless by abstracting away some of the complexity of implementing the MCP server. It gives you a drop-in way to define tools, setup https-streaming, and handle Oauth. By building on Vercel’s ecosystem, I can focus entirely on shipping my product without worrying about deployment, scaling, or server management. Everything just works. ` A Brief Case for MCP on Next.js Building an API without Next.js on Vercel is straightforward. Though, I’d be happy deploying this as a Next.js app, with the frontend features serving as the documentation, or the tools being a part of your website's agentic capabilities. Overall, this lowers the barrier to building any MCP you want for yourself, and I think that’s cool. Conclusion I'll avoid quoting Vercel documentation in this post. AI tooling is a critical component of this natural language UI, and we just want to ship. I declare Vercel is excellent for stateless MCP servers served over http....

Let's innovate together!

We're ready to be your trusted technical partners in your digital innovation journey.

Whether it's modernization or custom software solutions, our team of experts can guide you through best practices and how to build scalable, performant software that lasts.

Prefer email? hi@thisdot.co