Skip to content

Navigation Lifecycle using Vaadin Router, LitElement and TypeScript

Navigation Lifecycle using Vaadin Router, LitElement and TypeScript

This article was written over 18 months ago and may contain information that is out of date. Some content may be relevant but please refer to the relevant official documentation or available resources for the latest information.

In a previous post, I explained the main aspects to add a Routing Management with LitElement and TypeScript to build a SPA(Single Page Application). It's important to note that a good understanding of the routing library you selected to work through can help you to have more control over the navigation lifecycle.

Creating and configuring routes into your Web Application is only one part of the Routing Management story.

lifecycle-callbacks

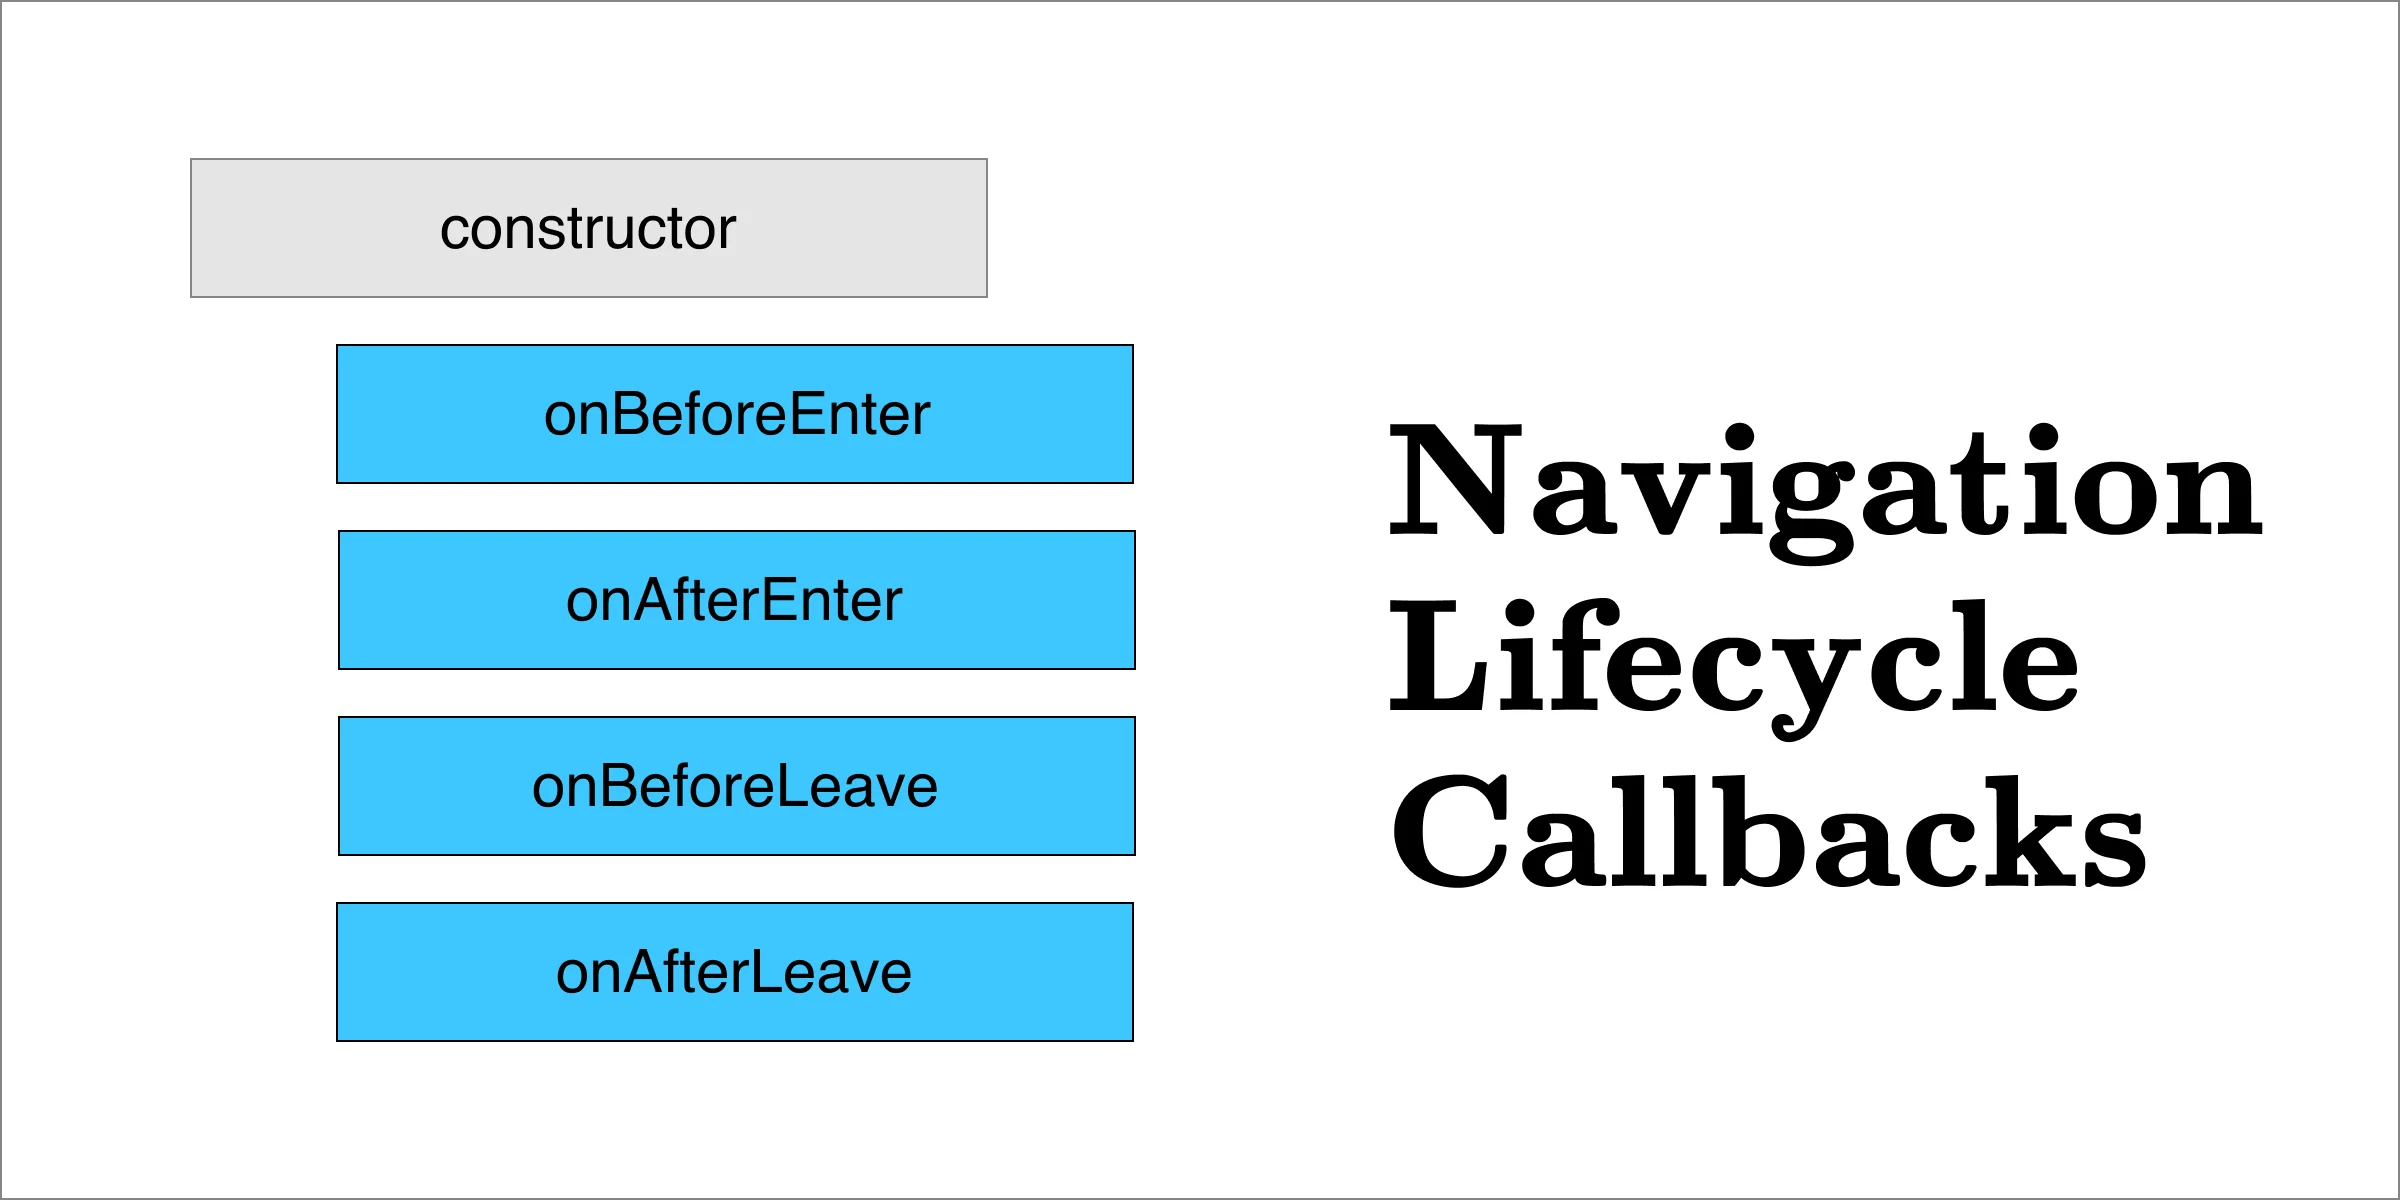
As you can see, an instance of the class will be created first (using the constructor). Let's walk around the Lifecycle functions we can use to have full control over navigation using Vaadin Router and LitElement for Web Components.

onBeforeEnter

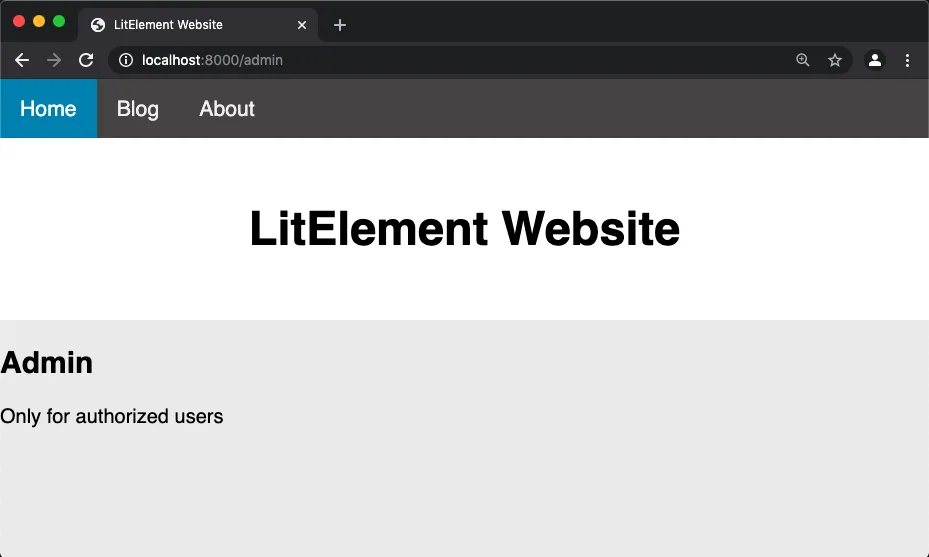
Let's suppose we have an Admin page, which is displayed only for authorized users. Our Web Component will look as follows:

import {
  PreventAndRedirectCommands,
  Router,
  RouterLocation,
} from '@vaadin/router';
import { LitElement, html, customElement } from 'lit-element';

@customElement('lit-admin')
export class Admin extends LitElement {
  render() {
    return html`
      <h2>Admin</h2>
      <p>Only for authorized users</p>
    `;
  }
}

However, this page will remain accessible to everyone unless you define a rule to avoid loading it for restricted users.

01-initial-screenshot

If you're working with Vaadin Router and Web Components, you don't need to implement or extend from any class. It's enough to define a function name that matches to any lifecycle functions.

So, it's time to implement a route guard in order to restrict the access to this page and do a redirect instead:

  public onBeforeEnter(
    location: RouterLocation,
    commands: PreventAndRedirectCommands,
    router: Router
  ): RedirectResult | undefined {
    if(!this.isAuthorized()) {
      return commands.redirect('/'); // Redirects to home page
    }
  }

  private isAuthorized() {
    // Logic to determine if the current user can see this page
    return false;
  }

In this case, the onBeforeEnter function returns a RedirectResult as a router command. That means the router will perform a redirection to /(the home page) before loading the current path.

If you need to perform any async action in this context, then you can return a Promise instead:

  public onBeforeEnter(
    location: RouterLocation,
    commands: PreventAndRedirectCommands,
    router: Router
  ): Promise<unknown> | undefined {
    if (!this.isAuthorized()) {
      return new Promise((resolve, reject) => {
        setTimeout(() => {
          resolve(commands.redirect('/'));
        }, 2000);
      });
    }
  }

In the previous example, the router will wait until the Promise is resolved before continuing to load the page.

Find below the complete TypeScript class implementation:

import {
  PreventAndRedirectCommands,
  RedirectResult,
  Router,
  RouterLocation,
} from '@vaadin/router';
import { LitElement, html, customElement } from 'lit-element';

@customElement('lit-admin')
export class Admin extends LitElement {
  render() {
    return html`
      <h2>Admin</h2>
      <p>Only for authorized users</p>
    `;
  }

  public onBeforeEnter(
    location: RouterLocation,
    commands: PreventAndRedirectCommands,
    router: Router
  ): Promise<unknown> | RedirectResult | undefined {
    console.log('onBeforeEnter');
    if (!this.isAuthorized()) {
      // sync operation
      // return commands.redirect('/');

      // async operation
      return new Promise((resolve, reject) => {
        setTimeout(() => {
          console.log('Not authorized, redirect to home page');
          resolve(commands.redirect('/'));
        }, 2000);
      });
    }

    console.log('You can see this page');
  }

  private isAuthorized() {
    // Logic to determine if the current user can see this page
    return false;
  }
}

onAfterEnter

This function can be used to process the URL params or even initialize the page. Any value you may return will be ignored.

@customElement('lit-admin')
export class Admin extends LitElement {

  @property({ type: String }) username!: string;

  render() {
    return html`
      <h2>Admin</h2>
      <p>Welcome ${this.username}</p>
      <p>Only for authorized users</p>
    `;
  }

  public onAfterEnter(
    location: RouterLocation,
    commands: PreventAndRedirectCommands,
    router: Router
  ): void {
    console.log('onAfterEnter');
    // Read params from URL
    const section = location.params.section; // path: 'admin/:section'
    const username = new URLSearchParams(location.search).get('username');
    console.log('section', section);
    console.log('username', username);

    // Assign the username value from the URL
    this.username = username || 'user';
    // No need to return a result.
  }
}

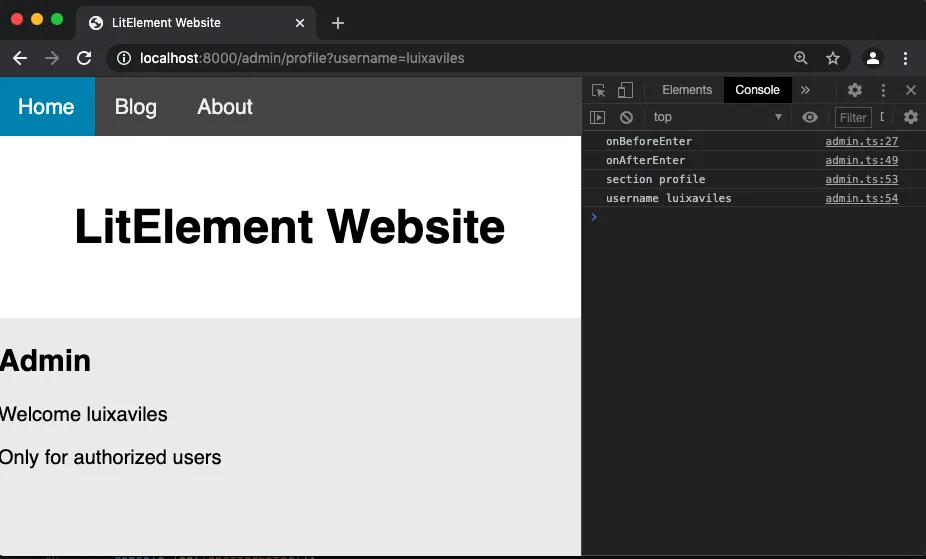
As you can see, this function will be in charge of all the needed initialization of the page.

As the first step, it will read the parameters from the URL: http://localhost:8000/admin/profile?username=luixaviles. Then the username value will be assigned to an existing property.

Here you have the output screen:

02-on-after-enter

onBeforeLeave

This function will be executed once the current path doesn't match anymore. That means the page or component is about to be removed from the DOM.

  public onBeforeLeave(
    location: RouterLocation,
    commands: PreventAndRedirectCommands,
    router: Router
  ): PreventResult | undefined {
    console.log('onBeforeLeave');

    const leave = window.confirm('Are you sure to leave this page?');
    if (!leave) {
      return commands.prevent();
    }
  }
03-on-before-leave

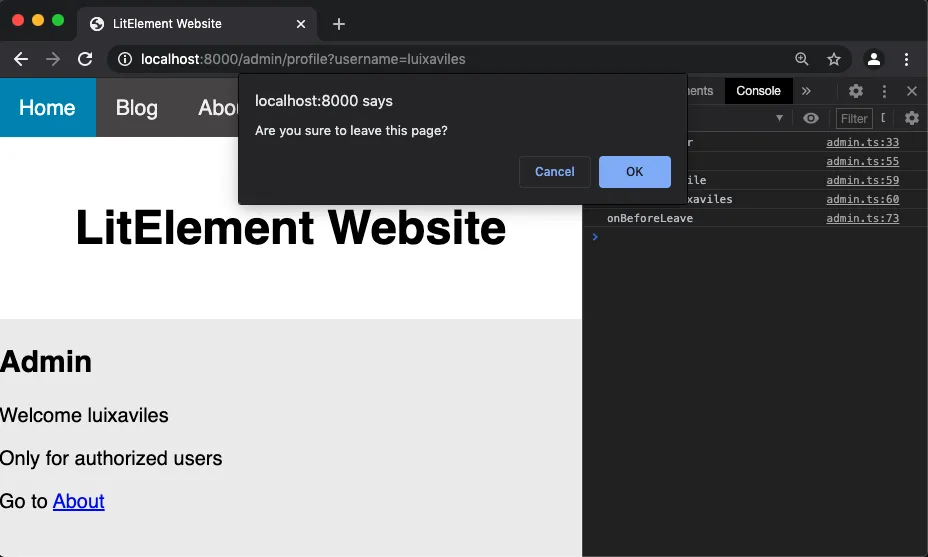
In this example, the application will show a confirm popup before leaving the current page. If the user decides to cancel the action, the function will return a PreventResult object due to return commands.prevent() call.

In case you need to perform an async operation, the function can return a Promise as follows:

  public onBeforeLeave(
    location: RouterLocation,
    commands: PreventAndRedirectCommands,
    router: Router
  ): PreventResult | Promise<unknown> | undefined {
    console.log('onBeforeLeave');

    const leave = window.confirm('Are you sure to leave this page?');
    if (!leave) {
      // sync operation
      // return commands.prevent();

      // async operation
      return new Promise((resolve, reject) => {
        setTimeout(() => {
          // console.log('Not authorized, redirect to home page');
          console.log('resolved');
          resolve(commands.prevent());
        }, 2000);
      });
    }
  }

onAfterLeave

This is pretty similar to the previous one and it will be executed once the current path doesn't match anymore AND the process to remove it from the DOM has been started. Any value returned by this function will be ignored.

  public onAfterLeave(
    location: RouterLocation,
    commands: PreventAndRedirectCommands,
    router: Router
  ): void {
    console.log('onAfterLeave');
    alert('Just wanted to say goodbye!');
  }
04-on-after-leave

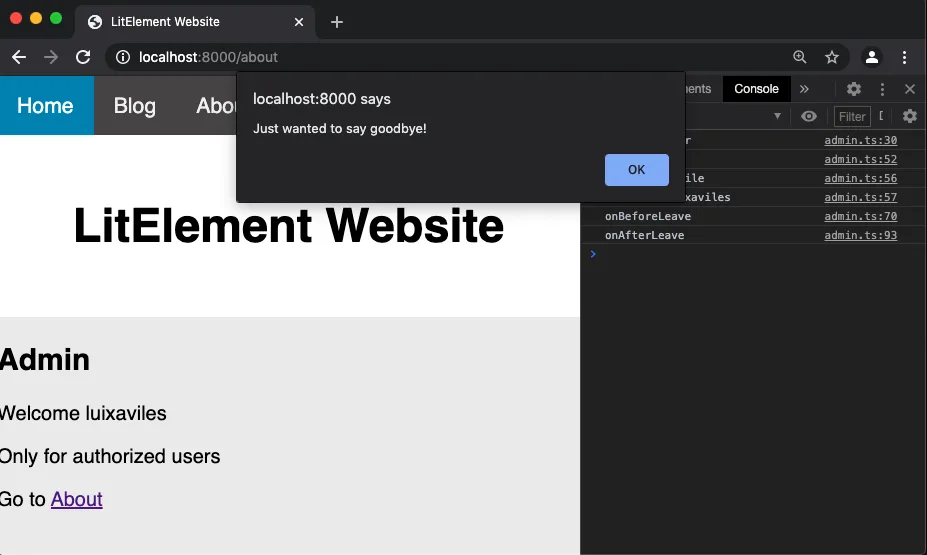
As you can see in this screenshot, the URL has been changed already and the function will run as a last action from the previous view.

The Final Component

Pay attention to all imports and types used here:

import {
  PreventAndRedirectCommands,
  PreventResult,
  RedirectResult,
  Router,
  RouterLocation,
} from '@vaadin/router';
import { LitElement, html, customElement, property } from 'lit-element';

import { router } from '../index';

@customElement('lit-admin')
export class Admin extends LitElement {
  @property({ type: String }) username!: string;

  render() {
    return html`
      <h2>Admin</h2>
      <p>Welcome ${this.username}</p>
      <p>Only for authorized users</p>
      <p>Go to <a href="${router.urlForPath('/about')}">About</a></p>
    `;
  }

  public onBeforeEnter(
    location: RouterLocation,
    commands: PreventAndRedirectCommands,
    router: Router
  ): Promise<unknown> | RedirectResult | undefined {
    if (!this.isAuthorized()) {
      // sync operation
      // return commands.redirect('/');

      // async operation
      return new Promise((resolve, reject) => {
        setTimeout(() => {
          resolve(commands.redirect('/'));
        }, 2000);
      });
    }
  }

  public onAfterEnter(
    location: RouterLocation,
    commands: PreventAndRedirectCommands,
    router: Router
  ): void {
    // Read params from URL
    const section = location.params.section; // path: 'admin/:section'
    const username = new URLSearchParams(location.search).get('username');
    console.log('section', section);
    console.log('username', username);

    // Assign the username value from the URL
    this.username = username || 'user';

    // No need to return a result.
  }

  public onBeforeLeave(
    location: RouterLocation,
    commands: PreventAndRedirectCommands,
    router: Router
  ): PreventResult | Promise<unknown> | undefined {
    const leave = window.confirm('Are you sure to leave this page?');
    if (!leave) {
      // sync operation
      // return commands.prevent();

      // async operation
      return new Promise((resolve, reject) => {
        setTimeout(() => {
          resolve(commands.prevent());
        }, 2000);
      });
    }
  }

  public onAfterLeave(
    location: RouterLocation,
    commands: PreventAndRedirectCommands,
    router: Router
  ): void {
    alert('Just wanted to say goodbye!');
  }

  private isAuthorized() {
    // Logic to determine if the current user can see this page
    return true;
  }
}

Source Code Project

If you work through the source code of this project, use this URL for testing the lifecycle callbacks: http://localhost:8000/admin/profile?username=luixaviles.

Find the complete project in this GitHub repository: https://github.com/luixaviles/litelement-website. Do not forget to give it a star ⭐️ and play around with the code.

You can follow me on Twitter and GitHub to see more about my work.

This Dot is a consultancy dedicated to guiding companies through their modernization and digital transformation journeys. Specializing in replatforming, modernizing, and launching new initiatives, we stand out by taking true ownership of your engineering projects.

We love helping teams with projects that have missed their deadlines or helping keep your strategic digital initiatives on course. Check out our case studies and our clients that trust us with their engineering.

You might also like

Testing a Fastify app with the NodeJS test runner cover image

Testing a Fastify app with the NodeJS test runner

Introduction Node.js has shipped a built-in test runner for a couple of major versions. Since its release I haven’t heard much about it so I decided to try it out on a simple Fastify API server application that I was working on. It turns out, it’s pretty good! It’s also really nice to start testing a node application without dealing with the hassle of installing some additional dependencies and managing more configurations. Since it’s got my stamp of approval, why not write a post about it? In this post, we will hit the highlights of the testing API and write some basic but real-life tests for an API server. This server will be built with Fastify, a plugin-centric API framework. They have some good documentation on testing that should make this pretty easy. We’ll also add a SQL driver for the plugin we will test. Setup Let's set up our simple API server by creating a new project, adding our dependencies, and creating some files. Ensure you’re running node v20 or greater (Test runner is a stable API as of the 20 major releases) Overview * index.js - node entry that initializes our Fastify app and listens for incoming http requests on port 3001 * app.js - this file exports a function that creates and returns our Fastify application instance * sql-plugin.js - a Fastify plugin that sets up and connects to a SQL driver and makes it available on our app instance Application Code A simple first test For our first test we will just test our servers index route. If you recall from the app.js code above, our index route returns a 501 response for “not implemented”. In this test, we're using the createApp function to create a new instance of our Fastify app, and then using the inject method from the Fastify API to make a request to the / route. We import our test utilities directly from the node. Notice we can pass async functions to our test to use async/await. Node’s assert API has been around for a long time, this is what we are using to make our test assertions. To run this test, we can use the following command: By default the Node.js test runner uses the TAP reporter. You can configure it using other reporters or even create your own custom reporters for it to use. Testing our SQL plugin Next, let's take a look at how to test our Fastify Postgres plugin. This one is a bit more involved and gives us an opportunity to use more of the test runner features. In this example, we are using a feature called Subtests. This simply means when nested tests inside of a top-level test. In our top-level test call, we get a test parameter t that we call methods on in our nested test structure. In this example, we use t.beforeEach to create a new Fastify app instance for each test, and call the test method to register our nested tests. Along with beforeEach the other methods you might expect are also available: afterEach, before, after. Since we don’t want to connect to our Postgres database in our tests, we are using the available Mocking API to mock out the client. This was the API that I was most excited to see included in the Node Test Runner. After the basics, you almost always need to mock some functions, methods, or libraries in your tests. After trying this feature, it works easily and as expected, I was confident that I could get pretty far testing with the new Node.js core API’s. Since my plugin only uses the end method of the Postgres driver, it’s the only method I provide a mock function for. Our second test confirms that it gets called when our Fastify server is shutting down. Additional features A lot of other features that are common in other popular testing frameworks are also available. Test styles and methods Along with our basic test based tests we used for our Fastify plugins - test also includes skip, todo, and only methods. They are for what you would expect based on the names, skipping or only running certain tests, and work-in-progress tests. If you prefer, you also have the option of using the describe → it test syntax. They both come with the same methods as test and I think it really comes down to a matter of personal preference. Test coverage This might be the deal breaker for some since this feature is still experimental. As popular as test coverage reporting is, I expect this API to be finalized and become stable in an upcoming version. Since this isn’t something that’s being shipped for the end user though, I say go for it. What’s the worst that could happen really? Other CLI flags —watch - https://nodejs.org/dist/latest-v20.x/docs/api/cli.html#--watch —test-name-pattern - https://nodejs.org/dist/latest-v20.x/docs/api/cli.html#--test-name-pattern TypeScript support You can use a loader like you would for a regular node application to execute TypeScript files. Some popular examples are tsx and ts-node. In practice, I found that this currently doesn’t work well since the test runner only looks for JS file types. After digging in I found that they added support to locate your test files via a glob string but it won’t be available until the next major version release. Conclusion The built-in test runner is a lot more comprehensive than I expected it to be. I was able to easily write some real-world tests for my application. If you don’t mind some of the features like coverage reporting being experimental, you can get pretty far without installing any additional dependencies. The biggest deal breaker on many projects at this point, in my opinion, is the lack of straightforward TypeScript support. This is the test command that I ended up with in my application: I’ll be honest, I stole this from a GitHub issue thread and I don’t know exactly how it works (but it does). If TypeScript is a requirement, maybe stick with Jest or Vitest for now 🙂...

TypeScript Integration with .env Variables cover image

TypeScript Integration with .env Variables

Introduction In TypeScript projects, effectively managing environment variables can significantly enhance the development experience. However, a common hurdle is that TypeScript, by default, doesn't recognize variables defined in .env files. This oversight can lead to type safety issues and, potentially, hard-to-trace bugs. In this blog post, we'll walk you through the process of setting up an environment.d.ts file. This simple yet powerful addition enables TypeScript to seamlessly integrate with and accurately interpret your environment variables. Let's dive into the details! Creating and Configuring environment.d.ts Install @types/node Before creating your environment.d.ts file, make sure you have the @types/node package installed as it provides TypeScript definitions for Node.js, including the process.env object. Install it as a development dependency: ` Setting Up environment.d.ts To ensure TypeScript correctly recognizes and types your .env variables, start by setting up an environment.d.ts file in your project. This TypeScript declaration file will explicitly define the types of your environment variables. 1. Create the File: In the root of your TypeScript project, create a file named environment.d.ts 2. Declare Environment Variables: In environment.d.ts, declare your environment variables as part of the NodeJS.ProcessEnv interface. For example, for API_KEY and DATABASE_URL, the file would look like this: ` 3. Typescript config: In you tsconfig.json file, ensure that Typescript will recognize our the new file: ` 4. Usage in Your Project: With these declarations, TypeScript will provide type-checking and intellisense for process.env.API_KEY and process.env.DATABASE_URL, enhancing the development experience and code safety. Checking on Your IDE By following the steps above, you can now verify on your IDE how your environment variables recognizes and auto completes the variables added: Conclusion Integrating .env environment variables into TypeScript projects enhances not only the security and flexibility of your application but also the overall developer experience. By setting up an environment.d.ts file and ensuring the presence of @types/node, you bridge the gap between TypeScript’s static type system and the dynamic nature of environment variables. This approach leads to clearer, more maintainable code, where the risks of runtime errors are significantly reduced. It's a testament to TypeScript's versatility and its capability to adapt to various development needs. As you continue to build and scale your TypeScript applications, remember that small enhancements like these can have a profound impact on your project's robustness and the efficiency of your development processes. Embrace these nuanced techniques, and watch as they bring a new level of precision and reliability to your TypeScript projects....

How to Manage Breakpoints using BreakpointObserver in Angular cover image

How to Manage Breakpoints using BreakpointObserver in Angular

Defining Breakpoints is important when you start working with Responsive Design and most of the time they're created using CSS code. For example: ` By default, the text size value will be 12px, and this value will be changed to 14px when the viewport gets changed to a smaller screen (a maximum width of 600px). That solution works. However, what about if you need to _listen_ for certain breakpoints to perform changes in your application? This may be needed to configure third-party components, processing events, or any other. Luckily, Angular comes with a handy solution for these scenarios: the BreakpointObserver. Which is a utility for checking the matching state of @media queries. In this post, we will build a sample application to add the ability to configure certain breakpoints, and being able to _listen_ to them. Project Setup Prerequisites You'll need to have installed the following tools in your local environment: - Node.js. Preferably the latest LTS version. - A package manager. You can use either NPM or Yarn. This tutorial will use NPM. Creating the Angular Project Let's start creating a project from scratch using the Angular CLI tool. ` This command will initialize a base project using some configuration options: - --routing. It will create a routing module. - --prefix corp. It defines a prefix to be applied to the selectors for created components(corp in this case). The default value is app. - --style scss. The file extension for the styling files. - --skip-tests. it avoids the generations of the .spec.ts files, which are used for testing Adding Angular Material and Angular CDK Before creating the breakpoints, let's add the Angular Material components, which will install the Angular CDK library under the hood. ` Creating the Home Component We can create a brand new component to handle a couple of views to be updated while the breakpoints are changing. We can do that using the ng generate command. ` Pay attention to the output of the previous command since it will show you the auto-generated files. Update the Routing Configuration Remember we used the flag --routing while creating the project? That parameter has created the main routing configuration file for the application: app-routing.module.ts. Let's update it to be able to render the home component by default. ` Update the App Component template Remove all code except the router-outlet placeholder: ` This will allow rendering the home component by default once the routing configuration is running. Using the BreakpointObserver The application has the Angular CDK installed already, which has a layout package with some utilities to build responsive UIs that _react_ to screen-size changes. Let's update the HomeComponent, and inject the BreakpointObserver as follows. ` Once the BreakpointObserver is injected, we'll be able to evaluate media queries to determine the current screen size, and perform changes accordingly. Then, a breakpoint$ variable references an _observable_ object after a call to the observe method. The observe method gets an observable of results for the given queries, and can be used along with predetermined values defined on Breakpoints as a constant. Also, it's possible to use custom breakpoints such as (min-width: 500px). Please refer to the documentation to find more details about this. Next, you may need to _subscribe_ to the breakpoint$ observable to see the emitted values after matching the given queries. Again, let's update the home.component.ts file to do that. ` In the above code, the ngOnInit method is used to perform a _subscription_ to the breakpoint$ observable and the method breakpointChanged will be invoked every time a breakpoint match occurs. As you may note, the breakpointChanged method verifies what Breakpoint value has a match through isMatched method. In that way, the current component can perform changes after a match happened (in this case, it just updates the value for the currentBreakpoint attribute). Using Breakpoint values on the Template Now, we can set a custom template in the home.component.html file and be able to render a square according to the currentBreakpoint value. ` The previous template will render the current media query value at the top along with a rectangle according to the size: Large, Medium, Small or Custom. Live Demo and Source Code Want to play around with this code? Just open the Stackblitz editor or the preview mode in fullscreen. Find the complete angular project in this GitHub repository: breakpointobserver-example-angular. Do not forget to give it a star ⭐️ and play around with the code. Feel free to reach out on Twitter if you have any questions. Follow me on GitHub to see more about my work....

Making AI Deliver: From Pilots to Measurable Business Impact cover image

Making AI Deliver: From Pilots to Measurable Business Impact

A lot of organizations have experimented with AI, but far fewer are seeing real business results. At the Leadership Exchange, this panel focused on what it actually takes to move beyond experimentation and turn AI into measurable ROI. Over the past few years, many organizations have experimented with AI, but the challenge today is translating experimentation into measurable business value. Moderated by Tracy Lee, CEO at This Dot Labs, panelists featured Dorren Schmitt, Vice President IT Strategy & Innovation at Allen Media Group, Greg Geodakyan, CTO at Client Command, and Elliott Fouts, CAIO & CTO at This Dot Labs. Panelists discussed how companies are moving from early AI experiments to initiatives that deliver real results. They began by examining how experimentation has evolved over the past year. While many organizations did not fully utilize AI experimentation budgets in 2025, 2026 is showing a shift toward more intentional investment. Structured budgets and clearly defined frameworks are enabling companies to explore AI strategically and identify initiatives with high potential impact. The conversation then turned to alignment and ROI. Panelists highlighted the importance of connecting AI projects to corporate strategy and leadership priorities. Ensuring that AI initiatives translate into operational efficiency, productivity gains, and measurable business impact is essential. Companies that successfully align AI efforts with organizational goals are better equipped to demonstrate tangible outcomes from their investments. Moving from pilots and proofs of concept to production was another major focus. Governance, prioritization, and workflow integration were cited as essential for scaling AI initiatives. One panelist shared that out of nine proofs of concept, eight successfully launched, resulting in improvements in quality and operational efficiency. Panelists also explored the future of AI within organizations, including the potential for agentic workflows and reduced human-in-the-loop processes. New capabilities are emerging that extend beyond coding tasks, reshaping how teams collaborate and how work is structured across departments. Key Takeaways - Structured experimentation and defined budgets allow organizations to explore AI strategically and safely. - Alignment with business priorities is essential for translating AI capabilities into measurable outcomes. - Governance and workflow integration are critical to moving AI initiatives from pilot stages to production deployment. Successfully leveraging AI requires a balance between experimentation, strategic alignment, and operational discipline. Organizations that approach AI as a structured, measurable initiative can capture meaningful results and unlock new opportunities for innovation. Curious how your organization can move from AI experimentation to real impact? Let’s talk. Reach out to continue the conversation or join us at an upcoming Leadership Exchange. Tracy can be reached at tlee@thisdot.co....

Let's innovate together!

We're ready to be your trusted technical partners in your digital innovation journey.

Whether it's modernization or custom software solutions, our team of experts can guide you through best practices and how to build scalable, performant software that lasts.

Prefer email? hi@thisdot.co