Are you new to Hasura GraphQL Engine? Do you want to learn more about it?
Join me in the first installment of a three-part series on Hasura GraphQL Engine. We’ll start by learning the basic Hasura concepts. Then, we’ll move on to explore how Hasura extends the standard GraphQL, allowing you to query and mutate the backend database.
Finally, we’ll demonstrate a Vue.js application that authenticates/authorizes with Auth0, which communicates in an instance of Hasura Engine deploying on Heroku to manage food recipes. Yummy!
Hasura GraphQL Engine is a high-performance GraphQL Server that gives you instant realtime GraphQL APIs over a Postgres database. It’s a packaged solution that wraps a Postgres database and exposes each and every table/view as an endpoint on a GraphQL Server API.
You can think of Hasura as both a PaaS and a BaaS. Platform as a Service (PaaS), because Hasura is offered that way and can be hosted in the cloud or on premises. For example, Heroku allows you to deploy it in the cloud with a few simple steps! In fact, this is the recommended method by which the Hasura team deploys it on Heroku.
On the other hand, Hasura can be a Backend as a Service (BaaS) to help developers in building scalable and reliable backends for their solutions. For instance, when you deploy Hasura to a new app on Heroku, Hasura makes sure you get your own dedicated backend including a Postgres database, a GraphQL Server API, and GraphiQL in browser IDE. This backend is completely separate from and independent of any other backend created for other applications.
Features
To help better understand Hasura, let’s start by exploring the major features that Hasura offers:
Postgres backend database
With Hasura, you can build backend apps quickly on top of the Postgres database. Hasura can be considered a Postgres Management Studio. You can create tables and views, add relationships among them, manage their permissions, and feed them with data.
GraphQL Tight Integration
In addition to managing Postgres databases, it exposes each and every table or view in the database as a field on the Root Query of a GraphQL Server API. Consequently, you can query or mutate any of the tables via GraphQL. In turn, you will be spending your time managing your Postgres database, while Hasura will do the rest of the hard work needed to prepare and expose a GraphQL Server on top of the database.
Working with Postgres Databases
You can either connect Hasura to a new Postgres database or even to an existing one. By using Hasura on an existing database, you are given the chance to move forward and migrate your application backend from using a traditional standard Postgres database to a GraphQL Server backend.
Import Existing Postgres Database
In case you decide to deploy Hasura on a new Postgres database, you can still import your database schemas from an existing or previous Postgres database into Hasura with a single click. Again, Hasura is giving you the opportunity to migrate your existing application backend to GraphQL.
GraphQL Live Queries
Hasura can convert any GraphQL query to a live query via the GraphQL Subscriptions. You may read more about Hasura Subscriptions.
Dynamic Access Control System
Hasura offers a dynamic access control system to protect your Postgres database and integrates with third-party authorization services like Auth0 and Firebase. With the use of roles and session variables, Hasura gives you the upper hand in adding dynamic permissions on the tables and the operations the user can make. It is based on some dynamic variables whose values are compared to the values coming from the authorization service. Part Three of this series shows how you can connect your Vue.js application with Auth0 and Hasura GraphQL Engine.
Extending GraphQL with new operators and expressions
Hasura extends the standard GraphQL query language with additional powerful operators, thus giving a rich developer experience in terms of flexibility and productivity. Part Two of this series goes over most of the GraphQL language additions and demonstrates by sample code how to make use of them in your queries and mutations.
Hasura Admin Console UI
Finally, Hasura offers an out of the box rich Admin Console UI that exposes the following:
-
API Explorer: This is an instance of the Graphiql in browser IDE that you use to connect to Hasura and issue queries and mutations against the backend GraphQL Server API.
-
Data: This is the Postgres Management Studio that manages your Postgres database.
-
Event Triggers: Hasura gives you the opportunity to define webhooks whenever a change occurs on the database. For example, you can define an event to trigger a webhook when a new row is added to a table in the database.
Demonstration
In this demonstration, we will deploy Hasura GraphQL Engine on Heroku and set up the database we will use throughout this series.
Create an account on Heroku
Start by signing up for a new account (if you don’t have one already) at Heroku. Once you sign up, you will be able to use Heroku free cloud services and deploy apps to your free dynos hours.
Deploy Hasura on Heroku
Now that you are logged in, it is time to deploy the Hasura GraphQL Engine. Hasura is set up on Heroku as a Heroku Button. Follow the link, locate the button Deploy to Heroku, and click it to initiate the process.
Heroku transfers you to the Create New App form shown in the figure below.
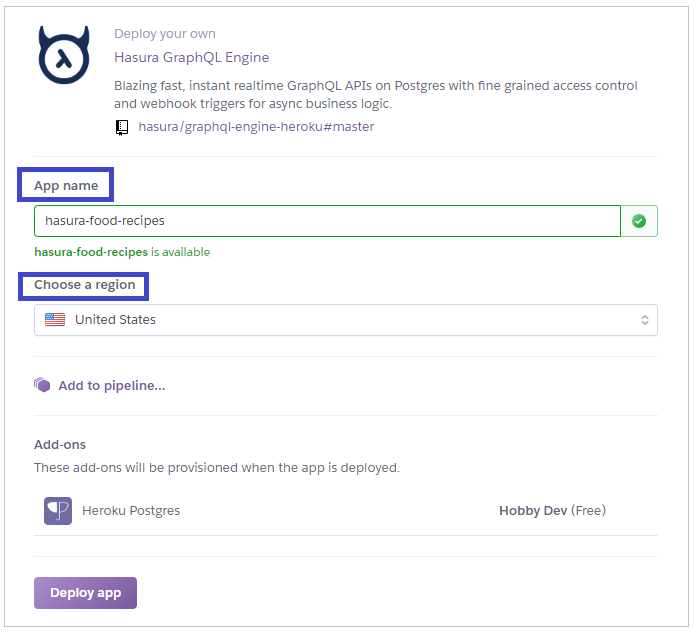
Choose a name for your new application and select the region where you want Heroku to deploy your application. There are only two available: the United States and Europe.
In this demonstration, I’ve chosen hasura-food-recipes for the name of the application. United States for the region.
Once done, click on the Deploy app button.
Heroku starts the process of deploying the app and then offers you two links to either Manage the App or View it.
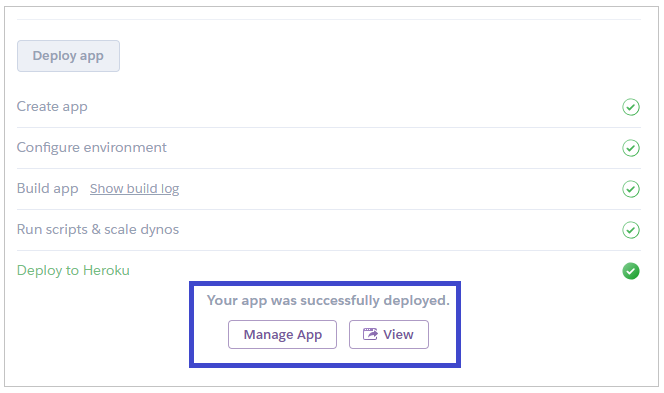
To start managing your app, click on the Manage App button.
Securing the GraphQL endpoint on Heroku
Now that you have landed on the app’s Dashboard on Heroku, let’s secure the Hasura GraphQL endpoint, by providing a secret key that you’ll need later whenever you access the Hasura Admin Console UI.
Click on the Settings button on the Dashboard’s page.
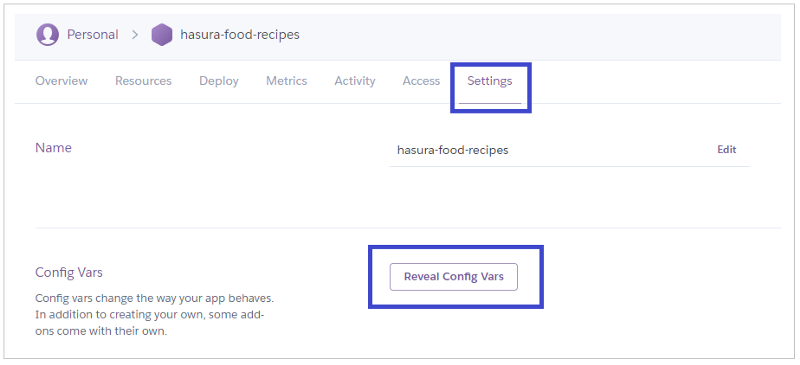
Under the Config Vars section, click on the Reveal Config Vars button. The Config Vars section allows you to define the application level variables that can be used elsewhere in the application.
Now that the Config Vars section is revealed, enter the following information:
-
Enter the value of HASURA_GRAPHQL_ACCESS_KEY into the Key input field.
-
Enter a secret key of your choice into the Value input field. Make sure you keep it somewhere safe, as you are going to use it later.
-
Click on the Add button to save your data.
When you access the Hasura Admin Console UI, you are prompted to enter your secret key to give or deny permissions for access.
Click on Open App button at the top of the page. Heroku transfers you to the Hasura Admin Console UI.
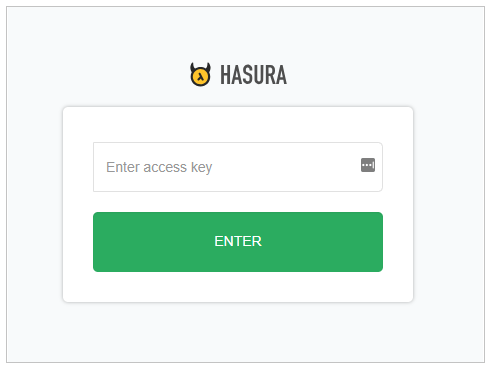
Enter your secret key in order to access the Admin Console UI.
Introducing the Hasura Admin Console UI
The Admin Console UI is the main interface of Hasura GraphQL Engine. Let’s explore it in detail.
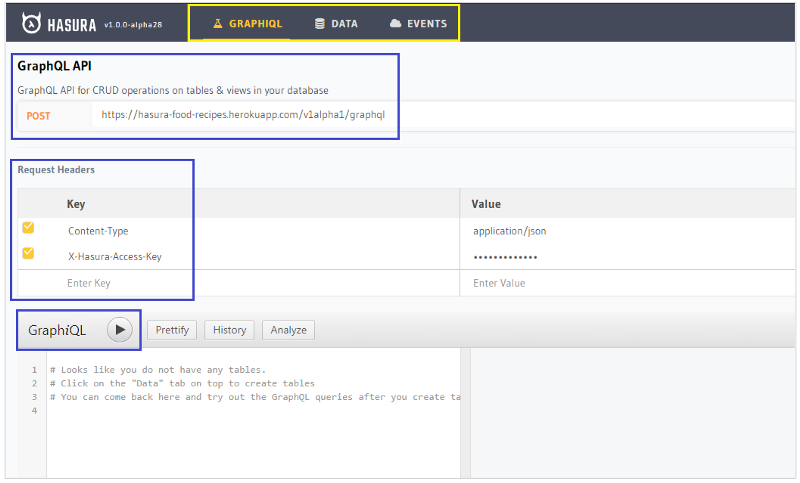
The Admin Console UI homepage can be split into major 4 sections:
-
The main navigation menu that you can use to navigate to the GraphiQL, Database, and Event Trigger sections.
-
GraphQL API representing the GraphQL URL, to be used when connecting to Hasura from a client side app. More on this in Part Three of the series.
-
Request Headers section that you use to specify request headers needed to communicate with Hasura. For instance, the Admin Console UI sends the X-Hasura-Access-Key request header to be able to access Hasura backend.
-
GraphiQL in-browser IDE that gives you the chance to test your Postgres backend via GraphQL queries and mutations.
Creating the Postgres database tables
Let’s create the tables we will need throughout this series on Hasura. Click on the Data toolbar menu item.
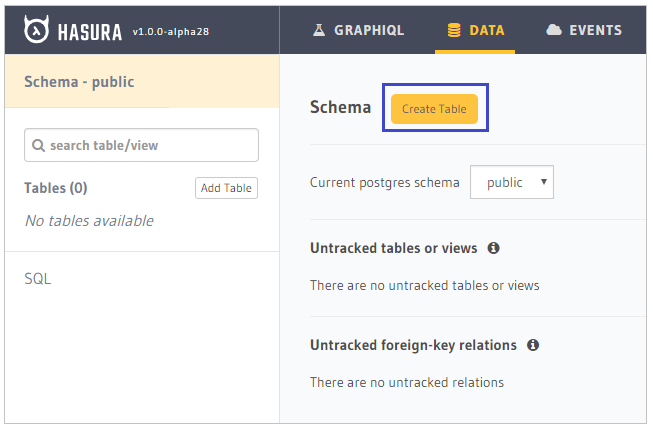
The left side of the screen lists all existing tables or database views. On the right side, click on Create Table to create your first table.
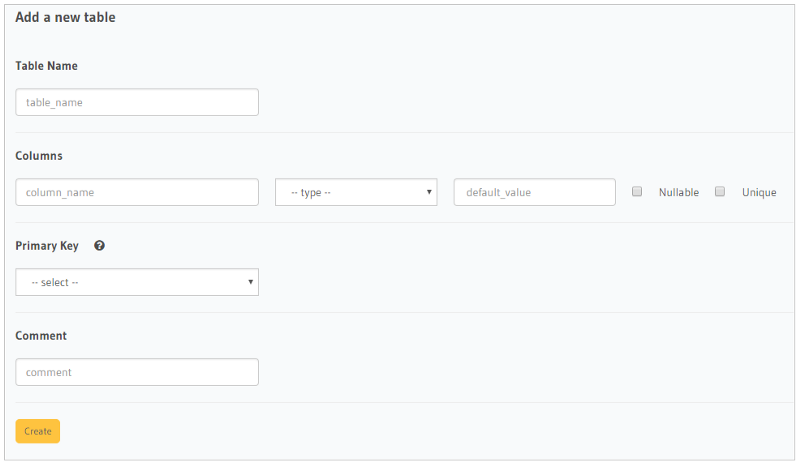
You create a table by giving it a Table Name. Then you start adding the Columns that belong to that table. For each column, you specify the Type of the data to be stored in that column, a Default Value, if any, whether the column allows Null values or not, and finally, whether the column value is Unique in the table. You may add as many columns as you want.
Then you specify which column is the Primary Key.
Finally, you hit the Create button to actually create the table in the database.
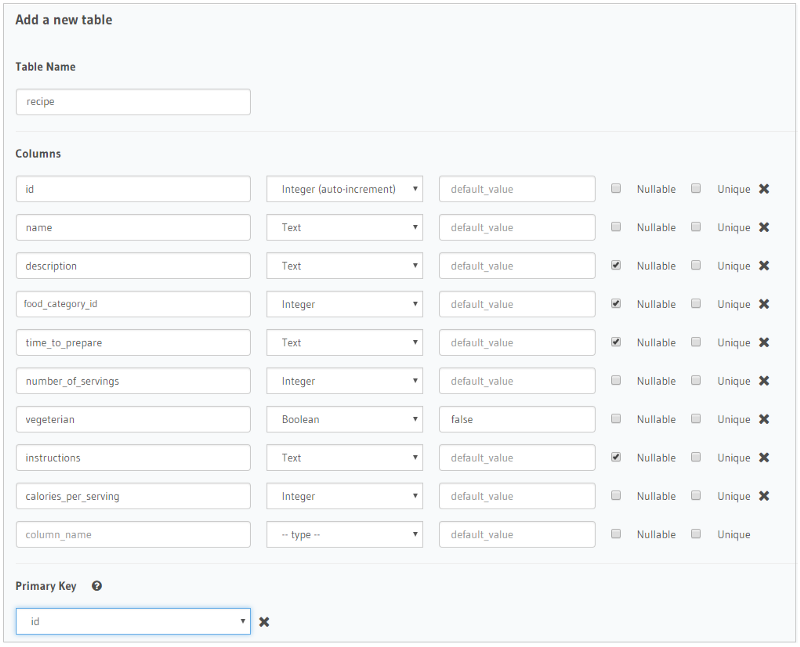
Let’s create our first table for this series, the Recipe table as follows:
Once the Recipe table is created, Hasura offers you several options to manage the table:
-
Browse Rows
-
Insert Row
-
Modify
-
Relationships
-
Permissions
Let’s modify the Recipe table and add the Recipe Source column.
Click on Modify Tab.
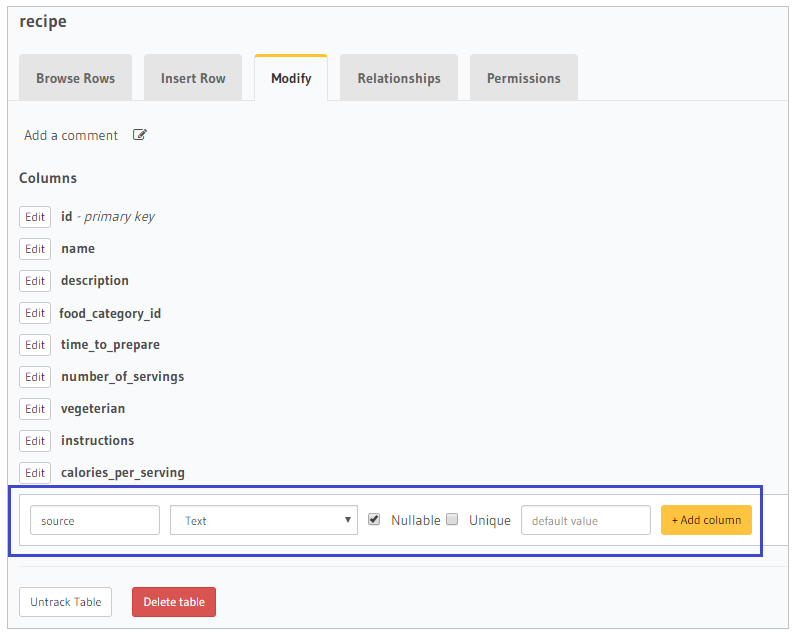
You can either Edit an existing column or Add a new column. For this scenario, let’s add the source column as shown in the figure above. Then, click Add column button. Now the Recipe table has a new column labeled source.
Let’s insert a new recipe using the Insert Row section. Click on the Insert Row tab.
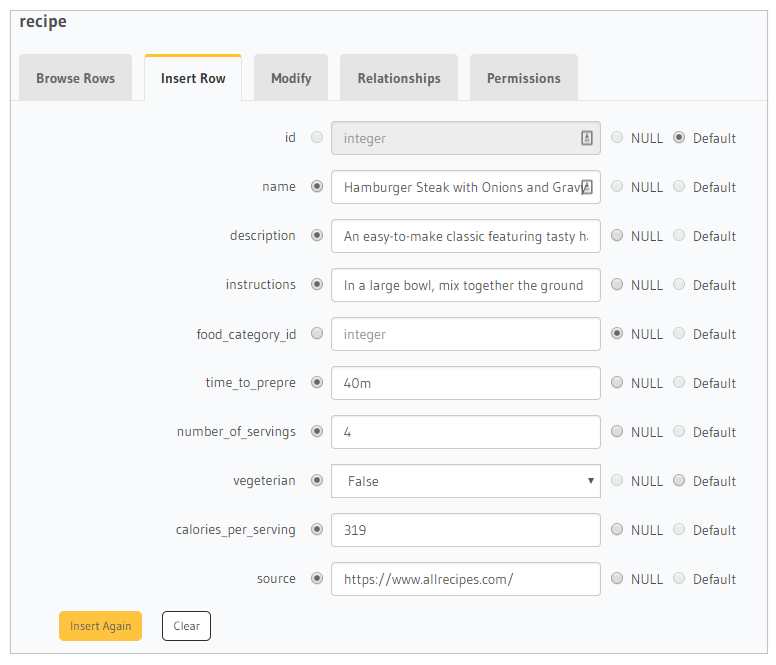
You can now click on Browse Rows to view the newly inserted row.
I will create the rest of the tables needed for this series. The tables are:
-
food_category
-
ingredient
-
recipe_ingredient
All tables created via Hasura are actual Postgres database tables.
The GraphQL schema object types and corresponding query/mutation fields with resolvers are automatically created by Hasura GraphQL Engine as we create tables and views in the Postgres database.
For instance, Hasura auto-generated the recipe field in the Schema / Root Query type as follows:
recipe(
	limit: Int
	offset: Int
	order_by: [recipe_order_by!]
	where: recipe_bool_exp
): [recipe!]!
The recipe field is defined on the Root Query object where applications can issue requests to retrieve a single Recipe by executing the recipe query and passing it a filter expression in the form of where: recipe_bool_exp, apply pagination via the limit and offset expressions, and order the results by any Recipe type object field using the order_by: [recipe_order_by!] expression.
In addition, mutations are also generated for the Recipe table:
delete_recipe(where: recipe_bool_exp!): recipe_mutation_response

insert_recipe(objects: [recipe_insert_input!]!on_conflict: recipe_on_conflict): recipe_mutation_response

update_recipe(
	_inc: recipe_inc_input
	_set: recipe_set_input
	where: recipe_bool_exp!
): recipe_mutation_response
The recipe_mutation_response is an object type defined by Hasura having two properties:
affected_rows: Int!
The number of affected rows by the mutation
returning: [recipe!]!
The data of the affected rows by the mutation
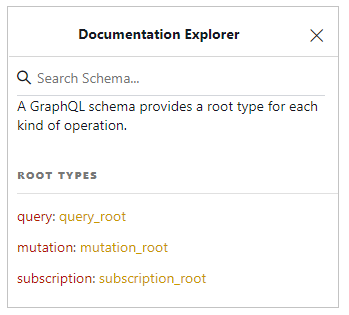
You can check the generated Schema object type together with all the queries and mutations fields on the Schema by navigating to the GraphiQL section on the Hasura Admin Console UI and explore the documentation tab on the right side of the page.
Add relationships between database tables
Relationships between database tables are processed by Hasura GraphQL Engine as GraphQL Nested Objects. There are three types of table relationships in Postgres database or any other relational database:
One-to-One Relationship
With such a relationship, Hasura would add a single nested object on each side of the tables.
One-to-Many Relationship
The Recipe table has a one-to-many relationship with the Food Category table. Using the Relationships Tab under the Data section, you can either define this relationship manually by clicking the Add a relationship manually button, or by modifying the Recipe table itself and mark the food_category_id column as a Foreign Key field in relation to the food_category table. Let’s follow the latter and modify the table accordingly. Navigate to the Modify Tab and click the Edit button near the food_category_id column.
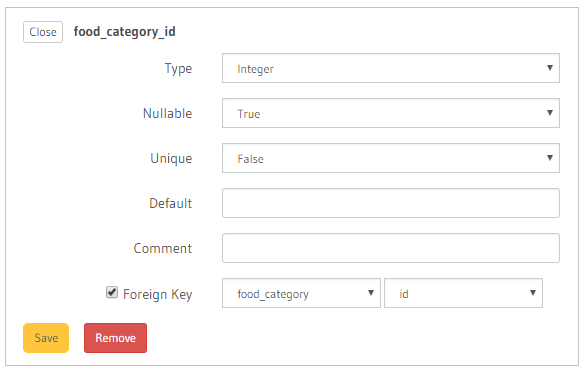
You select the Foreign Key checkbox, then select the table in the other end of this relationship, and finally the column to base the relationship on. In this case, food_category table and id column respectively. Finally, click on Save button to save the modification.
Let’s visit the Relationships Tab again. Hasura infers a relationship with the food_category table and suggests you add it:

Click on the Add button. Now you are prompted to give a name for this relation. In our case, we will call it food_category.
Many-to-Many Relationship
A recipe can have one or more ingredients. At the same time, an ingredient can be added to multiple recipes. Hence, a many-to-many relationship is detected. Usually, in a relational database, a many-to-many relationship is depicted by creating a third database table with a primary key, bringing over the primary key of the recipe table and the primary key of the ingredient table. Hence, you may add as many recipe-ingredient combinations as you want.
In this series, I’ve already configured the Recipe and Ingredient tables to have a many-to-many relationship by adding a third, named Recipe Ingredient table.
Now that all database tables and relationships are added, let’s have a look at the recipe object type generated by Hasura for us:
calories_per_serving: Int
description: String

food_category_id: Int
food_category: food_category
An object relationship

id: Int!
instructions: String
name: String!
number_of_servings: Int

recipe_ingredients(
	limit: Int
	offset: Int
	order_by: [recipe_ingredient_order_by!]
	where: recipe_ingredient_bool_exp
): [recipe_ingredient!]!
An array relationship

source: String
time_to_prepre: String
vegetarian: Boolean!
Using the API Explorer to query and mutate the Postgres database
Let’s switch to the GraphiQL section on the Hasura Admin Console UI and start issuing some mutations and queries.
We will start by adding a few ingredients and food categories before adding a recipe.
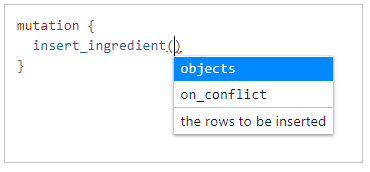
The Hasura API Explorer has an integrated live intellisense mechanism that suggests options while typing a GraphQL query or mutation.
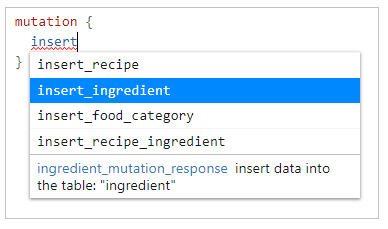
Once you select the mutation field, you are offered two suggestions for the input parameters of this mutation: ither the variable objects to list the data records to be inserted (one or bulk of records) or on_conflict to define how this mutation behaves in upsert mutations.
So our first mutation looks like this:
mutation {
	insert_ingredient(objects: [{
		name: "Bread Crumbs"
	}]) {
		affected_rows,
		returning {
			name
		}
	}
}
The mutation is inserting a new Ingredient by specifying the name of the ingredient. Also, it requests to return the number of affected_rows and the name of the newly inserted record.
You can use the API Explorer to execute the above mutation and receive the following response from the Hasura GraphQL Engine:
{
	"data": {
		"insert_ingredient": {
			"affected_rows": 1,
			"returning": [
				{
					"name": "Bread Crumbs"
				}
			]
		}
	}
}
I’ve taken the initiative and added a few ingredients. Now let’s query for all ingredients in the Postgres database and return their names only.
query return_ingredients {
	ingredient {
		name
	}
}
The response received is:
{
	"data": {
		"ingredient": [
			{
				"name": "Ground Beef"
			},
			{
				"name": "Eggs"
			},
			{
				"name": "Bread Crumbs"
			}
		]
	}
}
We are going to practice more queries and mutations in Part Two of this series.
Conclusion
In this introduction to Hasura GraphQL Engine, we’ve discovered the major features Hasura offers. We’ve also dealt with Postgres database tables, created some, added relationships among the tables, and finally made use of the Hasura API Explorer to query and mutate the database.
In Part Two of this series, we are going to explore more features of Hasura, including all extensions to GraphQL queries and mutations, in addition to playing around with the authentication and access control system defined and used by Hasura.
Happy Hasuring!