Despite being designed in the late 1970’s, the lightweight Mirage jet fighter is the topic of today’s article!
You might assume that I’m kidding, but I’m not!
We are going to look at Mirage from a different angle in this article. The Vue.js angle!
In the early stages of full-stack app development, everything is subject to change. The database structure is not complete, Web APIs are still under construction, and the front-end development is on-going. Building the layout, and writing all HTML/CSS can be a much faster process when you have a specific design in mind.
At some point, it's not unusual for the front-end developers to be stalled or blocked by the incomplete back-end APIs. They need to populate some dynamic sections based on data eventually coming through from the backend.
Solutions for this problem, which I’ve employed in the past, include using mock files or in-memory databases to see how things will pan out. The down side? It does come with its hiccups.
That’s why Mirage.js exists! Mirage.js is a client-side server that embeds itself into the app. It handles all of the API endpoints calls without the need for a real backend server.
This article will introduce to you Mirage.js as we'll build a Note Writer app in Vue.js.
The source code of this article can be cloned from this GitHub repo: Notes Writer.
How can Mirage.js help?
Developing an app with the backend API development lagging can bring things to a halt for the front-end team. That’s why we tend to use workarounds like reading from mock files, or even building fake in-memory services to simulate API responses. This enables us to build the front-end, display and render any dynamic data, and get a full picture of what the app looks like once it’s done.
For instance, each mock file mimics a separate database entity. You then add client-side Web services to read the mock files, and make their content available to the app. When the backend APIs are ready, you simply visit these services, and amend the code to interact with the real API endpoints instead. That’s easy, but time is wasted replacing the mock Web services with the real ones.
This approach creates extra work for the developer, and extensive time later coding the services to communicate with the real API endpoints.
Mirage.js offers a simple solution for this: an approach that requires no code changes at all when it’s time to use the real API endpoints.
With Mirage.js, you create an instance of a Server object. This object is the window through which Mirage.js interacts with your application and handles all API endpoints.
Routes and Route Handlers
Inside this Server object instance, you define a set of routes and route handlers. A route and a route handler look like this:
this.get("/notes", () => {
	return [
		{ id: "1", body: "The first note body goes here", title: "First Note" },
		{ id: "2", body: "The second note body goes here", title: "Second Note" },
		{ id: "3", body: "The third note body goes here", title: "Third Note" }
	];
})
For a moment, you feel you are writing some Node.js backend code!
This snippet defines a GET route having an endpoint of /notes. The second parameter of the get() route function defines the route handler, that is, the code that runs when the route /notes is called. The route handler returns notes data.
You can define more routes and route handlers as your app needs. For instance, you can define all CRUD routes including POSTING a new note, PATCHING an existing note, and DELETING an existing note.
Mirage.js supports all HTTP Verbs. In addition, to simulate a real API response delay, Mirage.js allows you to pass, as a third argument to the route function, a timing object that specifies the amount of delay in milliseconds to incur before returning a response to the client-side app. You can define this timing object as:
this.get("/notes", () => {
	return [
		{ id: "1", body: "The first note body goes here", title: "First Note" },
		{ id: "2", body: "The second note body goes here", title: "Second Note" },
		{ id: "3", body: "The third note body goes here", title: "Third Note" }
	];
}, { timing: 5000 })
Mirage.js Database and ORM
So far, we introduced the static route handlers. The route handler statically defines the set of data to return every time the route is requested.
What if you want the ability to add new notes? Delete existing? Edit existing? Then you can use the dynamic route handlers supported by Mirage.js.
In order to support dynamic data, Mirage.js offers an in-memory database that is accessed by the server.db object instance.
Along with the database support, Mirage.js comes with an ORM. You will spend most of your time working with the ORM instead of accessing the database directly. With the ORM, you can create, update, delete, and query for data inside the database.
For the ORM/Database integration to work, you should define your models inside the Server object. The models represent the entities you are dealing with within your application. Also, models are registered by the ORM that use them to shape the data returned from the database.
To define a model in your Server object, you:
import { Server, Model } from "miragejs";

new Server({
	models: {
		note: Model
	},

	routes () {
		this.namespace = "api";

		this.get("/notes", schema => {
			return schema.notes.all();
		})
	}
});
You wrap all your models inside the models object. Any model you define is of type Model class.
Internally, Mirage.js stores a collection of notes. By default, it pluralizes the model name you have given. Now you can add/edit/remove notes from this collection.
Then, you refactor the route handler to make use of the schema object. The schema object is provided as the first parameter on the route handler. It represents the ORM gateway to access all the collections stored inside the database.
The schema object adds functionality to the collections. For example, it adds a set of functions that are essential to retrieve, edit, create, and delete data from the collections.
schema.notes.create();
schema.notes.all();
schema.notes.find();
schema.notes.findBy();
schema.notes.where();
schema.notes.destory();
By using the ORM API, you let Mirage.js shape and use internal serializers to format your data as JSON, or any other supported format, and make your data ready to be transmitted to the front-end app.
A second parameter that a route handler accepts is the request parameter. The request parameter represents the current HTTP Request object.
To complete this section, it’s worth mentioning the seeds() function that you can use to seed your database with some initial data:
import { Server, Model } from "miragejs";

new Server({
	models: {
		note: Model
	},

	routes () {
		this.namespace = "api";

		this.get("/notes", schema => {
			return schema.notes.all();
		})
	},

	seeds (server) {
		server.create("note", { body: "# An h1 header", title: "# An h1 header" });
		server.create("note", { body: "## An h2 header", title: "## An h2 header" });
		server.create("note", { body: "### An h3 header", title: "### An h3 header" });
		server.create("note", { body: "#### An h4 header", title: "#### An h4 header" });
		server.create("note", { body: "##### An h5 header", title: "##### An h5 header" });
		server.create("note", { body: "###### An h6 header", title: "###### An h6 header" });
	}
});
The seeds() function accepts the server object as an input parameter. You make use of the server.create() function to seed initial data in the database.
One important aspect of Mirage.js is that it auto-generates values for the id field for each and every record in the notes collection.
The Mirage.js team has done a great job of documenting this product. You can consult the documentation website to read more about Mirage.js.
Demo
Now that we've laid down the basics of Mirage.js, let’s start using it to build a Vue.js Notes Writer app.
Create a new Vue.js app
To start, make sure you install the latest version of the Vue CLI by running this command:
npm install -g @vue/cli
The command downloads and installs the latest bits of the Vue CLI on your computer.
To verify the version of the Vue CLI installed, you can run this command:
vue --version
The command displays:
@vue/cli 4.1.1
To create a new Vue.js app, run the following command:
vue create notes-writer-app
This command triggers a set of questions to shape the features to be included in the new app. You are free to choose the options that suit your app. In my case, I’ve chosen the following:
Vue CLI v4.1.1
? Please pick a preset:
  default (babel, eslint)
❯ Manually select features

? Check the features needed for your project:
 ◉ Babel
 ◯ TypeScript
 ◯ Progressive Web App (PWA) Support
 ◯ Router
 ◉ Vuex
 ◉ CSS Pre-processors
 ◉ Linter / Formatter
❯◯ Unit Testing
 ◯ E2E Testing

? Pick a CSS pre-processor (PostCSS, Autoprefixer and CSS Modules are supported by default)
:
  Sass/SCSS (with dart-sass)
❯ Sass/SCSS (with node-sass)
  Less
  Stylus

? Pick a linter / formatter config:
  ESLint with error prevention only
  ESLint + Airbnb config
❯ ESLint + Standard config
  ESLint + Prettier

? Pick additional lint features:
❯◯ Lint on save
 ◉ Lint and fix on commit

? Where do you prefer placing config for Babel, ESLint, etc.?
  In dedicated config files
❯ In package.json
The CLI takes a few seconds to download and install all the bits. Once done, you can navigate to the newly created app folder and run the app:
cd notes-writer-app
npm run serve
Now that the Vue.js app is created, let’s install the required NPM packages for this app.
Install NPM dependencies
A few additional NPM packages are required by the Notes Writer app. To install them, follow the steps below:
npm install --save axios
This command installs the axios library to allow us to communicate with a backend API using HTTP Requests.
npm install --save lodash
This command installs the lodash library. This library gives us a handful set of JavaScript functions to perform complex tasks.
npm install --save marked
The command above installs the marked library. This library is used to convert Markdown text into HTML content. The Notes Writer app allows the user to write his/her notes using Markdown text. With the help of this library, the app shows the converted content in HTML right away.
npm install --save miragejs
The command above installs the miragejs library. This library will be used to build a client-side server to handle backend API requests.
One more dev-dependency is required since we will be using SASS is the sass library itself. You can install it by running:
npm install --save-dev sass
Those are all the NPM packages we need.
Let’s move on and introduce the Notes Writer app.
Introduce the UI
Before we start building the Notes Writer app, let me share the final app, and what it looks like when running it in a browser:
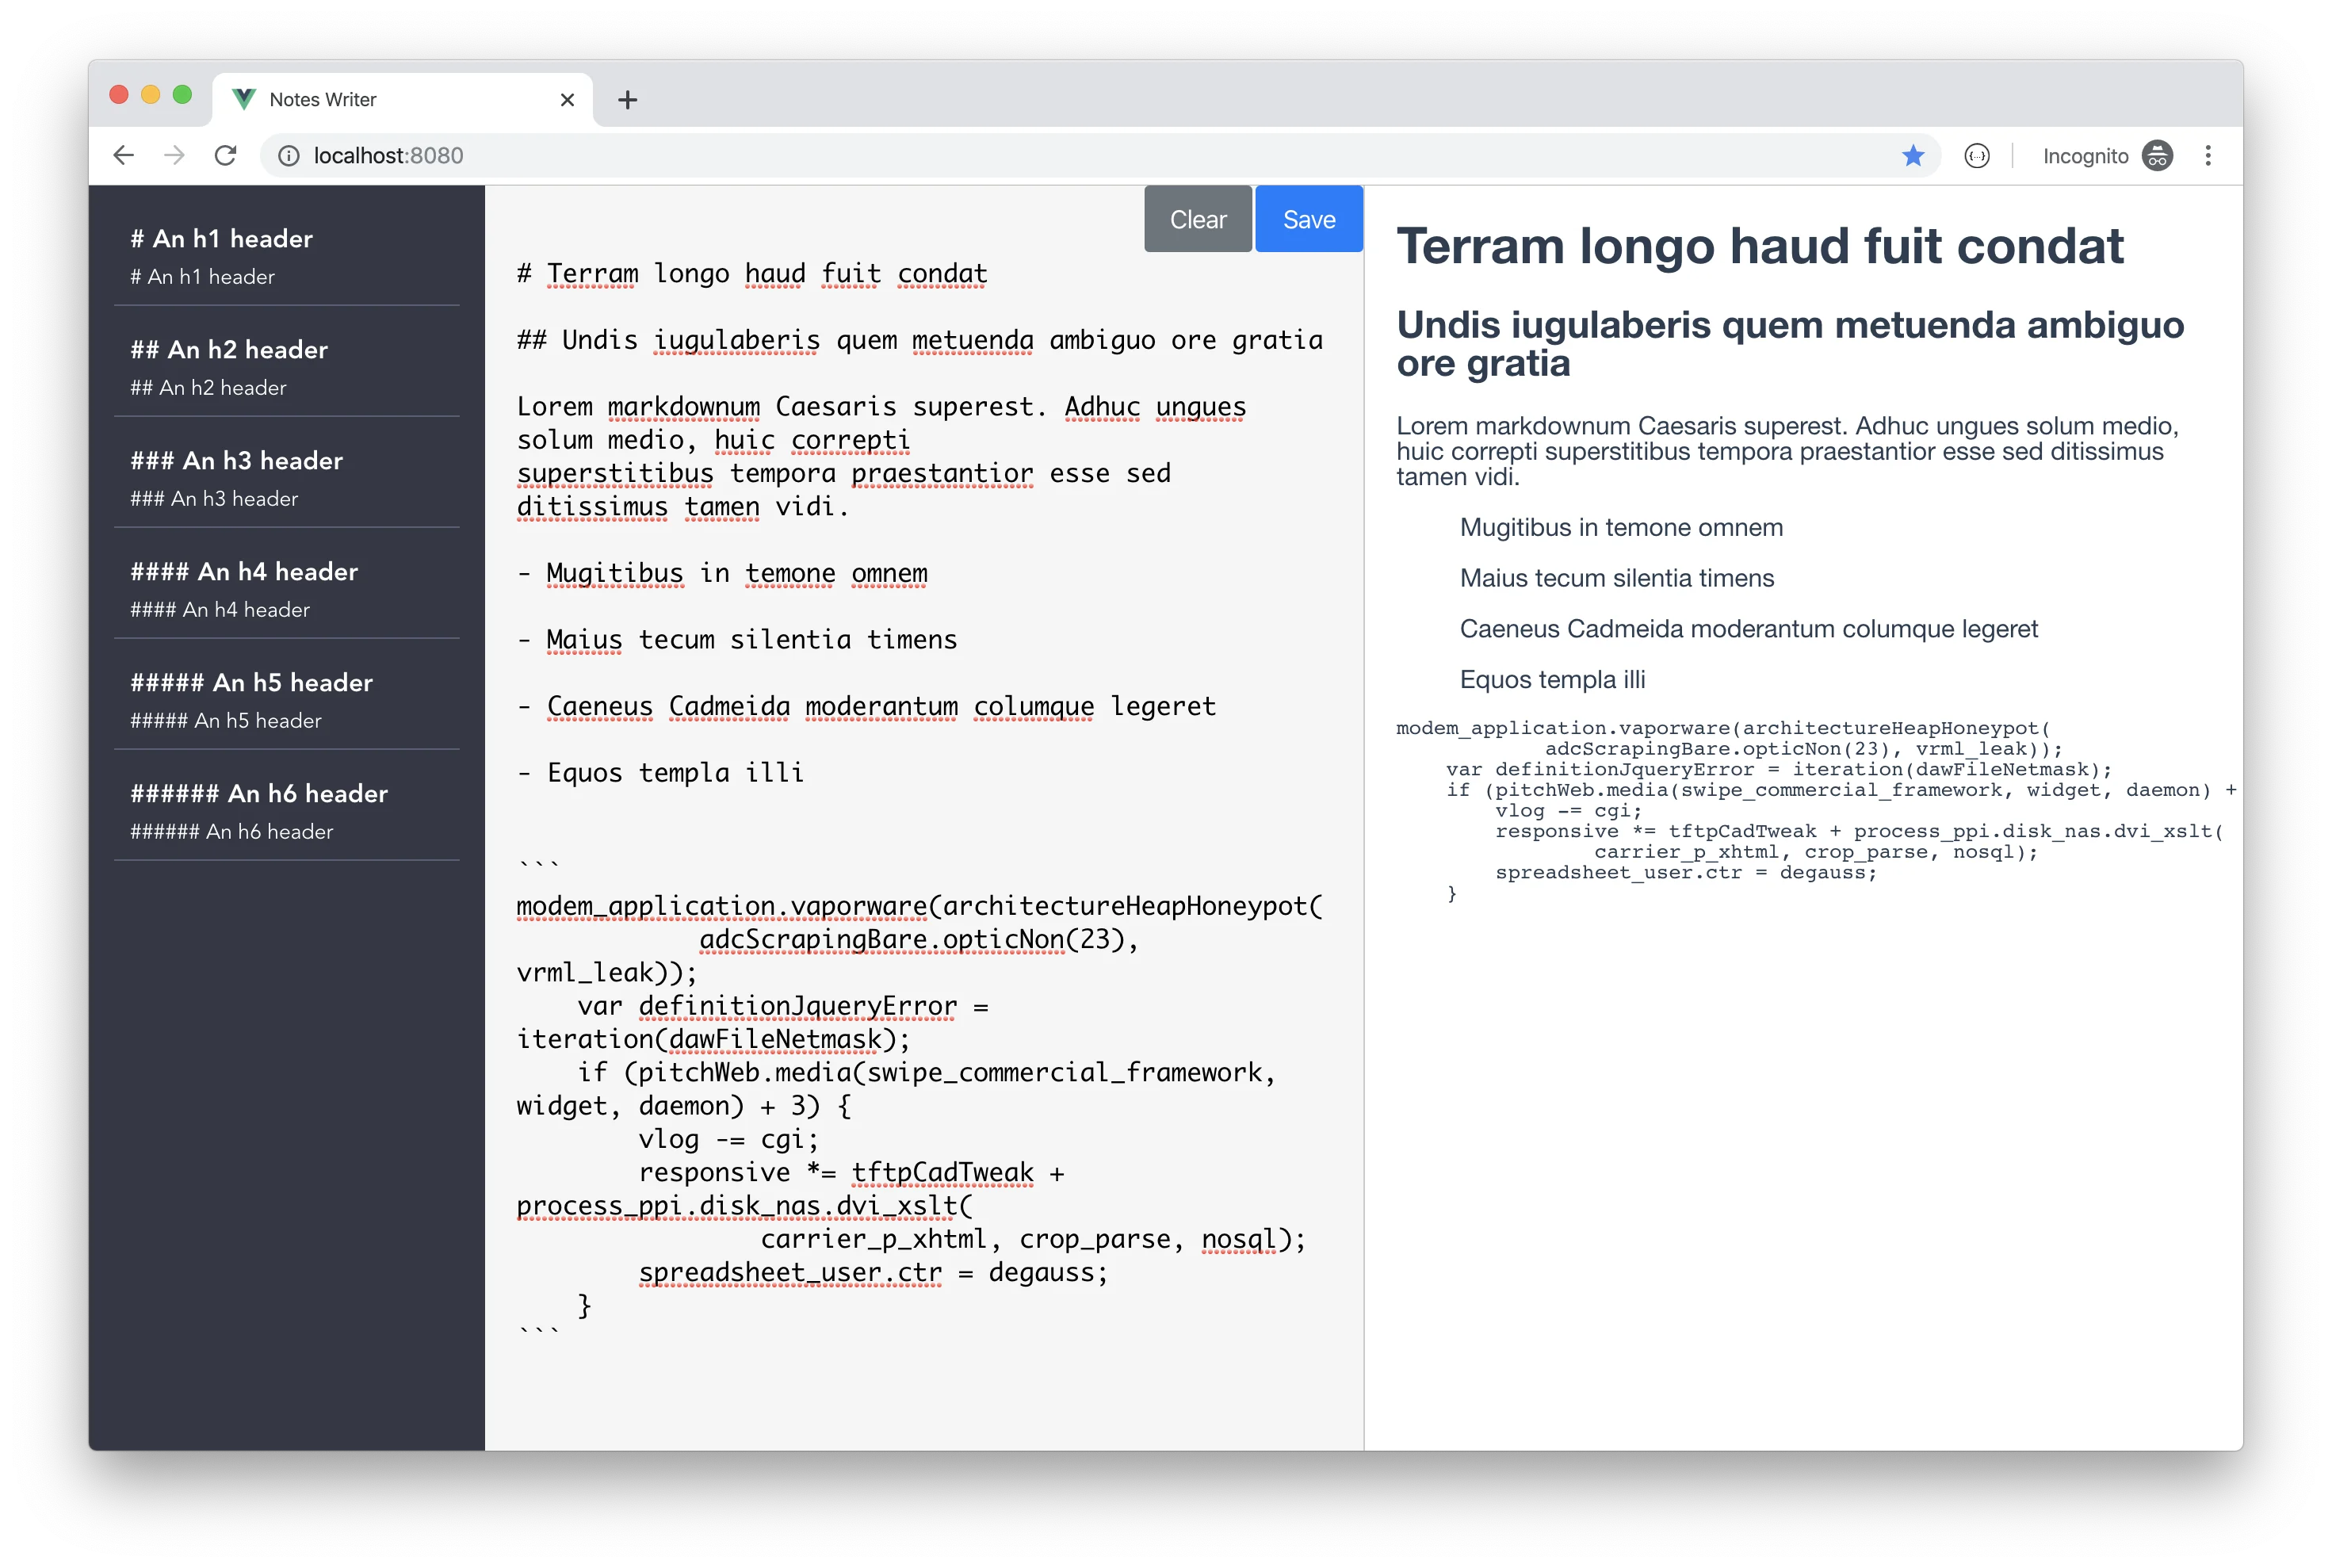
The app is split into two main sections:
- Notes List: This section lists all the saved notes in the app.
- Notes Editor: This section provides an editor to input the note content (Markdown or normal text). In addition, it displays a live preview of whatever text is typed inside the editor.
When the user starts typing, the Save and Clear buttons appear. The Save button is used to save the new or existing notes, while the Clear button clears the editor and disregards any text inside the editor.
The user can click a saved note in order to edit its content. When an existing note is being edited, an additional button named Delete appears to allow the user to delete an existing note.
Let’s start building this app!
Build the UI
Let’s start by building the Notes component. The template of this component is as follows:
<template>
  <div class="notes-container">
    <NotesList
      :notes="notes"
      @set-note="setNote"
      class="notes-container__list"
    ></NotesList>
    <NotesCreate
      :note="currentNote"
      @save-note="saveNote"
      @set-note="setNote"
      @delete-note="deleteNote"
      class="notes-container__create"
    ></NotesCreate>
  </div>
</template>
The template above embeds two other components:
- NotesList component. This component receives a collection of note records as input.
- NotesCreate component. This component receives the currently active note (being edited or viewed) as input.
The NotesList component exposes an event set-note that is emitted when the user clicks on an existing note to read or edit.
The NotesCreate component exposes a set of events:
save-note, emitted when the user clicks on theSavebutton to save a note.set-note, emitted when the user starts typing a new note. The app employs a mechanism that keeps track of what the user is typing, and emits theset-noteevent. This event is handled by the Vuex Store to save the contents of the current note in a temporary placeholder inside the Store. In addition, this event is emitted when the user clicks on theClearbutton to clear the editor.delete-noteemitted when the user clicks on theDeletebutton to delete an existing note.
The Notes component handles all the events emitted by its children components, and redirects them to the Vuex Store, where they are handled in one centralized place.
This component and the rest of the components use scoped SCSS in their templates:
<style lang="scss" scoped>
	@import "@/styles/components/notes.scss";
</style>
I’ve placed all the SCSS files inside a single /src/styles folder with the following structure:
componentsfolder holding all the SCSS files for all components._variables.scssfile to hold all SCSS variables used in the appglobal.scssfile to hold a reference to the_variables.scssfile or any other SCSS that needs to be shared among the components style sheet files.
You may add additional subfolders in your apps depending on the need and scenario at hand.
In order to make the global.scss available to all the components in the app you need to create a new file (or modify the exising one) at the root of the project folder named vue.config.js and paste the following content inside it:
// vue.config.js
module.exports = {
  css: {
    loaderOptions: {
      sass: {
        prependData: `@import "@/styles/global.scss";`
      }
    }
  }
}
The global.scss file will be prepended to any other SCSS files in the app and will be available everywhere.
The NotesList component template is as follows:
<template>
  <div class="notes">
    <div class="notes__items">
      <Note
        v-for="(note, index) in notes"
        :key="index"
        v-bind="note"
        class="notes__items__item"
        @set-note="setNote(note)"
      ></Note>
    </div>
  </div>
</template>
This component iterates over the collection of note records and renders each note inside its own NoteItem component. As well, it handles the set-note event that is triggered by the NoteItem component.
The NoteItem component template is as follows:
<template>
  <div
    class="notes__item"
    @click.prevent="setNote"
  >
    <h4>{{ title }}</h4>
    <p class="notes__item__body">{{ body }}</p>
  </div>
</template>
The component displays the Note title and body.
The NotesCreate component template is as follows:
<template>
  <div class="editor__md">
    <div class="editor">
      <div v-if="showControls">
        <button
          class="btn btn-new-note"
          @click="saveNewNote"
        >Save</button>
        <button
          class="btn btn-clear-note"
          @click="resetNote"
        >Clear</button>
        <button
          class="btn btn-delete-note"
          v-if="showDeleteBtn"
          @click="deleteNote"
        >Delete</button>
      </div>
      <textarea
        name="markdown"
        :value="currentNote"
        @input="onNoteChanged"
        placeholder="Type your note here ..."
      ></textarea>
    </div>
    <div class="editor__compiled-md">
      <div v-html="compiledMarkdown"></div>
    </div>
  </div>
</template>
This template is a bit more involved. It starts by displaying the Control Buttons. Then it displays the textarea that’s used as an editor. Finally, it displays the compiled Markdown to the right side of the editor.
The Control buttons are shown based on the showControls computed property that’s defined as follows:
currentNote () {
	return this.note && this.note.body
},
showControls () {
  return !!this.currentNote
},
If there is a current note (whether a new one or an existing one selected) to show the Controls buttons.
As for the Delete button, it’s visibility is controlled by the showDeleteBtn button defined as follows:
showDeleteBtn () {
	return !!this.note.id
},
Show the Delete button only when an existing note is being edited.
The rest of the UI files in the app are related to styling that you can check and go through by visiting the GitHub repo of this app.
Build the Server with Mirage.js
Open the main.js file, and add the following just before the instantiation of the main Vue instance:
import { Server, Model } from 'miragejs'

/* eslint-disable no-new */
new Server({
	models: {
		note: Model
	},

	routes () {
		this.namespace = 'api'

		this.get('/notes', schema => {
		  return schema.notes.all()
		})

		this.post('/notes', (schema, request) => {
		  let attrs = JSON.parse(request.requestBody)
		  let newNote = schema.notes.create(attrs)
		  return schema.notes.find(newNote.id)
		})

		this.patch('/notes/:id', (schema, request) => {
		  let newAttrs = JSON.parse(request.requestBody)
		  let id = request.params.id
		  let note = schema.notes.find(id)

		  return note.update(newAttrs)
		})

		this.delete('/notes/:id', (schema, request) => {
		  let id = request.params.id
		  return schema.notes.find(id).destroy()
		})
	},

	seeds (server) {
		server.create('note', { body: '# An h1 header', title: '# An h1 header' })
		server.create('note', { body: '## An h2 header', title: '## An h2 header' })
		server.create('note', { body: '### An h3 header', title: '### An h3 header' })
		server.create('note', { body: '#### An h4 header', title: '#### An h4 header' })
		server.create('note', { body: '##### An h5 header', title: '##### An h5 header' })
		server.create('note', { body: '###### An h6 header', title: '###### An h6 header' })
	}
});
The server instance defines the CRUD routes and route handlers. For instance, the post() route handler parses the request.requestBody to access the payload of this post request. It then uses the ORM schema object to create a new note record. Finally, it uses the ORM schema object to find the newly created note, and returns it to the front-end app.
The server makes use of the seeds() function to initialize the database with some preliminary set of note records.
The routes() function sets the namespace to a value of api. Consequently, this means that any route URL will be suffixed with the /api URL segment. To get all notes stored in the database, you issue a GET request to /api/notes.
Now that the Mirage.js backend server is ready, let’s move on and build the Vuex Store.
Build the Vuex Store
The Store defines the following state:
state: {
	notesList: [],
	note: {}
},
It defines the notesList array to hold the list of all notes in the app, and defines the note object to hold the currently selected or newly created note.
The Store defines a set of actions:
async getNotesList ({ commit }) {
  let notes = [];

	await axios.get('/api/notes')
	.then(response => {
		notes = response.data.notes
	});

	commit('setNotesList', notes)
},
This action issues a GET request to /api/notes to retrieve all notes stored in the database. It then commits the notes into the store by calling the setNotesList mutation.
The setNotesList mutation is defined as follows:
setNotesList (state, notes) {
	state.notesList = notes
},
Another important action is the setNote action defined as:
setNote ({ commit }, { id = '', body = '' } = {}) {
	commit('setNote', { id, body })
},
This action is triggered when the user selects an existing note. Also, it is being triggered while the user is editing an existing note or creating a new note. It receives, as input, the id and body of the note. It commits the data into the store by calling the setNote mutation.
The setNote mutation is defined as:
setNote (state, { id, body }) {
	let note = {}

	if (id) {
		note = state.notesList.find(note => note.id === id)
		const newNoteBody = body || note.body

		note = { ...note, body: newNoteBody, title: newNoteBody.substring(0, 20) }
	} else if (body) {
		note = { body, title: body.substring(0, 20) }
	}

	state.note = note
},
If the id input parameter is valid, it retrieves the existing note from the state.notesList array, and updates the content of the existing note. Otherwise, this is a new note. The code checks if the user has typed any content. If it does, it creates a new note record.
Finally, it sets the state.note to either the existing note or to the newly created note. This also covers the case in which the user clears the content of the editor, and resets the state.note object.
Another action that’s defined by the Store is the deleteNote action, which is defined as:
async deleteNote ({ commit, state }) {
	let id = (state.note && state.note.id)

	if (id) {
		let url = `/api/notes/${state.note.id}`
		await axios.delete(url)
	}

	commit('deleteNote', { id })
},
The action retrieves the note ID of the note currently stored inside the state.note object. If one exists, this means that there is an existing note that’s being edited right now. It then issues a DELETE Http Request to remove this note. Finally, it commits the results into the Store by calling the deleteNote mutation.
The deleteNote mutation is defined as follows:
deleteNote (state, { id }) {
	if (id) {
		state.notesList = state.notesList.filter(n => n.id !== id)
	}

	state.note = null
},
The deleteNote mutation filters out the deleted note from the state.notesList, and resets the existing state.note object.
The last action defined by the Store is the saveNote action that’s defined as:
async saveNote ({ commit, state }) {
	let note = {}

	let url = state.note.id ? `/api/notes/${state.note.id}` : '/api/notes'
	let method = state.note.id ? 'patch' : 'post'

	await axios({
		method,
		url,
		data: state.note
	}).then(response => {
		note = response.data.note
	})

	commit('saveNote', note)
}
This action checks if the currently edited note is an existing note or a new one. Accordingly, it sends a POST or PATCH request to the backend server to either create the new note or update an existing one. Finally, it commits the results into the Store by calling the saveNote mutation.
The saveNote mutation is defined as follows:
saveNote (state, note) {
	const notePosition = state.notesList.findIndex(n => n.id === note.id)

	if (notePosition < 0) {
		state.notesList.push(note)
	} else {
		state.notesList.splice(notePosition, 1, note)
	}

	state.note = null
}
The mutation above adds, or amends, a note inside the state.notesList to properly sync with the backend database.
Finally, the Store defines two getters to allow components to retrieve data from the state as:
getters: {
	notes: state => state.notesList,
	currentNote: state => state.note
},
That’s all that we have for the Store for the time being. Let’s see how the components make use of this Store in the next section.
Integrate the Store in the app
The components NoteItem, NotesList, and NotesCreate communicate with the Notes component via the this.$emit() event bus. And in turn, the Notes component communicates with the Store via Getters and Actions.
The Notes component defines the following code:
computed: {
	...mapGetters(['notes', 'currentNote'])
},
mounted () {
	this.getNotesList()
},
methods: {
	...mapActions(['getNotesList', 'saveNote', 'setNote', 'deleteNote'])
}
Inside the computed property, it imports the notes and currentNote Store getters. These getters are now available as computed properties inside this component.
Inside the methods section, it imports the Store actions: getNotesList, saveNote, setNote, and deleteNote. These actions become methods defined in this component, and can be called like any other method defined.
The mounted lifecycle hook calls the getNotesList() action to retrieve the list of notes from the backend API, and fill the Store with the data.
<NotesCreate
	:note="currentNote"
	@save-note="saveNote"
	@set-note="setNote"
	@delete-note="deleteNote"
	class="notes-container__create"
></NotesCreate>
Notice how the events emitted by the NotesCreate component are bound directly to the methods (actions mapped to method names inside the component). When the user clicks the Save button, the action method saveNote is triggered automatically inside the Store.
The same applies to the rest of the actions in this component.
Run the app
Run the following command and start playing around with the app:
npm run serve
The app runs on the port 8080, and can be accessed by visiting the following URL: http://localhost:8080.
Start typing text inside the editor. You can use Markdown text. Notice how the compiled Markdown text is displayed on the right side of the editor. You may click the Save button to create a new note, or clear the editor. You can also click an existing note to load its content inside the editor.
Conclusion
This article demonstrates how you can continue working on the front-end side of your application while the backend is being built, especially during the early stages of development.
In future installments, I will be showing you how to integrate this app with Google Firebase to store the data, and authenticate users. You will be able to login to the app and manage your own set of notes.